Have you ever felt the frustration of spotting errors in your document after you’ve hit send on Microsoft Word? Although mistakes happen, mastering Microsoft Word’s correction tools can be extremely beneficial. Are you ready to perfect your documents easily?
You’ll learn how to make consistent changes in Microsoft Word by following this guide. With our assistance, you can resolve common editing problems with simple typo fixes, advanced formatting adjustments, and troubleshooting common editing issues. The following resources will assist you in improving your document-editing skills to the next level.
If you want to let go of nagging errors and create polished documents more easily, we’ll show you how to use Microsoft Word’s correction tools.
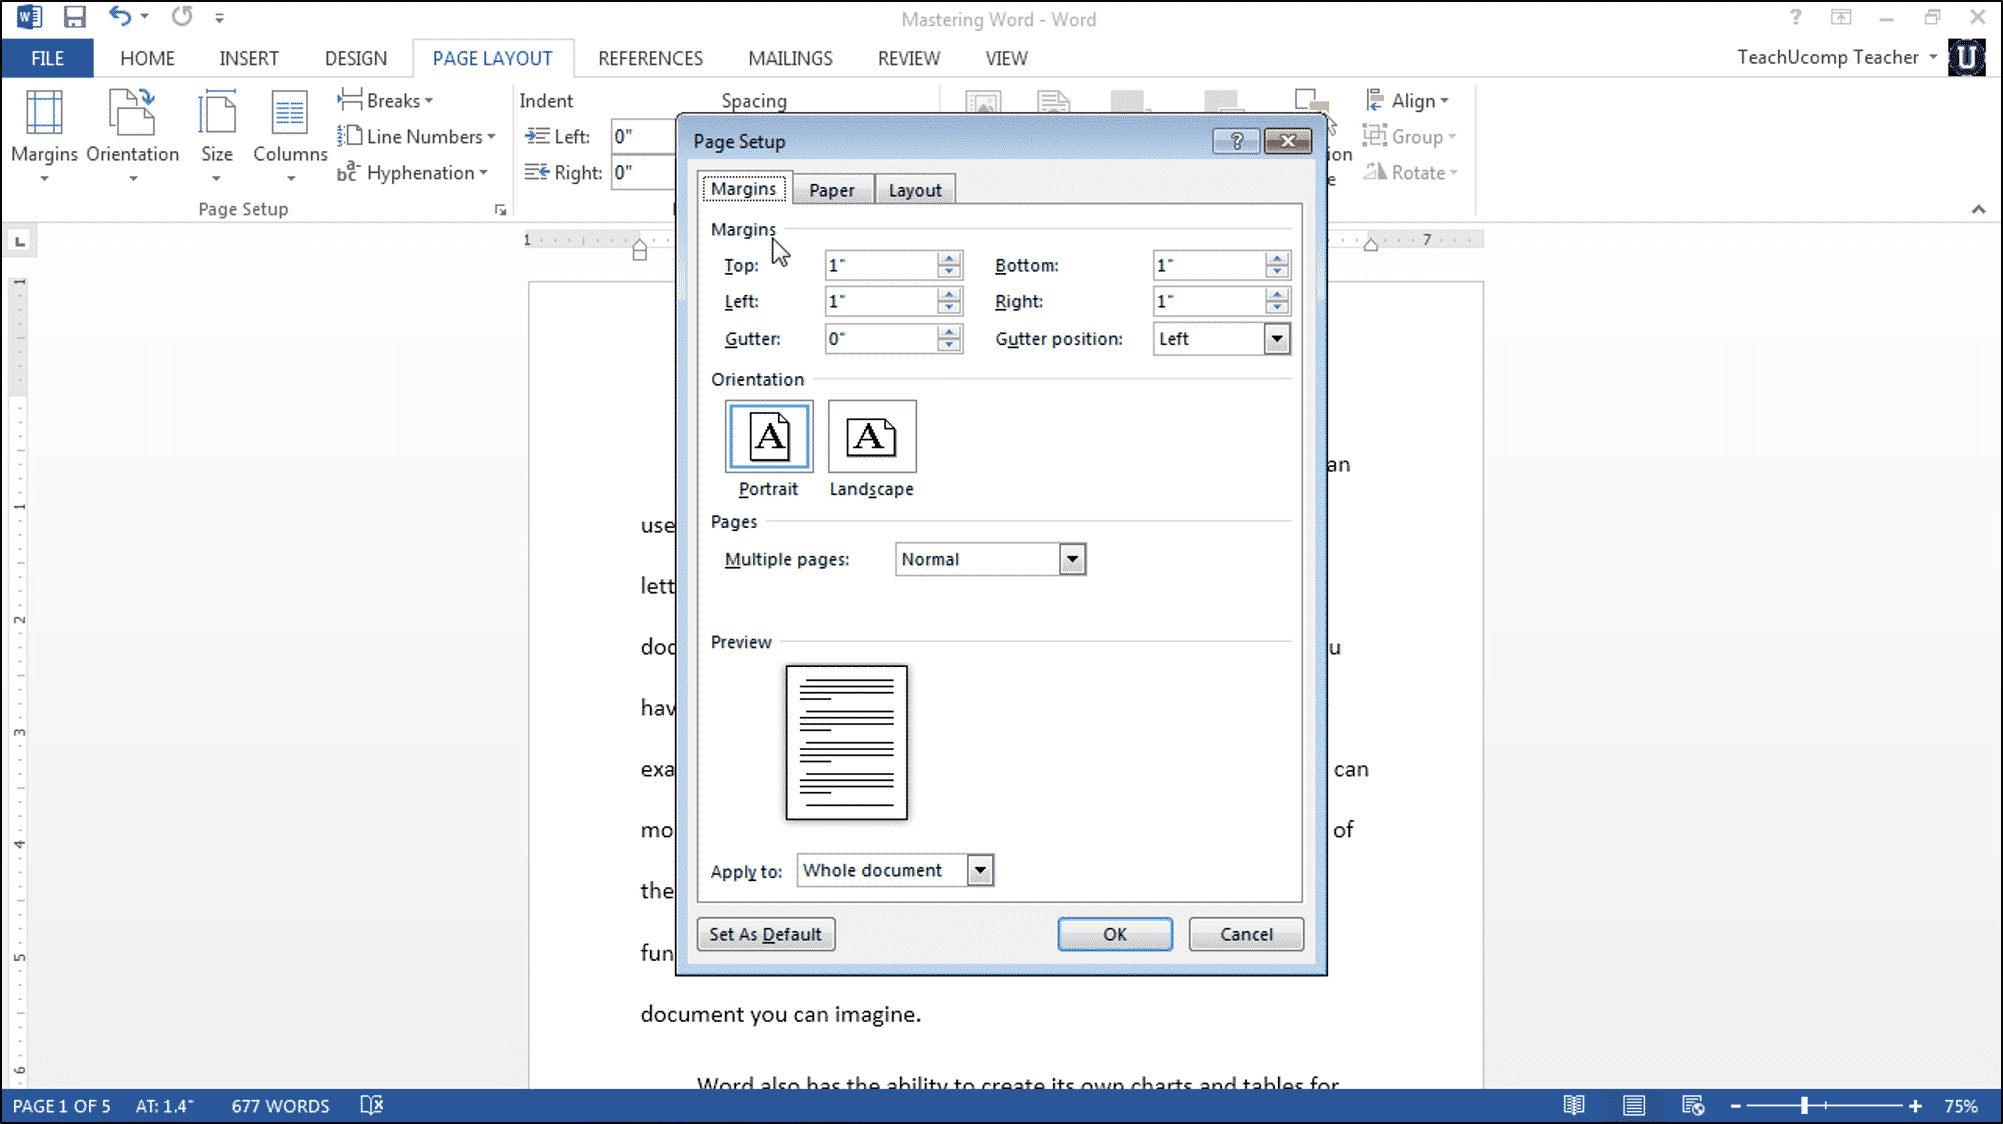
Understanding Microsoft Word’s Editing Tools
Image source: https://educba.com
Understanding the suite of editing tools within Microsoft Word lays the groundwork for seamless document refinement. The interface itself serves as a gateway to a multitude of features, each strategically positioned to facilitate a fluid editing experience. Navigating this terrain involves a series of deliberate steps, akin to unlocking a treasure trove of possibilities.
Overview of Microsoft Word Interface
The interface serves as the canvas upon which the masterpiece of text comes to life. Familiarity with its layout and functionalities is paramount. The toolbar, with its array of icons, beckons the editor to explore and utilize its offerings.
Accessing and Navigating Editing Tools
Efficiency in document correction hinges on swift access to editing tools. Understanding the shortcuts and precise locations of these features expedites the editing process, empowering users to swiftly rectify errors.
Utilizing Basic Editing Functions
Within this realm lie the fundamental tools: correcting typos and spelling errors, harnessing the capabilities of AutoCorrect and AutoFormat, and engaging with features like Track Changes and Comments. These tools form the bedrock of word refinement.
Correcting Typos and Spelling Errors: Addressing the smallest imperfections that mar the integrity of a document.
Using AutoCorrect and AutoFormat: Automating corrections and formatting, lending uniformity to the text.
Understanding Track Changes and Comments: Facilitating collaboration and review by allowing annotations and modifications to be tracked and incorporated seamlessly.
Working with the Undo and Redo Functions
In the realm of editing, the undo and redo functions function as the almighty time-travelers, rescuing or retracting amendments with precision. These functions provide a safety net, allowing for experimentation without fear of irreversible consequences.
Understanding these foundational elements sets the stage for a proficient journey through the landscape of Microsoft Word’s editing tools. Mastery of these tools empowers users to craft polished, error-free documents that resonate with professionalism and finesse.
Advanced Editing Techniques
Delving into the realm of advanced editing techniques within Microsoft Word unveils a world of finesse and precision, elevating document refinement to an art form. These techniques transcend the basics, offering a palette of tools to tailor documents with sophisticated precision.
Formatting and Reformatting Text
One cornerstone of advanced editing lies in the ability to manipulate the visual presentation of text. It’s not merely about correcting errors but sculpting the aesthetic appeal. Adjusting fonts, sizes, and styles bestows a distinct personality upon the text, ensuring readability and visual allure. The nuances of indents, line spacing, and alignment wield influence over the document’s visual rhythm, orchestrating its flow.
Paragraph and Page Layout Adjustments
Moving beyond the confines of individual words or sentences, the canvas of Microsoft Word extends to the entire page. Here, the margin becomes a boundary that shapes the essence of the content. The orientation and page breaks serve as navigational cues, guiding the reader through the narrative. The addition of headers and footers provides a consistent framework, enriching the document with contextual information or identification.
Utilizing Find and Replace Effectively
Precision reigns supreme in the realm of effective editing. The simple yet powerful search and replace functions act as surgical tools, swiftly remedying repetitions or inconsistencies across the document. However, the prowess lies not merely in their basic application but in delving deeper into advanced find options and customizations. Harnessing these capabilities grants the editor the finesse to execute intricate alterations with surgical precision.
Incorporating these advanced editing techniques into one’s repertoire fosters a new level of proficiency. It transcends mere correction; it’s about sculpting a document with deliberate finesse, ensuring not only accuracy but visual coherence and navigational fluency. Mastery over fonts, layouts, and the nuanced application of search and replace functions crafts documents that stand as exemplars of professionalism and precision. This mastery heralds a new era in document refinement, where each word and layout choice is an artistic endeavor toward perfection.
Correcting Errors Efficiently
Photo by: https://slideserve.com
The efficiency in rectifying errors within Microsoft Word is a skill that transcends mere correction; it embodies the finesse and precision essential for polished documentation. To embark on this journey of refinement, one must first acknowledge the pivotal role of language accuracy and textual coherence.
Reviewing Spelling and Grammar
At the nucleus of error correction lies the mastery of spelling and grammar. Microsoft Word presents an arsenal of tools for this purpose, equipping users with spell checkers and grammar validation functionalities. These tools operate as the initial gatekeepers, catching typographical blunders and syntactical missteps. Customizing proofing options empowers users to tailor these checks to suit specific language styles or specialized terminologies, thereby augmenting the accuracy of the document’s language.
Employing Thesaurus and Dictionary Tools
Language fluency extends beyond the realm of accuracy; it encompasses eloquence and variety. Microsoft Word’s integration of thesaurus and dictionary tools broadens the horizon of language usage. Employing these tools elevates the text beyond mundane repetitions, offering synonyms and alternative phrasings that enrich the prose.
Handling Repeated Corrections Effectively
The repetitive nature of corrections demands efficiency. Whether rectifying recurring errors or implementing consistent amendments throughout the document, an astute approach is imperative. Leveraging functions such as Find and Replace efficiently expedites this process. Simple search and replace functions offer quick remedies, while delving into advanced options enables nuanced alterations across the document, ensuring uniformity and precision.
Mastering these efficient error correction techniques within Microsoft Word empowers document editors to metamorphose errors into opportunities for refinement. The seamless integration of spelling and grammar checks, thesaurus and dictionary tools, and the strategic handling of repetitive corrections coalesce to foster documents of unparalleled accuracy and eloquence. This mastery not only ensures the elimination of errors but also signifies a commitment to professionalism and linguistic finesse in every written endeavor.
Troubleshooting Common Editing Challenges
Navigating the intricate landscape of document editing within Microsoft Word often poses challenges that demand adept troubleshooting and resolution. These hurdles encompass not only technical glitches but also encompass collaborative obstacles and the unexpected loss of work. Addressing these complexities requires a multifaceted approach that encapsulates diverse editing mishaps.
Dealing with Formatting Mishaps
Formatting errors can disrupt the coherence and aesthetics of documents. Clearing these issues necessitates a systematic approach that involves identifying and rectifying formatting inconsistencies. Whether it’s unintentional font changes, misplaced indents, or misaligned margins, addressing these discrepancies ensures document uniformity.
Managing Large Documents and Collaboration
As documents expand in size or when multiple collaborators work simultaneously, challenges arise. Strategies for efficient collaboration become indispensable, encompassing streamlined communication and standardized protocols. Resolving versioning conflicts and compatibility issues amidst collaborative efforts secures the integrity of the document, ensuring seamless workflow continuity.
Recovering Lost Work and Document Versions
The unforeseen loss of work or versions stands as a daunting challenge in the editing process. Implementing strategies to retrieve lost data or previous versions mitigates potential setbacks. Backup mechanisms and understanding version recovery tools serve as the safety net, ensuring the retrieval of crucial data in the face of unexpected mishaps.
The realm of troubleshooting common editing challenges within Microsoft Word demands a proactive and agile approach. Clearing formatting mishaps, orchestrating efficient collaboration amidst large documents, and implementing robust recovery mechanisms fortify the editing process against potential hurdles. These strategies amalgamate into a comprehensive toolkit, empowering users to navigate and triumph over the complexities inherent in the editing domain.
Optimizing Workflow and Productivity
Optimizing workflow and enhancing productivity within the framework of Microsoft Word is a pivotal pursuit in the landscape of document creation and editing. Leveraging a myriad of strategies enables users to streamline their processes, maximizing efficiency and output.
Keyboard Shortcuts for Quick Corrections
Utilizing keyboard shortcuts is akin to wielding a power tool within Word. These shortcuts facilitate swift navigation, quick formatting, and efficient corrections. From simple actions like Copy (Ctrl + C) and Paste (Ctrl + V) to nuanced features like Find and Replace (Ctrl + F), these shortcuts expedite editing, significantly reducing time spent on repetitive tasks.
Customizing Word for Personalized Editing Experience
Tailoring Word’s interface and functionalities to align with personal preferences augments the editing experience. Customizing toolbars, defining auto-correct options, and configuring settings enable a seamless and personalized environment for efficient editing. These alterations transform Word into an extension of the user’s workflow, optimizing productivity.
Using Templates and Styles for Consistency
Templates serve as foundational frameworks, providing consistency and structure across documents. Employing predefined templates streamlines the creation process, ensuring uniformity in formatting and layout. Styles further enhance this uniformity by defining font, paragraph, and formatting standards, fostering a cohesive and professional document aesthetic.
Harnessing these strategies empowers users to orchestrate a more efficient editing workflow within Microsoft Word. Embracing keyboard shortcuts, tailoring Word’s interface, and leveraging templates and styles form a trifecta that amplifies productivity, ensuring a seamless and expedited editing experience.
Final Checks and Proofreading
Final checks and proofreading are the anchor points of a meticulous and error-free document preparation process, ensuring the delivery of polished, refined content. These quintessential steps not only fortify the integrity of the document but also attest to the professionalism and attention to detail embedded within the work.
Conducting a Final Review
The final review phase serves as a comprehensive examination of the document, encompassing an assessment of its structure, content coherence, and formatting accuracy. It involves scrutinizing the document from multiple angles, ensuring that the intended message is succinctly conveyed and seamlessly delivered to the audience. This step minimizes the likelihood of oversight and guarantees the highest quality output.
Utilizing Read Aloud and Accessibility Features
Employing the read-aloud and accessibility features within the document editor enhances proofreading effectiveness. These features facilitate a multi-sensory review, aiding in the identification of potential errors that might have been overlooked during the conventional proofreading process. By engaging both visual and auditory senses, it ensures a more comprehensive evaluation, thereby bolstering the document’s quality and accessibility.
Proofreading Strategies for Error-Free Documents
Incorporating meticulous proofreading strategies is paramount to achieving an error-free document. This involves a meticulous examination of spelling, grammar, punctuation, and consistency. Employing tools like spell checkers, grammar checkers, and style guides assists in refining the document to its highest standard, eliminating errors and inconsistencies.
These final steps in the document preparation journey, ranging from meticulous reviews to leveraging advanced features, culminate in a document that exemplifies precision, clarity, and professionalism. The amalgamation of comprehensive reviews, accessibility features, and rigorous proofreading strategies underscores the commitment to delivering high-quality content that resonates seamlessly with the intended audience.
Best Practices for Document Correction
In the realm of document correction, adhering to a set of best practices stands as the cornerstone for achieving precision and ensuring the integrity of the content. These practices encompass an array of meticulous steps and strategies, aligning precision with efficiency, thereby culminating in a flawless document.
Creating a Revision and Correction Checklist
One of the paramount practices involves the development of a meticulous checklist encompassing various elements pivotal to document correction. This checklist acts as a guiding compass, ensuring that no facet of the document remains unchecked. It covers a spectrum of aspects, including grammar, spelling, punctuation, formatting consistency, and overall coherence. This structured approach significantly streamlines the correction process, leaving no room for oversight or error.
Balancing Precision and Efficiency in Editing
Finding the equilibrium between precision and efficiency constitutes a significant aspect of document correction. While precision demands an in-depth scrutiny of every element within the document, efficiency emphasizes the necessity of completing the task within a reasonable timeframe. Employing strategies that integrate both precision-driven techniques and time-efficient practices ensures that the document is meticulously corrected without compromising on timeliness.
Backing Up Documents and Saving Versions
Safeguarding documents through regular backups and version saving serves as a failsafe mechanism in the event of unexpected errors or data loss. These proactive measures mitigate the risks associated with accidental deletions or unforeseen technical issues. By regularly saving document versions and employing secure backup mechanisms, the integrity and continuity of the correction process remain intact.
These best practices collectively represent a holistic approach to document correction, emphasizing meticulousness, efficiency, and resilience. From the inception of a comprehensive checklist to the balancing act between precision and efficiency and finally safeguarding through backups, these practices intertwine to deliver impeccably refined documents that stand as exemplars of accuracy and professionalism.
How do you seamlessly switch from Microsoft Word to Spanish and gain access to a whole new world of possibilities? You can change the language settings in Microsoft Word in a matter of seconds.
To make Microsoft Word more Spanish-friendly, there are several steps to follow. The Word now has a Spanish flair, thanks to the changes made in the display language, settings, and language packs. The information contained in this guide makes it simple for you to navigate these settings. The new personalized multilingual writing experience eliminates the need for language barriers and allows you to personalize your writing.
With us on this linguistic journey, we will go over the ins and outs of changing language settings in Microsoft Word. It’s not just about learning how to change languages; you’ll also learn how to seamlessly collaborate, troubleshoot problems, and leverage language-specific features. You can create the Microsoft Word you want by tailoring it to your specific needs. Let’s get started on transforming your writing experience.
Understanding Language Settings in Microsoft Word
Source: https://homeandlearn.co.uk
In the intricate ecosystem of Microsoft Word, the language settings wield a transformative influence, shaping the very fabric of the user experience. Understanding the nuances of these settings is akin to possessing a key to unlock a world where the digital realm seamlessly aligns with linguistic preferences. The impact is profound, transcending mere utility to redefine how users engage with the software.
At the heart of this linguistic symphony lies the meticulous orchestration of language settings. Picture this – a step-by-step guide that not only demystifies the process but also empowers users to navigate the labyrinth of Microsoft Word’s language configurations effortlessly. To embark on this journey, consider the following insights:
The Impact on User Experience
Language settings are the silent conductors orchestrating the user’s journey through Microsoft Word. Their impact resonates in every click, every command, subtly influencing the user’s perception and interaction. The choice of language is not merely a cosmetic alteration but a fundamental shift in how the software responds and communicates. Imagine crafting documents in a language that feels intuitive, where the interface seamlessly adapts to your linguistic inclinations. This is the transformative power of language settings, where the user experience transcends the utilitarian to become a personalized, almost symbiotic, interaction.
Navigating the Linguistic Landscape
The journey begins with a roadmap – a guide through the intricate web of language settings in Microsoft Word. A user-friendly, step-by-step approach is the linchpin, ensuring that users, regardless of their technological acumen, can effortlessly navigate and customize their language preferences. Imagine the clarity of a well-defined path, demystifying the settings menu and empowering users to make informed choices. This is not merely a technical walkthrough; it’s a narrative, a user-centric saga that unfolds as users traverse the linguistic landscape of Microsoft Word.
In essence, understanding language settings in Microsoft Word is not a mere technicality; it’s a voyage of discovery. It’s about embracing a digital space that resonates with the user’s linguistic identity, where the software becomes an extension of self-expression. As users delve into the intricacies of language customization, they unlock a realm where the written word seamlessly aligns with personal preferences. This, my friends, is not just about navigating menus and toggling options; it’s about sculpting a digital environment that speaks your language, literally and metaphorically. So, as you embark on this linguistic journey within Microsoft Word, remember – the settings aren’t just adjusting; they’re transforming your digital narrative.
Changing the Display Language
When it comes to making Microsoft Word truly yours, the journey into language customization takes a pivotal turn with the process of changing the display language. Imagine the interface seamlessly transforming into Spanish, a linguistic dance that mirrors your thought process. Here’s a comprehensive guide, not just instructing but ushering you into a realm where language isn’t just a tool; it’s an experience.
Instructions for Language Metamorphosis
Changing the display language of Microsoft Word to Spanish is more than a technical maneuver; it’s a narrative shift. Follow these step-by-step instructions, and witness your word processor transforming into a bilingual haven:
Navigate with Ease:
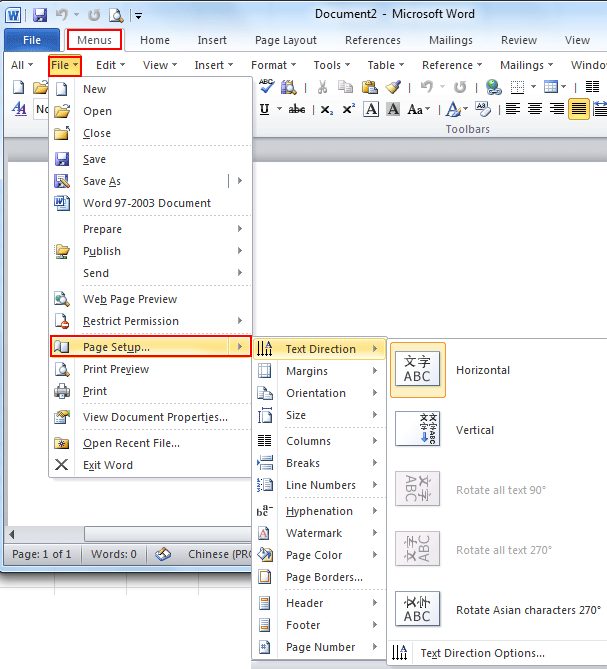
Access the language settings through the “File” menu, a portal to the heart of customization.
Select “Options” and find the “Language” section, your gateway to linguistic metamorphosis.
Choose Your Language:
Within the language settings, locate the “Add additional editing languages” option.
Scroll through the extensive list until you find Spanish – the language waiting to infuse your Word with vibrancy.
Set as Default:
Highlight Spanish as your preferred language and set it as the default, ensuring every new document resonates with your linguistic choice.
Restart for Effect:
Save changes and restart Microsoft Word, allowing the alterations to take full effect.
Watch as the interface seamlessly transitions into Spanish, a visual testament to the power of language customization.
Troubleshooting the Linguistic Odyssey
As with any digital transformation, the journey into a Spanish-language Word may encounter a few bumps. Here are troubleshooting tips to navigate potential issues and ensure a smooth transition:
Compatibility Check:
Ensure your version of Microsoft Word supports the desired language change.
Compatibility issues may arise if the selected language pack isn’t fully supported.
Internet Connectivity:
A stable internet connection is crucial, especially when downloading language packs.
Connectivity issues may interrupt the language change process, so ensure a seamless online experience.
Update Microsoft Word:
Check for updates on your Microsoft Word application.
Outdated versions may pose compatibility issues; updating ensures optimal performance.
Reset to Default and Retry:
If issues persist, consider resetting language settings to default.
Reapply the steps, ensuring each action aligns with the prescribed instructions.
Seek Online Support:
Microsoft’s online support forums can be a valuable resource.
Tap into the community’s collective knowledge to troubleshoot specific issues.
In navigating the display language change, remember, this is not just about altering words on a screen; it’s about crafting a user experience that mirrors your linguistic identity. Embrace the process, troubleshoot with tenacity, and soon you’ll find yourself seamlessly immersed in a Spanish-language Word, where every click feels like a conversation. Welcome to a Word where language is not just a tool; it’s your narrative palette.
Modifying Proofing Language
In the intricate realm of language customization within Microsoft Word, the art of modifying proofing language emerges as a crucial brushstroke, fine-tuning the canvas of document review in Spanish. Here, we delve into the nuances of adjusting the proofing language for spell check and grammar, unraveling the significance that extends beyond mere linguistic precision.
Crafting Linguistic Precision
Adjusting the proofing language settings for Spanish spell check and grammar is a meticulous process, akin to refining the contours of a masterpiece. Here are the essential details to guide you through this linguistic endeavor:
Navigate to Proofing Options:
Access the “File” menu and select “Options.”
Within the options menu, find and click on “Proofing” – the gateway to linguistic precision.
Select the Desired Language:
In the Proofing options, locate the “Language” section.
Choose Spanish as the preferred language for spelling and grammar checks.
Customization for Specific Sections:
Microsoft Word allows for section-specific proofing language adjustments.
Tailor the language settings to specific portions of your document, ensuring nuanced proofing.
Set Grammar and Style Preferences:
Fine-tune grammar and style preferences within the language settings.
Customize the proofing experience to align with your writing style and grammatical preferences in Spanish.
Significance of Proofing Language Settings
Beyond the apparent correction of linguistic errors, the modification of proofing language settings plays a pivotal role in elevating the accuracy and coherence of document review. Here’s why it matters:
Contextual Accuracy:
Spanish, like any language, carries nuances that extend beyond basic grammar rules.
Proofing language settings in Spanish ensure contextual accuracy, capturing the intricacies of the language.
Enhanced Document Review:
Accurate proofing language settings contribute to a comprehensive document review process.
From catching spelling errors to refining grammatical nuances, the proofing becomes a thorough and refined exercise.
Professionalism and Credibility:
A document free from language errors exudes professionalism and credibility.
Proofing language settings elevate the overall quality of your content, fostering a positive impression.
User-Friendly Interaction:
Tailored proofing settings create a user-friendly environment.
Users engaging with your documents in Spanish experience a seamless and error-free interaction, enhancing the overall user experience.
Efficiency in Communication:
Accurate proofing language settings contribute to efficient communication.
Whether it’s a business proposal or creative writing, the precision in language proofing ensures effective and impactful communication.
In the ever-evolving landscape of digital communication, where language is both a tool and an art form, modifying proofing language in Microsoft Word becomes a cornerstone of excellence. It’s not just about correcting errors; it’s about crafting a document that resonates with linguistic precision. So, as you navigate the labyrinth of language customization, remember that the details matter, and within the details lies the artistry of effective communication. Let your words in Spanish not just be correct but resonate with the finesse that sets your content apart.
Adding Spanish Language Packs
In the dynamic landscape of language customization within Microsoft Word, the addition of Spanish Language Packs emerges as a game-changer, amplifying language support and providing users with a gateway to a more enriched linguistic experience. Let’s delve into the intricacies of language packs, understanding their pivotal role, and unravel a step-by-step guide on seamlessly integrating the Spanish Language Pack into your Microsoft Word.
Unveiling the Magic of Language Packs
Language packs, in the realm of Microsoft Word, are akin to linguistic envoys, expanding the software’s capabilities beyond its default language settings. Their role is not merely to offer translations but to encapsulate the essence of a language, ensuring a holistic and immersive user experience. Here’s a closer look at their significance:
Comprehensive Language Support:
Language packs go beyond the superficial, providing comprehensive support for spell check, grammar, and even language-specific features within Microsoft Word.
Cultural Nuances and Idioms:
They capture the cultural nuances and idioms intrinsic to a language, enhancing the authenticity of your written content.
Seamless Multilingual Writing:
With language packs, the transition between languages becomes seamless, empowering users to effortlessly switch between their preferred languages.
The Art of Integration: Downloading and Installing Spanish Language Packs
Now, let’s demystify the process of adding Spanish Language Packs to your Microsoft Word – a journey that opens doors to a bilingual realm within your word processor.
Navigate to Language Preferences:
Access the “File” menu and select “Options.”
Within the Options menu, locate and click on “Language” to unveil a spectrum of language-related settings.
Choose Editing Languages:
Scroll to the “Choose Editing Languages” section, where you’ll find a list of available languages.
Select Spanish from the list, signifying your intent to integrate the Spanish Language Pack.
Download Language Pack:
Microsoft Word will prompt you to download the necessary language pack.
Click on “Add a Language” and select Spanish, initiating the download process.
Installation Prompt:
Once downloaded, the installation prompt will guide you through the process.
Follow the on-screen instructions to seamlessly install the Spanish Language Pack into Microsoft Word.
Restart for Full Effect:
Save any open documents and restart Microsoft Word to allow the language pack to take full effect.
Upon reopening, you’ll experience a transformed interface with Spanish language capabilities seamlessly integrated.
As you embark on this journey of language customization, adding the Spanish Language Pack becomes more than a technicality – it’s a declaration of linguistic diversity within your digital workspace. The magic of language packs lies not just in their technical functionality but in the rich tapestry of expression they unfurl. So, whether you’re crafting documents, analyzing data, or engaging in creative endeavors, let the Spanish Language Pack be your linguistic ally, enhancing your Microsoft Word experience one word at a time.
Utilizing Language-specific Features
Image taken by: weebly.com
Within the realm of Microsoft Word, the shift in language is not just a linguistic alteration but an unlocking of a myriad of language-specific features that can elevate your document creation process to unprecedented heights. As we delve into showcasing these features and providing practical tips on leveraging them for an efficient Spanish document creation journey, it becomes apparent that language customization is not merely a cosmetic adjustment but a strategic enhancement of your digital workspace.
Unveiling Language-specific Features
Once the language metamorphosis occurs within Microsoft Word, a trove of language-specific features unveils itself, transforming the software into a dynamic tool for seamless expression. Here’s a closer look at the showcase of these features:
Grammar and Style Suggestions:
The language change activates grammar and style suggestions tailored to the nuances of the chosen language, in this case, Spanish. This goes beyond simple spell-check, offering context-aware recommendations for a refined writing style.
Language-specific Templates:
Microsoft Word introduces language-specific templates, allowing users to kickstart their document creation with pre-designed formats catering specifically to the chosen language. From business letters to creative writing, these templates align with the conventions of Spanish communication.
Auto-Correct Enhancements:
Language-specific auto-correct features become more nuanced, correcting not only spelling errors but also predicting language-specific phrases and expressions. This ensures that your Spanish document maintains linguistic authenticity.
Multilingual Thesaurus:
The thesaurus feature expands its capabilities to offer synonyms and antonyms specific to the chosen language. This is invaluable for writers seeking varied expressions and avoiding repetition in Spanish documents.
Tips for Efficient Spanish Document Creation
With the array of language-specific features at your disposal, optimizing their use becomes paramount for a streamlined document creation process. Consider these practical tips:
Familiarize Yourself:
Take the time to explore and familiarize yourself with the newly available language-specific features.
Understanding their functionalities ensures you harness their full potential.
Utilize Grammar Suggestions Actively:
Embrace the grammar and style suggestions actively. Allow them to guide you in refining your Spanish writing style.
Incorporate suggested changes to enhance the overall quality of your documents.
Explore Language-specific Templates:
Explore and utilize language-specific templates for different document types.
This not only saves time but also ensures your documents adhere to the conventions of Spanish communication.
Embrace Auto-Correct Enhancements:
Trust the enhanced auto-correct features but remain vigilant.
While it streamlines the correction process, reviewing suggested changes ensures accuracy in language usage.
Diversify Language with the Thesaurus:
Leverage the multilingual thesaurus to diversify your language and expressions.
Enhance the richness of your Spanish documents by incorporating varied synonyms.
In the landscape of document creation, the utilization of language-specific features isn’t just a matter of convenience; it’s a strategic choice to elevate your writing. As you weave through the capabilities of Microsoft Word transformed by language customization, remember that each feature is a brushstroke in your digital canvas, allowing you to craft documents that resonate with linguistic finesse. So, embark on this journey armed with knowledge, and let the language-specific features of Microsoft Word be the catalyst for your Spanish document creation brilliance.
Collaborating in Spanish
Image by – pinimg.com
Navigating the collaborative landscape within Microsoft Word takes on a nuanced dimension when engaging in bilingual collaboration, particularly when using the software in Spanish. This collaborative synergy extends beyond the standard functionalities, requiring a thoughtful approach to ensure seamless cooperation in a bilingual environment. Here, we provide guidance on collaborating effectively with others in Spanish using Microsoft Word, addressing potential challenges and offering pragmatic solutions for a harmonious and productive collaborative process.
Collaborative Guidance in Spanish
Unified Language Settings:
Ensure all collaborators have their Microsoft Word language settings aligned.
A unified language setting minimizes confusion and ensures consistent communication in Spanish.
Clear Communication Channels:
Establish clear communication channels for collaboration.
Utilize comments, tracked changes, and the chat feature within Microsoft Word to maintain a streamlined dialogue in Spanish.
Utilize Language-specific Features:
Leverage the language-specific features discussed earlier, such as grammar and style suggestions.
These features enhance the collaborative writing process, providing a shared language reference for all collaborators.
Collaborative Editing Protocols:
Establish collaborative editing protocols to prevent conflicting changes.
Clearly define roles and responsibilities within the collaborative group to ensure a smooth editing and review process.
Addressing Challenges in Bilingual Collaboration
Language Barrier Concerns:
Acknowledge potential language barriers and provide resources for language clarification.
Encourage open communication to address any linguistic uncertainties and foster a collaborative learning environment.
Version Control Challenges:
Implement version control practices to manage document iterations.
Clearly label versions and utilize file-sharing platforms to minimize confusion about the most recent document iteration.
Cultural Sensitivity Training:
Consider providing cultural sensitivity training for effective cross-cultural collaboration.
Understanding cultural nuances enhances communication, contributing to a more cohesive collaborative effort.
Time Zone Considerations:
Address time zone differences proactively.
Establish flexible timelines and utilize scheduling tools to accommodate collaborators in different time zones.
Solutions for a Seamless Collaborative Experience
Regular Check-ins:
Schedule regular check-ins to assess progress and address any collaborative challenges.
Video conferences or virtual meetings provide a platform for real-time communication in Spanish.
Document Collaboration Platforms:
Explore document collaboration platforms integrated with Microsoft Word.
Platforms like SharePoint or OneDrive facilitate concurrent editing and document sharing, enhancing collaborative efficiency.
Bilingual Collaboration Guidelines:
Develop and distribute bilingual collaboration guidelines.
These guidelines can include best practices, language preferences, and collaborative etiquette to ensure a cohesive working environment.
In the ever-connected world of collaborative digital workspaces, effective collaboration in Spanish using Microsoft Word transcends mere document editing. It becomes a fusion of language, culture, and technology, requiring a strategic and mindful approach. By implementing the outlined guidance and addressing potential challenges head-on, collaborators can navigate the intricacies of bilingual collaboration, transforming the collaborative process into a harmonious and productive endeavor. So, whether crafting documents, editing content, or collaborating on creative projects, let the language be a bridge, fostering collaboration that transcends linguistic boundaries within the collaborative ecosystem of Microsoft Word.
Integrating Translation Tools
In the intricate tapestry of language diversity, Microsoft Word emerges as a powerhouse not only for document creation but also for transcending linguistic barriers. The integration of translation tools within this digital realm opens a gateway to a world where language ceases to be a hindrance and becomes a bridge for effective communication. Let’s embark on a journey to unravel the nuances of these translation tools, understanding their role, and uncovering insightful tips on harnessing their capabilities to enhance document translation within Microsoft Word.
Unveiling the Translation Tools
The introduction of translation tools within Microsoft Word is a testament to the software’s commitment to facilitating seamless communication across languages. Here’s a glimpse into their functionality:
Built-in Language Translator:
Microsoft Word boasts a built-in language translator, allowing users to translate text from one language to another effortlessly. This feature supports a multitude of languages, including Spanish, French, German, and beyond.
Real-time Translation:
The translation tools operate in real-time, providing instantaneous results. This is particularly advantageous for users engaged in collaborative efforts spanning across different linguistic backgrounds.
Language Detection Capabilities:
These tools come equipped with language detection capabilities, eliminating the need for manual language selection. The software intelligently identifies the language in use, streamlining the translation process.
Tips for Optimizing Translation Tools
To harness the full potential of these translation tools and bridge language gaps effectively, consider the following tips:
Selecting Text for Translation:
Highlight the specific text you want to translate within your document.
This targeted approach ensures precision in translation, especially in documents with diverse content.
Choosing Target Languages:
Be mindful of selecting the appropriate target language.
Microsoft Word offers a plethora of language options, enabling users to tailor translations to their specific needs.
Reviewing Translations in Context:
Review the translated text within the context of the document.
This ensures that the translated content aligns seamlessly with the overall tone and structure of the document.
Exploring Synonyms and Alternatives:
Use translation tools to explore synonyms and alternative expressions.
This aids in diversifying language use, adding nuance and depth to the translated content.
Utilizing Translation for Collaboration:
Leverage translation tools for collaborative efforts in a multilingual environment.
This fosters inclusivity, allowing collaborators to engage seamlessly despite language differences.
Enhancing Document Translation Capabilities
As the world becomes increasingly interconnected, the ability to translate documents effectively becomes a valuable skill. Microsoft Word’s integration of translation tools transcends mere language conversion; it facilitates a harmonious exchange of ideas, irrespective of linguistic backgrounds. Whether you’re crafting a global business proposal, collaborating with international partners, or simply seeking to broaden your linguistic horizons, these translation tools serve as your linguistic compass, navigating the diverse seas of language with finesse.
In the digital age where communication knows no bounds, the integration of translation tools within Microsoft Word epitomizes the software’s commitment to fostering a globalized and inclusive environment. So, as you navigate the realms of language diversity within your digital workspace, let these tools be your companions, enabling you to communicate with the world in a language that transcends borders and resonates with the richness of global expression.
Customizing the Language Experience
In the dynamic realm of Microsoft Word, the ability to tailor the language experience to individual preferences is a pivotal aspect that goes beyond the conventional understanding of document processing. Customizing Microsoft Word settings to align with personal preferences in Spanish involves a strategic navigation of the software’s expansive features, ensuring a user-centric approach that transcends linguistic nuances. Here, we delve into detailed instructions on how users can embark on the journey of customization, fostering a seamless and personalized language experience within the confines of Microsoft Word.
Personalizing Microsoft Word Settings in Spanish
Language Preferences:
Begin by navigating to the language settings within Microsoft Word.
Select Spanish as the preferred language to establish the foundational customization for your language experience.
Font and Style Customization:
Tailor the font and style settings to align with personal preferences.
Choose fonts that resonate with your aesthetic inclinations and adjust styles for enhanced readability in Spanish.
Default Language for Spell Check and Grammar:
Set the default language for spell check and grammar to Spanish.
This ensures that linguistic corrections align with the chosen language, providing more accurate proofing.
Keyboard Shortcuts in Spanish:
Explore the option to customize keyboard shortcuts in Spanish.
This facilitates a more intuitive and efficient workflow, streamlining your interactions within the software.
Showcasing Additional Customization Options
Beyond the fundamental language settings, Microsoft Word offers a plethora of additional customization options that elevate the user experience to unprecedented heights. Here’s a showcase of these options:
Theme Personalization:
Explore theme personalization to give your Microsoft Word interface a distinct visual identity.
Choose from a range of themes that resonate with your style, fostering a personalized workspace.
Quick Access Toolbar Customization:
Tailor the Quick Access Toolbar to feature the commands you frequently use.
This customization optimizes your workflow, placing essential tools at your fingertips for seamless access.
Document View Settings:
Experiment with document view settings for a tailored visual experience.
Whether it’s the reading layout, print layout, or web layout, customize the view to suit your preferences.
Custom Dictionary Inclusions:
Add industry-specific or personal terms to the custom dictionary.
This ensures that specialized vocabulary is recognized and accepted within your Spanish documents.
Tips for a Seamless Customization Experience
Regularly Review and Update Settings:
Periodically review and update your customized settings.
As your preferences evolve, so should your Microsoft Word environment to align with your current needs.
Utilize Online Resources and Communities:
Explore online resources and communities for tips and tricks on advanced customization.
The Microsoft Word user community often shares insights into maximizing the software’s potential.
Experiment with Accessibility Features:
Consider experimenting with accessibility features for an inclusive experience.
Customize settings to enhance readability, ensuring an accommodating environment for all users.
Backup Customization Settings:
Back up your customization settings to prevent loss during updates or system changes.
This precautionary measure safeguards your tailored language experience.
In the tapestry of document creation, the ability to customize the language experience within Microsoft Word is akin to wielding a personalized linguistic toolkit. It transforms the software from a mere tool into a seamless extension of individual expression. So, as you navigate the intricacies of customization, let each adjustment be a stroke on your digital canvas, creating a workspace that not only speaks your language but resonates with the rhythm of your unique preferences within the expansive domain of Microsoft Word.
Troubleshooting Language-related Issues
In the intricate landscape of digital document creation, the seamless integration of language settings within Microsoft Word can sometimes encounter hiccups, leading users to face common language-related issues. To empower users in overcoming these challenges, let’s delve into a comprehensive guide on troubleshooting language-related issues, offering practical solutions and highlighting available resources for a smoother user experience.
Common Issues and Troubleshooting Steps
Language Mismatch:
Issue: Documents displaying language mismatch errors or inconsistent language settings.
Troubleshooting:
Verify and adjust the document language settings under the Review tab.
Ensure that the default language for spell check and grammar matches the desired language.
Difficulty in Changing Language:
Issue: Users encountering difficulties in changing the overall display language of Microsoft Word.
Troubleshooting:
Navigate to the Language preferences in the software settings.
Follow step-by-step instructions to change the display language, ensuring a seamless transition.
Proofing Language Errors:
Issue: Spell check and grammar proofing errors persisting despite correct language settings.
Troubleshooting:
Modify proofing language settings to align with the document’s language.
Update language dictionaries and ensure they are installed and activated.
Language-specific Features Not Activated:
Issue: Users not leveraging language-specific features after the language change.
Troubleshooting:
Explore the software’s features menu and activate language-specific tools.
Familiarize yourself with the enhanced capabilities that become available post-language change.
Resources and Support Options
Online Support Communities:
Leverage Microsoft Word online communities for user-generated solutions.
Engage with fellow users who might have encountered similar language-related challenges.
Official Microsoft Support Documentation:
Refer to the official Microsoft support documentation for detailed guides.
Find step-by-step troubleshooting instructions and FAQs related to language settings.
Live Chat Support:
Utilize Microsoft’s live chat support for real-time assistance.
Connect with support agents who can guide you through specific language-related issues.
Video Tutorials and Webinars:
Explore video tutorials and webinars hosted by Microsoft.
Visual guides can provide a more immersive learning experience for troubleshooting language-related concerns.
Proactive Tips for a Smooth Language Experience
Regular Software Updates:
Keep Microsoft Word up to date with the latest software releases.
Updates often include bug fixes and enhancements that address language-related issues.
Back Up Customization Settings:
Create regular backups of your customized settings.
This precautionary measure ensures that you can restore your preferred language configurations in case of unexpected issues.
Clear Cache and Temporary Files:
Periodically clear cache and temporary files that may impact language settings.
A clutter-free system contributes to a smoother overall experience.
Stay Informed About Software Changes:
Stay informed about any changes or updates in Microsoft Word’s language-related features.
Microsoft often releases feature enhancements that can improve language functionality.
In the dynamic world of digital communication, the ability to troubleshoot language-related issues within Microsoft Word is a valuable skill that ensures a seamless and efficient document creation process. By understanding common challenges, implementing troubleshooting steps, and utilizing available resources, users can navigate the intricate terrain of language settings with confidence, unlocking the full potential of Microsoft Word for a truly customized linguistic experience.
FAQ
How can I change the language settings in Microsoft Word?
To change language settings in Microsoft Word, follow these steps:
Navigate to Review Tab:
Open your Word document and go to the “Review” tab on the toolbar.
Language Preferences:
Look for the “Language” option; click on it to access language preferences.
Choose Your Language:
A dialog box will appear; select your preferred language from the list.
Set as Default:
If you want this language for all documents, click “Set As Default.”
Confirm Changes:
Confirm and close the dialog box.
By following these steps, you’ll customize the language settings, ensuring a seamless experience in your preferred language within Microsoft Word.
What are the steps to display Microsoft Word in Spanish?
To display Microsoft Word in Spanish, follow these steps:
Open Microsoft Word:
Launch Microsoft Word on your computer.
Navigate to File:
Click on the “File” tab in the top left corner of the screen.
Choose Options:
Scroll down and select “Options” at the bottom of the File menu.
Access Language Preferences:
In the Word Options window, choose “Language” from the left-hand menu.
Set Display Language:
Under “Choose Editing Languages,” select “Spanish” from the list and click “Add.”
Change Display Language:
Set Spanish as the primary editing language and click “OK.”
By following these steps, you’ll successfully display Microsoft Word in Spanish, providing a localized and user-friendly interface.
How do I add a language pack to Microsoft Word?
To add a language pack to Microsoft Word, follow these steps:
Open Word:
Launch Microsoft Word on your computer.
Navigate to File:
Click on the “File” tab in the top left corner.
Choose Options:
Select “Options” at the bottom of the File menu.
Access Language Preferences:
In Word Options, go to the “Language” tab on the left-hand menu.
Install Additional Editing Languages:
Under “Choose Editing Languages,” click “Add additional editing languages.”
Select Language:
Choose the desired language from the list and click “Add.”
Install Language Pack:
Follow prompts to download and install the language pack.
By following these steps, you can seamlessly enhance language support in Microsoft Word, ensuring a versatile and multilingual document creation experience.
Can I collaborate with others in different languages using Microsoft Word?
Yes, Microsoft Word facilitates seamless collaboration in different languages. Through its collaborative features, users can work on documents collectively, even if each participant uses a different language setting. Key functionalities include real-time editing, comments, and tracking changes, fostering effective communication in a multilingual environment. This ensures that diverse teams can collaborate efficiently, regardless of the languages they work in. By leveraging Microsoft Word’s collaborative tools, users can streamline their workflow, enhance productivity, and create a conducive environment for teamwork across language barriers.
Are there translation tools built into Microsoft Word?
Certainly, Microsoft Word offers built-in translation tools to enhance document translation capabilities. These tools empower users to seamlessly translate text from one language to another directly within the Word interface. By leveraging this feature, users can bridge language gaps and ensure accurate and effective communication in diverse linguistic contexts. The translation tools in Microsoft Word provide a user-friendly and efficient solution for creating content that caters to a global audience. Whether it’s for business documents, academic papers, or personal communication, these tools contribute to a more inclusive and accessible document creation process, aligning with the diverse language needs of users.
How do I troubleshoot language-related issues in Microsoft Word?
To troubleshoot language-related issues in Microsoft Word:
Check Document Language:
Ensure the document language matches your intended setting. Go to the “Review” tab, select “Language,” and choose the correct language.
Verify System Language:
Confirm your system language settings align with your preferred language. Adjust them in your computer’s settings if necessary.
Reinstall Language Packs:
If encountering issues, reinstall language packs. Navigate to Word Options, select “Language,” and reinstall the desired language pack.
Update Word:
Ensure your Microsoft Word application is up-to-date. Updates often include bug fixes that may resolve language-related issues.
Check Third-Party Add-ins:
Disable third-party add-ins as they can sometimes conflict with language settings.
By systematically addressing these steps, users can troubleshoot and resolve language-related challenges in Microsoft Word for a smoother document creation experience.
It is possible to master this special character in Microsoft Word, allowing you to add that quintessential Spanish touch to your document with ease.
This article is your go-to resource for flawlessly incorporating the * character into Word documents. Using shortcut keys and leveraging the Symbol menu and AutoCorrect feature to type * again ensures that you never have to struggle to type it again.
Discover various techniques to improve your writing, troubleshoot common problems, and discover the significance of this symbol in language and communication with the following sections on this character. You will learn how to get the most out of this unique character in Microsoft Word.
Understanding the Importance of ñ
Understanding the significance of the “ñ” character extends beyond mere keystrokes; it’s an embodiment of linguistic nuances and cultural depth. In the realm of language and communication, the “ñ” symbol holds an irreplaceable position, serving as more than a typographic peculiarity. Its value lies in its capacity to encapsulate the phonetic sound unique to various languages, notably Spanish. This significance resonates profoundly in linguistic circles, where accuracy in expression is paramount.
Culturally, the “ñ” transcends its visual representation on a keyboard. It embodies historical, societal, and linguistic heritage, serving as a symbol of identity for communities worldwide. It’s not just a letter; it’s a testament to the richness of language and a bridge to understanding diverse cultures. Considered an integral part of Spanish language and heritage, the “ñ” character represents a distinctiveness that surpasses mere alphabetical sequences.
Exploring the depth of its relevance, one discovers how this seemingly small symbol plays a pivotal role in preserving traditions and oral histories. Its absence alters meanings and, in turn, impacts narratives, emphasizing its indispensable status in literary works, cultural expressions, and everyday conversations. The absence or misrepresentation of the “ñ” can significantly affect comprehension and authenticity in language, underscoring its indispensable nature in communication.
This character’s role goes beyond linguistic accuracy; it serves as a cultural marker, guiding readers into understanding the intricacies of various languages and the communities they represent. Its absence diminishes the integrity of words, stripping them of their intended essence and cultural context. Whether used in poetry, prose, or everyday communication, the “ñ” character is an irreplaceable vessel for preserving linguistic and cultural identities, embodying a world of meanings within its unique curvature.
Ways to Type ñ in Microsoft Word
In navigating the terrain of Microsoft Word to effortlessly incorporate the elusive “ñ” character, various methods come to the fore, each offering distinct pathways to typographic mastery. These methods, often a boon to linguists and writers, include keyboard shortcuts, the insert symbol method, and the AutoCorrect or AutoText feature, each presenting a unique approach to seamlessly integrating the “ñ” into your documents.
Keyboard Shortcuts
Windows: For Windows users, the path to typing “ñ” often involves employing Alt codes—a series of numeric codes generated by pressing the Alt key in combination with specific numbers on the numeric keypad. These codes yield a range of special characters, including the coveted “ñ.”
Mac: Mac users navigate a slightly different route, tapping into keyboard combinations involving specific keys like Option + N to produce the cherished “ñ” effortlessly.
Insert Symbol Method
For those seeking an alternative route, the Insert Symbol feature within Microsoft Word proves to be a valuable ally. This method allows users to delve into a vast repository of symbols, enabling the swift inclusion of the “ñ” character without the need for memorizing complex codes or keyboard combinations.
AutoCorrect or AutoText Feature
The AutoCorrect or AutoText feature stands as a convenient aide, especially for those who frequently use the “ñ” character. Users can set up Word to automatically replace a specified text or sequence with the “ñ” character, significantly streamlining the typing process.
Unveiling the Easiest Path
While each method holds its own allure and utility, the choice ultimately rests on user preference, convenience, and the frequency of usage. Keyboard aficionados might favor the swift strokes of shortcuts, while others may find solace in the simplicity of the Insert Symbol function or the automated prowess of AutoCorrect.
Incorporating the “ñ” character into your Word documents need not be an arduous endeavor. Armed with these diverse methods, users can seamlessly infuse their text with the linguistic richness encapsulated within this special character, enhancing expression and embracing cultural diversity in their written work.
Step-by-Step Guide to Using Different Methods
Image source: abebooks
Navigating the intricate landscape of typing the elusive “ñ” character within Microsoft Word entails a methodical approach, encompassing distinct steps tailored for both Windows and Mac users, along with leveraging the Insert Symbol function and harnessing the AutoCorrect or AutoText feature.
Keyboard Shortcuts
Windows: Alt Codes
a. Finding the Appropriate Alt Code: Windows users seeking to wield Alt codes to manifest the revered “ñ” embark on a quest to discover the specific numeric combination that yields this character. Typically, this involves identifying the unique sequence associated with the “ñ” symbol within the expansive realm of Alt codes.
b. Inputting ñ Using Alt Codes: Armed with the discovered Alt code, users execute a seamless keystroke sequence, often involving the numerical keypad and the Alt key, resulting in the coveted appearance of the “ñ” within their Word document.
Mac: Keyboard Combinations
a. Locating Necessary Keyboard Combinations: Mac users traverse a distinct route, engaging in a quest to uncover the keyboard combination that magically conjures the elusive “ñ.” This typically involves identifying and executing a specific combination of keys—often a nuanced blend—such as Option + N, culminating in the triumphant display of the “ñ” character.
b. Typing ñ Using Keyboard Combinations: With the identified keystrokes at their disposal, Mac users seamlessly weave the “ñ” character into their textual tapestry, leveraging the identified keyboard combination to effortlessly infuse their document with this distinctive symbol.
Insert Symbol Method
Accessing the Symbol Menu: For those who opt for the Insert Symbol method, the journey commences with navigating Word’s expansive symbol repository. Users delve into the Symbol menu, often tucked away within the interface, to unearth the revered “ñ” character.
Finding and Inserting the ñ Character: Within the Symbol menu’s treasure trove, users zero in on the sought-after “ñ” symbol, employing precision and patience to pinpoint and seamlessly embed this character into their document, ensuring linguistic finesse.
AutoCorrect or AutoText Feature
Setting Up AutoCorrect for ñ: Users exploring the AutoCorrect or AutoText feature initiate the process by configuring Word’s settings, programming it to recognize specific sequences or text inputs that trigger the automatic substitution of the “ñ” character.
Utilizing AutoCorrect for Effortless ñ Input: With AutoCorrect primed and poised, users experience a streamlined typing journey, as Word intuitively replaces predefined sequences or text inputs with the desired “ñ” character, augmenting efficiency and precision in their textual endeavors.
Embracing these step-by-step methods empowers users to seamlessly integrate the “ñ” character into their Word documents, fostering linguistic richness and cultural authenticity within their written expressions.
Troubleshooting and Common Issues
Image credit: limblecmms
Troubleshooting the integration of the “ñ” character in Microsoft Word can unveil a myriad of challenges, encompassing incorrect characters, keyboard shortcut complications, and symbol insertion woes, hindering the seamless incorporation of this linguistic gem into written text.
A. Incorrect Characters Appearing
In the quest for linguistic precision, users might encounter the disheartening sight of incorrect characters usurping the coveted “ñ.” This issue often arises due to encoding or font discrepancies, where systems or applications interpret input in ways unintended by the user. Such errors undermine the authenticity and accuracy of the intended linguistic expression, demanding swift resolution.
B. Challenges with Keyboard Shortcuts
The allure of expedited keystrokes via shortcuts can be tempered by challenges in execution, especially when users encounter variations across systems or configurations. Inconsistent functionality, failure to produce the expected character, or conflicting sequences might impede the seamless generation of the elusive “ñ,” requiring adept troubleshooting skills to restore the intended functionality.
C. Symbol Insertion Problems
The seemingly straightforward task of inserting the “ñ” character through symbol menus can devolve into a labyrinthine ordeal when confronted with symbol insertion problems. Users may face difficulties locating the desired character within vast symbol libraries, encountering interface complexities or font rendering issues that obstruct the effortless integration of the “ñ” into their textual canvas.
Navigating these troubleshooting challenges demands a deft hand and a keen eye for detail. Resolving encoding discrepancies, ensuring consistent functionality across systems, and circumventing symbol insertion hurdles necessitate a systematic approach. Users can mitigate these issues by exploring alternative methods, updating software configurations, or seeking support from forums and online resources to decipher and surmount the obstacles hindering the seamless adoption of the “ñ” character in their Word documents.
Additional Tips and Tricks
When aiming for seamless integration of the esteemed “ñ” character into Microsoft Word documents, delving deeper into advanced techniques and leveraging customization options can significantly enhance efficiency and precision. Here are invaluable tips and tricks that pave the way for a smoother journey toward incorporating this symbol:
A. Customizing Shortcuts
Tailored Keystrokes: Users seeking streamlined access to the “ñ” character can personalize their keyboard shortcuts, assigning intuitive combinations that align with their typing habits and preferences. This customization empowers users with swift, personalized access to the elusive “ñ,” amplifying efficiency and minimizing keystroke complexities.
Shortcut Memorization: Embracing customized shortcuts entails a learning curve. Users are encouraged to practice and commit these personalized keystrokes to memory, ensuring seamless recall and integration into their workflow for effortless “ñ” insertion.
B. Exploring Alternate Methods or Tools
Third-party Tools: Beyond the confines of Word, users can explore third-party software or add-ons tailored to facilitate the input of special characters like “ñ.” These tools often offer intuitive interfaces and customizable functionalities, serving as invaluable aids in ensuring smooth “ñ” integration across various platforms or applications.
Utilizing Unicode Options: Unraveling the possibilities within Unicode presents an alternate avenue for users seeking to master the inclusion of the “ñ” character. Exploring Unicode’s expansive character set unveils diverse options and methods, offering insights into innovative ways to incorporate this symbol effortlessly.
C. Language Settings and ñ Input Support
System-Level Configurations: Users can optimize their language settings at a system level, fine-tuning configurations to accommodate the seamless input of characters like “ñ.” Configuring language preferences and input methods ensures comprehensive support for these characters across various applications, fostering a consistent and cohesive typing experience.
Embracing Input Support: Familiarizing oneself with the range of input methods available within different systems or platforms augments the ease of typing the “ñ” character. Exploring and mastering diverse input methods—be it keyboard layouts, language settings, or specialized software—facilitates effortless integration of this character into text across diverse contexts.
By customizing shortcuts, exploring alternative methods or tools, and optimizing language settings, users can transcend the challenges associated with typing the “ñ” character, unlocking a realm of efficiency and precision in their written expressions within Microsoft Word. These advanced strategies offer a repertoire of techniques, empowering users to navigate the complexities of character input and embrace the linguistic richness embodied by the revered “ñ” with ease.
Final Thoughts and Practice
Mastering the integration of the “ñ” character in Microsoft Word is more than a technical feat—it’s a journey that embodies the fusion of linguistic finesse and cultural appreciation. The path toward proficiency in utilizing this special character entails deliberate familiarization and practice, where users navigate through diverse methods, hone their skills, and embrace the intrinsic value of this symbol.
A. Importance of Familiarization and Practice
Repetition Breeds Proficiency: Mastery over the “ñ” character demands regular practice. Repetition not only engrains the keystrokes or methods required for its inclusion but also nurtures familiarity, ensuring swift and accurate insertion.
Consistency and Precision: Through practice, users cultivate consistency and precision in their approach, minimizing errors and fostering a seamless workflow that enriches written communication.
B. Encouragement for Utilizing ñ in Writing
Cultural Appreciation: Embracing the “ñ” character transcends its functional utility; it embodies cultural respect and appreciation. Its inclusion acknowledges linguistic diversity and honors the richness of various languages and traditions.
Expressive Depth: Leveraging the “ñ” character enriches written expressions, adding depth and authenticity to texts. Its absence can dilute meanings and compromise the integrity of language, highlighting the significance of its deliberate inclusion.
C. Enhancing Language Diversity and Expression
Celebrating Linguistic Diversity: Incorporating the “ñ” symbol celebrates linguistic diversity, acknowledging the nuances that define various languages. It underscores the importance of preserving and honoring these linguistic intricacies.
Fostering Expressive Freedom: Encouraging the use of the “ñ” character empowers writers to explore and embrace expressive freedom, transcending conventional linguistic boundaries and enriching written content with cultural depth and authenticity.
In essence, the journey toward mastering the “ñ” character in Microsoft Word extends beyond technical proficiency—it embodies a celebration of language diversity, cultural appreciation, and expressive depth. Through familiarity, practice, and a conscientious embrace of this unique symbol, writers infuse their texts with richness, authenticity, and a profound nod to the diverse tapestry of languages and cultures.
Additional questions and answers
How can I type the ñ character on a Windows/Mac computer?
On a Windows computer, type the ñ character using the Alt code method by pressing and holding the Alt key while entering 164 or 0241 using the numeric keypad. For Mac users, utilize the Option + N keys followed by typing the letter n to produce the ñ character seamlessly. These keyboard shortcuts offer quick access to the ñ character, facilitating its integration into your text on both Windows and Mac platforms.
Are there alternative methods to insert the ñ symbol in Word?
Certainly, aside from keyboard shortcuts, Microsoft Word offers alternative methods to insert the ñ symbol. The “Insert Symbol” feature allows users to access a wide array of characters, including ñ. Within Word, navigate to “Insert” on the toolbar, select “Symbol,” then “More Symbols.” This opens a window displaying various characters where you can find and insert the ñ symbol into your document effortlessly. Additionally, utilizing the AutoCorrect or AutoText feature allows for automatic substitution of a designated text sequence with the ñ character. Customizing these settings provides a convenient way to integrate the ñ symbol without relying solely on keyboard shortcuts, enhancing accessibility and ease of use within Word documents.
How do I troubleshoot ñ character insertion issues in Word?
Troubleshooting ñ character insertion in Word involves several steps. Firstly, verify the font being used; some fonts lack ñ support. Secondly, check the language settings—ensuring it’s set to a language that incorporates ñ, like Spanish. If using shortcuts, ensure Num Lock is on for numeric keypad input. For symbol insertion issues, explore alternative fonts or insert from the symbol library. In case of persistent problems, consider updating Word or resetting AutoCorrect/AutoText settings. Forums or Microsoft support can offer tailored solutions. Understanding font compatibility, language settings, and alternative insertion methods helps diagnose and resolve ñ character insertion challenges within Word, ensuring smooth and accurate integration into your documents.
Why is the ñ character important in language and communication?
The ñ character holds significance in language and communication for several reasons. Primarily, it symbolizes linguistic diversity and cultural identity, notably in languages like Spanish, where it represents distinct phonetic sounds absent in other alphabets. Its absence can alter meanings, leading to confusion or misinterpretation. Additionally, the ñ character preserves the integrity of words and expressions, ensuring accuracy and authenticity in written communication. Embracing this symbol acknowledges the richness of various languages, fostering inclusivity and respect for diverse linguistic traditions. Its presence enhances expressive depth, enabling writers to convey nuances that might otherwise be lost, underscoring the importance of ñ in preserving the essence and integrity of language and communication.
What role does the AutoCorrect feature play in typing ñ in Word?
The AutoCorrect feature in Word streamlines ñ typing by automatically replacing specific text sequences with the ñ character. Users can define custom autocorrect rules, associating commonly typed sequences, like “n~” or “n'”, with the ñ character. Once set up, when users type the designated sequence, Word automatically substitutes it with the ñ symbol. This feature enhances typing efficiency, especially for users frequently incorporating the ñ character. However, it requires initial setup and may vary based on user preferences or language settings. Leveraging AutoCorrect for ñ ensures consistent and effortless integration within Word documents, reducing the reliance on manual keyboard shortcuts or symbol insertion methods.
How do language settings affect typing special characters like ñ?
Language settings profoundly influence typing special characters like ñ. Configuring the language settings in software or operating systems determines the character set and keyboard layout accessible to users. For instance, selecting a language like Spanish or setting the keyboard layout to Spanish provides direct access to ñ without complex shortcuts. Language settings impact the keyboard mapping, enabling specific key combinations to generate special characters inherent to that language. Correct language settings ensure seamless integration of ñ into text, simplifying its inclusion without relying on convoluted methods. Thus, understanding and aligning language settings to languages featuring special characters like ñ significantly ease their incorporation, enhancing typing efficiency and accuracy.
Main takeaway
As a result, typing the * character in Microsoft Word opens up a world of linguistic finesse and cultural expression. Throughout this section, we’ve looked at a variety of methods, including keyboard shortcuts and the Symbol menu and AutoCorrect, to ensure that this special character is integrated in your documents.
You’ve empowered yourself to effortlessly enhance your writing by knowing these techniques; the * brings richness and authenticity to languages such as Spanish and others. Using this character not only adds a unique visual element, but it also respects and acknowledges its cultural significance in a variety of contexts.
Remember that practice is the key to success. As you continue to use these methods, incorporating the * will become second nature, providing you with greater clarity and depth of thought. Whether you’re creating linguistic accuracy, improving cultural relevance, or simply adding an extra touch to your documents, make the use of the * character in Word adaptable.
Have you ever manually capitalized every sentence in your Microsoft Word document, wishing there was an easier way to ensure consistency? The good news is that there is an alternative method that will save you time and help you maintain a polished appearance. In this guide, we will go over the ins and outs of Microsoft Word’s auto-capitalization feature, allowing you to focus solely on writing.
You don’t have to manually capitalize sentences in Microsoft Word because the program provides a powerful auto-capitalization feature. This course will walk you through how to harness the full potential of auto-capitalization, from enabling it to configuring it. There is no need to check or correct capitalization every time you type with Microsoft Word; all of this can be done automatically.
By understanding the fundamentals of auto-capitalization, you will discover a game-changing tool that not only streamlines your writing process but also improves the overall presentation of your documents. This step-by-step guide will give you all you need to get the most out of this feature, whether you’re a Word veteran or a newcomer. In this lesson, we’ll go over how to use automatic capitalization in Microsoft Word to make your writing experience even better.
Enabling Auto-Capitalization
Image source: guidingtech.com
Navigating the intricate landscape of Microsoft Word becomes an effortless endeavor when one harnesses the power of auto-capitalization. The second pillar of this journey involves the crucial step of enabling this feature, a process that can be likened to unlocking a treasure trove of writing efficiency. The first stride on this path involves a meticulous step-by-step guide that transforms what might seem like a mundane task into a seamless experience:
Step-by-Step Guide
Locating the Feature: Begin by launching Microsoft Word and directing your attention to the upper ribbon. Here, nestled among various formatting options, is the gateway to auto-capitalization. Click on the “Review” tab, and a cascade of possibilities unfolds.
Enabling the Magic: Within the “Review” tab, spot the “Proofing” section. Here lies the crux of your journey. Click on “AutoCorrect Options,” and a window to a world of writing convenience opens. Navigate to the “AutoFormat As You Type” tab – the lair of auto-capitalization. Here, the real magic begins.
Tick the Capitalization Box: A subtle yet powerful checkbox beckons – the “Capitalize first letter of sentences.” With a simple click, you’ve set in motion a transformation that will echo through your document as each sentence receives its deserved capitalization. It’s a moment of triumph, a writer’s secret weapon unlocked.
Screenshots for Clarity
They say a picture is worth a thousand words, and in the realm of enabling auto-capitalization, clarity is key. Visual learners and seasoned writers alike benefit from a visual guide that accompanies the intricate dance of settings. To illuminate the process further:
Capturing the Journey: Integrate screenshots seamlessly into your guide, capturing each click and checkbox. A well-placed image not only demystifies the process but also ensures that writers of all levels can follow the trail effortlessly.
Visual Appeal: Consider the aesthetics of your screenshots, aligning them with the overall tone of your document. Clarity extends beyond functionality to the visual allure, ensuring that your guide is not just informative but also visually engaging.
The Art of Empowering Writers
In the realm of writing, time is a precious commodity. The ability to enable auto-capitalization swiftly and comprehensively is a game-changer, especially for those juggling multiple tasks. This feature, when unlocked with precision through our step-by-step guide and accompanied by visuals for clarity, transforms Microsoft Word into a writer’s haven. It’s not just about capitalizing sentences; it’s about empowering writers to focus on the art of expression while leaving the technical nuances to the technology at hand. So, dive into the realm of auto-capitalization – where efficiency meets creativity in the grand symphony of words.
Understanding Auto-Capitalization Options
Exploring the myriad possibilities within Microsoft Word’s auto-capitalization feature is akin to unraveling a tapestry of writing finesse. This segment delves into the nuanced realm of capitalization options, offering writers a spectrum of choices to tailor their text precisely to their stylistic preferences.
Exploring Different Capitalization Options
In the symphony of written expression, the choice of capitalization is a conductor guiding the narrative’s tone. Microsoft Word presents writers with a palette of options, each a brushstroke in the canvas of textual artistry:
Sentence Case: The default setting, where the first letter of the first word in a sentence is capitalized. This option maintains a balance between formality and readability.
Title Case: Elevating the prominence of major words in headings and titles, Title Case exudes authority. Writers can effortlessly command attention by enabling this option for impactful headers.
UPPERCASE: When the need arises to convey a sense of urgency or shout a message from the digital rooftops, the UPPERCASE option stands ready. Perfect for emphasis or categorical statements.
lowercase: In contrast, the lowercase option allows for a more intimate and conversational tone. Ideal for scenarios where a gentle touch is preferred over the assertiveness of uppercase.
Customizing Auto-Capitalization Settings
The beauty of Microsoft Word’s auto-capitalization lies in its adaptability to the unique needs of individual writers. This flexibility extends beyond choosing capitalization styles; it seeps into the very fabric of your writing environment:
Acronyms and Initials: Tailor the rules for automatic capitalization around acronyms or initials specific to your writing. Avoid the inconvenience of the system misinterpreting specialized terms.
Exception Dictionary: Craft a personalized exception dictionary to shield specific words from the auto-capitalization rule. This is particularly handy when dealing with industry terms or proper nouns that defy conventional capitalization norms.
Language-Specific Rules: For multilingual writers, the ability to set language-specific auto-capitalization rules ensures a seamless transition between different linguistic nuances.
Auto-Correct Enhancements: Beyond capitalization, explore the broader landscape of auto-correct options. Fine-tune the system to rectify common typos or customize corrections based on your unique writing style.
A Writer’s Playground
Understanding auto-capitalization options transcends the mere technicalities of formatting; it transforms Microsoft Word into a writer’s playground. Writers are no longer confined by rigid rules but rather empowered to sculpt their prose with precision. This feature, with its diverse capitalization options and customizable settings, beckons writers to infuse their words with personality and flair. As you navigate through these options, envision your text not just as words on a screen but as a dynamic expression of your unique voice, now enhanced by the versatile tool that is auto-capitalization in Microsoft Word. Let your words dance to the rhythm of your creativity.
Overcoming Common Challenges
Navigating the terrain of auto-capitalization in Microsoft Word is not without its occasional hurdles. As writers harness the power of this feature, they may encounter instances where the expected automatic capitalization falls short. Addressing these challenges and providing effective troubleshooting tips is paramount in ensuring a seamless writing experience.
Instances Where Auto-Capitalization May Falter
Even the most sophisticated tools encounter hiccups. Auto-capitalization is no exception, and understanding the scenarios where it may stumble is crucial for preemptive problem-solving:
Abbreviations and Acronyms: Auto-capitalization might misinterpret abbreviations and acronyms, leading to inconsistent capitalization. Writers often grapple with maintaining the intended format, especially in technical or specialized documents.
Non-Standard Formatting: In documents with unconventional formatting or a mix of languages, auto-capitalization may struggle to discern the intended capitalization style. This can be particularly challenging for writers working on diverse projects.
Document Import Challenges: When importing text from external sources, auto-capitalization may not seamlessly adapt to the existing formatting. This can result in a document with inconsistent capitalization, demanding manual intervention.
Troubleshooting Tips for Seamless Auto-Capitalization
Resolving challenges with auto-capitalization requires a strategic approach. Writers can overcome these hurdles with a blend of precision and understanding:
Customizing Exceptions: Create a bespoke exception list tailored to the idiosyncrasies of your writing. By adding specific terms, abbreviations, or acronyms, writers can guide auto-capitalization to align with their unique linguistic landscape.
Language Settings Verification: Ensure that the language settings in your document match the language of your content. Auto-capitalization is language-sensitive, and discrepancies can lead to unexpected results.
Manual Adjustments: In cases where automatic capitalization falls short, empower yourself with the ability to manually override the settings. Utilize keyboard shortcuts to swiftly capitalize or decapitalize words as needed.
Regular Document Audits: Periodically review your document for capitalization consistency. Conducting systematic audits allows writers to catch anomalies early on and rectify them before they become pervasive.
A Writer’s Arsenal for Uninterrupted Creativity
Overcoming common challenges in auto-capitalization is akin to arming oneself with a writer’s arsenal for uninterrupted creativity. By acknowledging the potential pitfalls and embracing troubleshooting techniques, writers transform obstacles into opportunities to refine their craft. The journey of mastering auto-capitalization extends beyond the initial setup; it involves an ongoing dialogue between the writer and the tool, fostering a symbiotic relationship where challenges become stepping stones to a more refined writing experience. As you navigate the nuances of automatic capitalization, remember that mastery lies not just in leveraging the feature but in skillfully overcoming its occasional quirks. Let your words flow seamlessly, unencumbered by the nuances of formatting, as you wield the power of auto-capitalization with finesse.
Utilizing Quick Correct
In the realm of Microsoft Word, where the precision of language meets the efficiency of technology, the Quick Correct feature emerges as a silent yet powerful ally for writers seeking to elevate their text. This unassuming tool, nestled within the expansive arsenal of Word’s capabilities, serves as a guardian of accuracy, swiftly addressing errors and, notably, enhancing the prowess of automatic capitalization.
An Introduction to Quick Correct
Quick Correct, a beacon in the proofing landscape, is Microsoft Word’s response to the nuanced dance of language. It stands poised, ready to lend its expertise in identifying and rectifying errors, be they typographical slip-ups, grammatical faux pas, or, crucially, lapses in capitalization. The introduction of this feature signals a paradigm shift, where precision meets expediency, empowering writers to navigate the intricacies of language with finesse.
How Quick Correct Enhances Automatic Capitalization
In the realm of automatic capitalization, where each keystroke carries the weight of consistency, Quick Correct emerges as a formidable partner. Its seamless integration into the writing process unfolds like a well-choreographed dance, enhancing the efficacy of auto-capitalization in profound ways:
Real-Time Corrections: Quick Correct operates in real time, ensuring that as you type, deviations from capitalization norms are swiftly identified and rectified. This instantaneous correction mechanism eliminates the need for post-production editing, streamlining the writing workflow.
Contextual Understanding: Beyond mere error identification, Quick Correct demonstrates a nuanced understanding of context. It discerns intentional deviations from standard capitalization rules, respecting the writer’s stylistic choices while intervening only when necessary. This contextual sensitivity is a hallmark of its sophistication.
User-Friendly Customization: Quick Correct bows to the user’s authority, offering a user-friendly interface for customization. Writers can fine-tune its settings to align with their specific preferences, creating a symbiotic relationship between the tool and the individual writing style.
Efficiency in Action: In the fast-paced world of content creation, time is of the essence. Quick Correct, by swiftly addressing capitalization issues, liberates writers from the shackles of manual correction. This efficiency is not merely a time-saving tactic but a strategic investment in the seamless flow of ideas.
A Symphony of Precision and Efficiency
As writers embark on the journey of leveraging Quick Correct within Microsoft Word, they find themselves orchestrating a symphony of precision and efficiency. This unassuming feature, with its real-time corrections, contextual acumen, user-friendly customization, and inherent efficiency, becomes a conductor guiding the narrative toward a crescendo of flawless prose. The synergy between Quick Correct and automatic capitalization transforms the act of writing into a dance where each word finds its rhythm, each sentence resonates with clarity, and each paragraph becomes a testament to the marriage of technology and language. So, embrace Quick Correct as your linguistic companion, and let your words flow effortlessly, refined by the meticulous touch of this unassuming yet indispensable feature.
Creating Exceptions
In the intricate tapestry of automatic capitalization within Microsoft Word, the ability to craft exceptions is akin to wielding a fine brush in the hands of an artist, providing a level of control and precision that elevates the entire composition. This section serves as a guide, unveiling the nuanced process of adding exceptions to automatic capitalization rules, ensuring that specific words or instances retain their unique formatting untouched by the pervasive influence of auto-capitalization.
A Guide on Adding Exceptions
The process of creating exceptions within Microsoft Word is a testament to the platform’s commitment to user customization. Here’s a step-by-step guide to adding exceptions seamlessly:
Accessing AutoCorrect Options: Begin by navigating to the “File” menu and selecting “Options.” Within the ensuing window, locate and click on “Proofing.” Here, the gateway to AutoCorrect beckons.
Exception Dictionary Entry: Enter the word or phrase you wish to exempt from automatic capitalization into the “Replace” field. This serves as the trigger for the exception. In the “With” field, leave it blank to maintain the desired lowercase format.
Confirming the Exception: Click “Add” to confirm the exception entry. This action essentially instructs Microsoft Word to overlook the specified word or phrase when applying automatic capitalization rules.
Review and Modify: Regularly review the exception dictionary to ensure it aligns with your evolving writing requirements. Modify entries as needed, accommodating changes in terminology or project-specific nuances.
Ensuring Specific Words Remain Unaffected
In the dynamic landscape of writing, certain words or instances carry a unique significance that transcends conventional capitalization norms. Ensuring their preservation requires a vigilant approach:
Proper Nouns and Technical Terms: Designate proper nouns and technical terms as exceptions to safeguard their integrity. In industries where specific terms must retain their original casing, this approach prevents unintentional formatting alterations.
Quotations and Dialogue: Maintain the authenticity of quotations and dialogue by exempting them from auto-capitalization. This ensures that the original intent and style of quoted content remain unaltered.
Acronyms and Abbreviations: Preserve the intended casing of acronyms and abbreviations critical to the context. Auto-capitalization might inadvertently alter their meaning, making exceptions imperative for clarity.
Stylized Writing: For creative works or stylized writing where intentional deviation from standard capitalization is a deliberate choice, exceptions become the guardian of the writer’s artistic expression.
Empowering Writers with Precision
Creating exceptions within the realm of automatic capitalization is an art that empowers writers with a level of precision that transcends the one-size-fits-all approach. It allows for the preservation of linguistic nuances, industry-specific terminology, and the unique cadence of each writer’s voice. As you embark on this journey of exception crafting within Microsoft Word, envision it as sculpting your prose with a chisel, ensuring that specific words and instances emerge unscathed by the sweeping brushstrokes of auto-capitalization. This level of customization transforms the writing process from a technical exercise into a nuanced art form, where the rules serve the writer, not the other way around.
Auto-Capitalization in Tables and Forms
Within the intricate tapestry of Microsoft Word’s auto-capitalization prowess, navigating the structured domains of tables and forms presents a unique set of challenges and opportunities. This segment unveils essential tips for ensuring consistent capitalization in these formatted realms and delves into the nuanced strategies for overcoming challenges specific to tables and forms.
Tips for Ensuring Consistent Capitalization
In the world of tables and forms, where information is organized with meticulous precision, maintaining consistent capitalization is imperative for readability and professionalism. Here are key tips to ensure the seamless application of auto-capitalization within these structured documents:
Utilize Cell Formatting: Leverage cell formatting options to align the capitalization of text within individual cells. This ensures that content retains a uniform appearance, particularly useful when dealing with diverse data sets.
Apply Table Styles: Microsoft Word offers a range of predefined table styles. Choose a style that complements your document’s aesthetic while adhering to your capitalization preferences. Consistency in table styles extends to consistent capitalization, contributing to a polished presentation.
Customize Heading Rows: In tables, where heading rows play a pivotal role in providing context, customize the capitalization of these rows to adhere to established norms. This not only aids in clarity but also maintains a professional and organized appearance.
Use Form Field Properties: When dealing with forms, explore the properties of form fields to enforce specific capitalization rules. Tailor these properties based on the nature of the information being collected, ensuring a harmonious blend of structure and style.
Overcoming Challenges Specific to Structured Documents
While the benefits of auto-capitalization in tables and forms are evident, challenges unique to structured documents necessitate strategic solutions. Acknowledging and overcoming these challenges ensures a seamless writing experience:
Handling Dynamic Content: In dynamic documents with content subject to frequent updates, auto-capitalization may face challenges in maintaining consistency. Regularly review and update auto-capitalization settings to align with evolving content.
Addressing User Input in Forms: Forms often involve user input, introducing the potential for varied capitalization styles. Implement validation checks and provide clear instructions to users regarding the desired capitalization format, minimizing inconsistencies.
Navigating Multilingual Tables: For tables containing multilingual content, each with its unique capitalization rules, employ language-specific settings. This mitigates the risk of auto-capitalization misinterpretation in documents with diverse linguistic elements.
Customizing Auto-Correct Options: Beyond auto-capitalization, delve into the broader spectrum of auto-correct options. Customize corrections based on the specific challenges posed by structured documents, creating a fail-safe mechanism for maintaining writing standards.
Harmony in Structure and Style
Auto-capitalization, when applied judiciously within tables and forms, becomes the linchpin that harmonizes structure and style in structured documents. These tips not only facilitate consistency but elevate the visual appeal and professionalism of information presented in tabular or form format. As writers navigate the intricate landscape of structured documents, envision auto-capitalization as a subtle yet powerful ally, ensuring that each cell and form field contributes to a cohesive and refined document. Let your tables and forms not only convey information but also resonate with the precision and elegance afforded by the seamless integration of auto-capitalization.
Using Keyboard Shortcuts
In the realm of efficient word processing, mastering the art of manual capitalization through keyboard shortcuts emerges as a skill that transcends mere convenience; it becomes a power move, a testament to the dexterity of a writer navigating the digital expanse. This segment introduces the uninitiated to the world of keyboard shortcuts for manual capitalization, unveiling a suite of commands that swiftly transform lowercase letters into uppercase champions.
Introducing Keyboard Shortcuts for Manual Capitalization
The keyboard, akin to a maestro’s baton, orchestrates the symphony of words on a digital canvas. Here’s a primer on the keyboard shortcuts that metamorphose the casing of your text with a few deft strokes:
Shift + F3: A versatile shortcut that toggles between lowercase, uppercase, and title case. Select the text you wish to transform and press Shift + F3 to witness the instant metamorphosis.
Ctrl + Shift + A: A gem for those who prefer the nuanced touch of sentence case. Highlight the desired sentence and employ Ctrl + Shift + A to capitalize the initial letter of each selected word.
Ctrl + Shift + K: An underappreciated ally, especially when dealing with acronyms or abbreviations. Select the target and deploy Ctrl + Shift + K to switch between uppercase and lowercase effortlessly.
Ctrl + Shift + U: The unsung hero for those seeking a rapid shift to uppercase glory. Select the text in question and invoke Ctrl + Shift + U to witness an instantaneous transition.
How to Capitalize Words, Sentences, or Paragraphs Swiftly
Efficiency in writing is often synonymous with speed, and keyboard shortcuts offer a express lane to capitalize words, sentences, or paragraphs without the laborious drag of a mouse. Here’s a step-by-step guide:
Navigate to the Target Text: Use your arrow keys or mouse to position the cursor at the beginning of the word, sentence, or paragraph you wish to capitalize.
Select the Text: Employ the Shift key in tandem with your arrow keys or, for broader strokes, hold down the left mouse button and drag to encompass the target text.
Execute the Shortcut: With the text highlighted, execute the relevant keyboard shortcut based on your capitalization preference. Whether it’s a single word, a sentence, or an entire paragraph, the transformation is swift and seamless.
Refine as Needed: For nuanced adjustments, such as transitioning between title case and sentence case, or toggling acronyms, refine your selection and apply the corresponding shortcut.
A Symphony of Efficiency at Your Fingertips
In the fast-paced realm of digital content creation, keyboard shortcuts emerge as the unsung heroes, enabling writers to navigate the intricate dance of capitalization with unparalleled speed and finesse. As you familiarize yourself with these shortcuts, envision your keyboard as a trusty accomplice, responding to your commands with the precision of a seasoned collaborator. Whether it’s a single word demanding emphasis or an entire paragraph seeking a bold proclamation, let the symphony of efficiency orchestrated by these keyboard shortcuts elevate your writing experience. In the realm of digital composition, where every stroke matters, mastering these shortcuts is akin to unlocking a secret passage to a realm where words bow to your command.
Reviewing Auto-Capitalization Settings
Credit: office-watch.com
In the dynamic landscape of digital writing, where the nuances of language continually evolve, the periodic review of auto-capitalization settings within Microsoft Word emerges as a strategic imperative. This section delves into the crucial practice of regularly checking and updating these settings to ensure accuracy and alignment with evolving writing requirements.
Periodic Check on Auto-Capitalization Settings for Accuracy
Auto-capitalization, while a steadfast companion in the realm of word processing, is not immune to the subtle shifts in language conventions and individual writing preferences. To maintain precision and uphold the integrity of your prose, a periodic check on auto-capitalization settings is essential. Here’s a structured approach to this practice:
Navigate to AutoCorrect Options: Access the “File” menu, proceed to “Options,” and select “Proofing.” Within this tab, locate and click on “AutoCorrect Options.” This gateway provides a comprehensive view of the auto-capitalization settings.
Inspect Language-Specific Rules: Language nuances influence capitalization rules, and Microsoft Word accommodates this with language-specific settings. Ensure that the chosen language aligns with the linguistic requirements of your content, preventing inadvertent capitalization errors.
Verify Title Case and Sentence Case Rules: Auto-capitalization often involves distinctions between title case and sentence case. Review and verify that the rules governing these two cases accurately reflect your writing conventions, maintaining consistency throughout your document.
Check Exceptions and Custom Entries: Auto-capitalization exceptions and custom entries in the dictionary warrant scrutiny. Ensure that specific words or phrases requiring unique capitalization treatment remain accounted for, aligning with your stylistic preferences.
How to Update or Modify Settings as Writing Requirements Evolve
Writing is a dynamic process, and as your projects evolve, so should your auto-capitalization settings. Adaptability is key to maintaining a seamless writing experience. Here’s a strategic guide on updating or modifying settings as your writing requirements shift:
User-Defined Styles: For projects with distinct stylistic requirements, leverage the power of user-defined styles. Tailor these styles to incorporate specific auto-capitalization preferences, providing a cohesive and standardized look across your document.
Adjusting for Industry Norms: Different industries may adhere to specific capitalization norms. Stay attuned to these norms and adjust your auto-capitalization settings accordingly, ensuring your writing aligns with the expectations of your audience or sector.
Regularly Review Style Guides: If your writing adheres to a particular style guide, whether it’s APA, Chicago, or another, incorporate the recommended capitalization conventions into your settings. Regularly reviewing and aligning with established style guides maintains a professional and standardized approach.
Responding to Feedback: If you receive feedback or encounter instances where auto-capitalization may not align with your intent, use this information to refine your settings. The iterative nature of writing demands responsiveness to feedback for continuous improvement.
Striking the Balance between Consistency and Flexibility
In the ever-evolving landscape of digital writing, reviewing and updating auto-capitalization settings within Microsoft Word is not merely a maintenance task; it’s a strategic maneuver. It strikes the delicate balance between consistency, a hallmark of professional writing, and the flexibility to adapt to the dynamic nature of language and industry conventions. As you navigate this terrain, envision auto-capitalization settings as a finely tuned instrument, harmonizing with the cadence of your words and the evolving requirements of your writing endeavors. In the pursuit of linguistic excellence, the periodic review of these settings is not just a routine; it’s a commitment to precision, ensuring that your written expression remains a testament to the evolving artistry of language.
Best Practices for Professional Documents
In the meticulous craft of creating professional documents, the judicious incorporation of auto-capitalization emerges as a linchpin for imparting a polished and consistent appearance to written content. This segment explores the symbiotic relationship between auto-capitalization and broader strategies for elevating document professionalism, providing insights into the nuanced art of presenting written material with finesse.
Incorporating Auto-Capitalization into a Broader Strategy for Document Professionalism
Effortless and effective, auto-capitalization transcends its utilitarian role to become a cornerstone in the architecture of professional documents. Here’s a strategic playbook for seamlessly integrating auto-capitalization into a broader strategy:
Define Style Guidelines: Begin by establishing clear style guidelines that reflect the professional ethos of your organization or industry. Outline preferences for title case, sentence case, and any industry-specific conventions that govern capitalization.
Customize Auto-Capitalization Settings: Harness the power of Microsoft Word’s auto-capitalization settings to align with your predefined style guidelines. Tailor settings for acronyms, exceptions, and specific words that demand distinctive capitalization treatment, ensuring a harmonious flow throughout the document.
Consistency Across Sections: In large documents or reports with distinct sections, maintain consistency in capitalization rules. Auto-capitalization settings should seamlessly transition from the introduction to the body and onward to the conclusion, presenting a unified and professional aesthetic.
Prioritize Readability: Beyond adherence to rules, prioritize readability. Use auto-capitalization judiciously to enhance the clarity and comprehension of your content. Ensure that headings, subheadings, and other capitalized elements contribute to a reader-friendly experience.
Ensuring a Polished and Consistent Appearance in Written Content
The quest for document professionalism extends beyond grammar and syntax; it delves into the realm of visual appeal and coherence. Auto-capitalization, when wielded with finesse, plays a pivotal role in ensuring a polished and consistent appearance in written content. Here’s how to master this delicate art:
Utilize Heading Styles: Leverage the heading styles available in Microsoft Word to create a hierarchical structure within your document. Auto-capitalization seamlessly integrates with these styles, maintaining a polished and organized visual hierarchy.
Precision in Formal Communications: In formal communications such as business letters, proposals, or official reports, auto-capitalization serves as a silent guardian of professionalism. Configure settings to align with the formality required in these contexts, presenting a document that exudes competence and attention to detail.
Dynamic Adaptation to Content Changes: Professional documents often undergo iterations and revisions. Auto-capitalization settings should dynamically adapt to content changes, effortlessly accommodating modifications in text length, structure, or emphasis while preserving the overall professionalism of the document.
Accessibility Considerations: Recognize the role of auto-capitalization in enhancing document accessibility. Consistent and well-implemented capitalization aids readers, especially those with visual impairments, in navigating and comprehending the content more effectively.
The Artistry of Auto-Capitalization in Professional Expression
In the realm of professional documents, where first impressions wield profound influence, the artistry of auto-capitalization emerges as a subtle yet potent force. It transforms written content into a visual symphony of coherence, guiding the reader through a structured narrative that exudes professionalism. Like a skilled conductor orchestrating a masterpiece, wield auto-capitalization judiciously, allowing it to enhance, not overpower, the eloquence of your written expression. In the interplay of rules, style, and the nuanced dance of letters, auto-capitalization stands as a testament to the commitment to presenting documents that not only convey information but also elevate the very act of reading into an aesthetically pleasing experience.
Frequently asked questions
How can I make Microsoft Word capitalize the first letter of each sentence automatically?
To automate capitalization of the first letter in each sentence on Microsoft Word, follow these steps:
Open Microsoft Word: Launch the Word application on your computer.
Navigate to Proofing Options: Go to the “File” menu, select “Options,” and choose “Proofing.”
Access AutoCorrect Options: Within the Proofing options, find and click on “AutoCorrect Options.”
Enable Capitalization: In the AutoCorrect tab, check the box that says “Capitalize first letter of sentences.”
Apply and Save Changes: Confirm your selection and click “OK” to apply the changes.
With these settings activated, Microsoft Word will automatically capitalize the initial letter of each sentence as you type, streamlining the formatting process in your documents.
What are the common issues with auto-capitalization in Microsoft Word?
Common issues with Microsoft Word’s auto-capitalization include incorrect settings, especially in the “Proofing” options. Acronyms might be mistakenly capitalized, requiring manual adjustment. In structured documents like tables, auto-capitalization may not consistently apply. Special cases and exceptions may not be handled accurately, necessitating custom entries in the program’s dictionary. Additionally, formatting inconsistencies in different document sections can disrupt the auto-capitalization flow. Ensure uniformity to prevent discrepancies.
Can I customize the auto-capitalization settings for specific documents?
Yes, Microsoft Word allows customization of auto-capitalization settings for specific documents. Navigate to the “File” menu, select “Options,” and choose “Proofing.” Click on “AutoCorrect Options” and go to the “AutoCorrect” tab. Here, you can customize auto-capitalization settings for the current document by adding specific entries or exceptions. This enables tailored capitalization rules that suit the unique requirements of individual documents. Ensure to apply these changes specifically to the document in question, offering a flexible and personalized approach to auto-capitalization within Microsoft Word.
Are there keyboard shortcuts for capitalizing text in Microsoft Word?
Certainly, Microsoft Word offers convenient keyboard shortcuts for capitalizing text swiftly. To capitalize a single letter, place the cursor before the letter and press “Shift” along with the desired letter. For capitalizing an entire word, highlight the word and press “Shift” + “F3.” Repeating this command toggles between uppercase, lowercase, and title case. Additionally, to capitalize a sentence or paragraph, select the text and press “Ctrl” + “Shift” + “K.” These shortcuts enhance efficiency and provide quick control over text capitalization, streamlining the writing process in Microsoft Word.
How does Quick Correct enhance auto-capitalization in Word?
Quick Correct in Microsoft Word enhances auto-capitalization by providing a dynamic and intuitive tool for real-time corrections. It augments the auto-capitalization feature by swiftly identifying and rectifying capitalization errors as you type. For instance, if a sentence begins without proper capitalization, Quick Correct automatically adjusts it. This ensures a seamless writing experience, maintaining consistent and accurate capitalization throughout your document. By proactively addressing errors, Quick Correct streamlines the proofreading process, reducing the need for manual corrections and enhancing the overall professionalism of your written content in Word. It acts as a valuable companion to auto-capitalization, promoting accuracy and efficiency in your document creation.
What are the best practices for maintaining consistent capitalization in professional documents?
Maintaining consistent capitalization in professional documents is crucial for a polished appearance. Firstly, adhere to a specific style guide, ensuring uniformity. Proofread diligently to catch discrepancies and use tools like Microsoft Word’s auto-capitalization features. Create a customized dictionary for exceptions and special cases. When collaborating, establish capitalization guidelines with team members. Additionally, pay attention to acronyms and ensure they follow the intended style. Utilize software tools that assist in maintaining uniform capitalization throughout the document. By implementing these best practices, you enhance the overall professionalism and readability of your written content, presenting a cohesive and well-crafted document to your audience.
Have you ever wondered how to make a fake newspaper article that looks so real it could almost fool anyone? In a world where information can be manipulated, it can be fascinating to learn how to make a convincing fake newspaper article. The key to being effective is not only understanding deception; it’s also learning how to use media responsibly and how to use it correctly.
Creating a convincing fake newspaper article in Microsoft Word requires a combination of formatting, storytelling, and visual elements to appear genuine. You can do whatever you want by reading this article, whether you’re looking for a prank or a creative project, and you’ll learn everything there is to know about misinformation.
Let’s dive into the world of fake news writing, where you can create convincing articles that your readers will be taken aback by – or even be taken aback by. So, are you ready to embark on this intriguing journey of creativity and responsibility?
You’ll learn how to create a compelling and authentic-looking piece of news in just a few simple steps with Microsoft Word, and if you’re ready, we’ll show you how to create a fake newspaper article that’s virtually indistinguishable from the real thing.
How do I make fake news articles not only look real but also adhere to ethical standards and respect the power of information?
You should think about how fake news affects our society before continuing. As you read on, you’ll discover that creating a fake newspaper article is not simply about design and content; it is a reflection of our responsibility in the digital age. Through our investigation into creating a convincing fake newspaper article, we will learn how to combine creativity and ethics. What do you think are the implications of this skill in today’s media landscape?
Understanding the Motivation
Photo by – verywellmind
In a digital age where information is both abundant and malleable, one might ponder the motivation behind creating a fake newspaper article within the confines of Microsoft Word. This seemingly unconventional endeavor finds its allure in a variety of intriguing reasons, each serving as a unique facet of human ingenuity and curiosity. Why would someone embark on such a creative journey? Let’s delve into the complex tapestry of motivations that often interweave in this craft:
Artistic Expression and Creativity: At its core, crafting a fake newspaper article is a canvas for artistic expression. It allows individuals to flex their creative muscles, constructing narratives that captivate and challenge the imagination. Much like a novelist or a screenwriter, a digital wordsmith seeks to tell a story, albeit in the format of a news article, with Microsoft Word serving as the pen and paper.
Educational Experimentation: For some, delving into the realm of fake newspaper articles represents a valuable learning experience. It’s an opportunity to understand the dynamics of the media, learning how news is presented, structured, and what elements make it believable or dubious. By creating a fake article, one can gain insights into the media’s inner workings and its potential vulnerabilities.
Social Commentary and Satire: Fake newspaper articles can be a vessel for social commentary and satire. They allow creators to mimic the tone and style of established publications to deliver poignant messages or humorous critiques on contemporary issues. This form of artistic protest can serve as a powerful tool for shedding light on societal concerns and sparking important conversations.
Pranks and Entertainment: Much like a magician performing sleight of hand, crafting a fake newspaper article can be an act of entertainment. The thrill of fooling friends or colleagues with a well-crafted faux news story adds a layer of intrigue to the endeavor. It’s the digital age’s version of a practical joke, a form of playful deception.
Creative Writing Practice: Aspiring writers often use the creation of fake newspaper articles as an exercise to refine their craft. It challenges them to emulate the style, tone, and structure of authentic journalism, honing their storytelling abilities. In doing so, they explore the fine line between fact and fiction, improving their writing skills along the way.
Now, as we unravel the motivations that drive individuals to craft these deceptive narratives, it’s crucial to address the elephant in the room—the ethical implications. To create a fake newspaper article is to tiptoe on the ethical precipice of information dissemination. It’s here where one must tread carefully, aware of the broader consequences of their actions.
The ethical dilemmas that arise are manifold and profound. False information can sow confusion, perpetuate myths, and even incite panic in an already tumultuous digital landscape. In a world where trust in media is paramount, engaging in the creation of fake news challenges the very foundations of journalistic integrity.
By delving into this craft, one must reckon with questions of authenticity, accountability, and the potential to harm individuals or communities. The responsibility to discern fact from fiction is a core principle of ethical journalism, and straying from this path raises significant concerns about the power and reach of misleading information.
Gathering Necessary Materials
When embarking on the intriguing journey of crafting a convincing fake newspaper article in Microsoft Word, one must first assemble a toolbox of essential materials and information. The success of this endeavor hinges on meticulous preparation, attention to detail, and access to reliable sources. Let’s delve into the core aspects of gathering the necessary materials:
**1. Imagination and Creativity: Before delving into the technicalities, it’s vital to tap into your wellspring of creativity. The most important material you possess is your imagination. It’s the foundation upon which you’ll construct your narrative, lending authenticity and depth to your fake newspaper article.
**2. Microsoft Word: A powerful word processing tool, Microsoft Word is your primary platform for creating the article. Ensure that you have the latest version, as it offers a wide array of formatting options, fonts, and templates to make your article appear genuinely newspaper-like.
**3. News Articles for Reference: To create a convincing fake news article, you must first understand what real news articles look like. Collect a selection of credible news articles from reputable sources. These will serve as your reference materials, guiding you on the structure, tone, and style of authentic news content.
**4. Images and Graphics: Visual elements are crucial in mimicking a real newspaper article. Gather relevant images, photographs, and graphics that complement your story. Ensure that you have the necessary permissions to use these visuals, respecting copyright laws.
**5. Factual Information: If your fake news article includes specific data or facts, ensure they are accurate. Factual information must be well-researched and properly cited, even in a fictitious piece, to maintain credibility and ethical standards.
**6. Templates and Fonts: Select appropriate newspaper-style templates and fonts. This choice can significantly impact the overall look and feel of your article. Utilize fonts commonly found in newspapers, and templates that resemble the layout of real newspapers.
**7. Plagiarism Checkers: To maintain ethical standards and ensure the originality of your content, consider using plagiarism checkers or tools like Copyscape. This step is essential to avoid any unintentional content duplication.
**8. Style Guides: Familiarize yourself with the style guides used by reputable newspapers. Whether it’s the Associated Press (AP) Stylebook or The New York Times Manual of Style and Usage, adhering to these guides will enhance the authenticity of your article.
**9. Editorial Guidelines: Create a set of self-imposed editorial guidelines to follow throughout the crafting process. Consistency in style, tone, and formatting is crucial for a convincing result.
**10. Ethical Considerations: Never underestimate the importance of ethical considerations. Though you’re creating a fake article, it’s imperative to respect ethical boundaries, especially concerning sensitive subjects or controversial content.
In this dynamic and creative process, gathering the necessary materials is akin to assembling the building blocks of a captivating story. It’s about nurturing your imagination, mastering the tools at your disposal, and understanding the intricacies of genuine news articles. As you immerse yourself in this art, remember that your quest for authenticity should be balanced with a commitment to ethical standards, ensuring that your creative endeavor remains responsible and respectful of the power of the written word.
Setting Up Microsoft Word
Image taken by: https://addintools.com
As you embark on the journey of crafting a convincing fake newspaper article within Microsoft Word, the initial setup of this versatile word processing software is crucial. The way you configure your document can make all the difference in achieving an authentic newspaper-like appearance. Here, we’ll provide a step-by-step guide to ensure your Microsoft Word is tailored for this task and share essential tips for selecting the right page layout, font, and margins.
Configuring Microsoft Word: A Step-by-Step Guide
Open Microsoft Word: Launch Microsoft Word on your computer. If you don’t have it installed, ensure you download and install a recent version, as it offers more features and customization options.
Select a Blank Document: When prompted to choose a document type, select “Blank Document.” This provides a clean slate for your newspaper article.
Page Orientation: Under the “Layout” tab, select “Orientation.” Choose “Portrait” for a traditional newspaper article layout.
Page Size: Click on “Size” within the “Layout” tab and select the appropriate page size. A common newspaper size is 11×17 inches. Custom dimensions can also be set as per your requirements.
Margins: To create the column layout typical of newspapers, navigate to “Margins” under the “Layout” tab. Choose “Custom Margins” and set left and right margins to around 0.5 inches for a classic newspaper look.
Selecting Fonts, Margins, and Page Layout: Essential Tips
Font Selection: The choice of font can dramatically influence the authenticity of your newspaper article. Opt for classic, serif fonts such as Times New Roman or Georgia. Ensure readability, and consider using bold for headlines. For body text, a font size of 10-12 points is generally suitable.
Headlines and Subheadings: Differentiate headlines and subheadings by using larger, bold fonts. This draws the reader’s attention to key points and creates a hierarchy within your article.
Columns: In the “Layout” tab, select “Columns” to divide your document into two or more columns. For a newspaper-like appearance, two columns often suffice. Adjust the column width as needed.
Line Spacing: Maintain a line spacing of 1.5 to 2.0 for readability and to mimic the layout of real newspaper articles.
Text Alignment: Justified text alignment, where text lines up evenly on both the left and right sides, gives your article a professional and newspaper-like appearance.
Headers and Footers: Include headers and footers with the newspaper’s title, page numbers, and publication date for added authenticity.
Images and Captions: Position images within the text, and add captions below. Ensure images are aligned appropriately and relevant to the content.
Formatting Consistency: Throughout your document, maintain consistency in font style, size, and formatting. This ensures your article looks cohesive and professional.
Consider Templates: To streamline the process, you can find newspaper-style templates for Microsoft Word online. These templates come preconfigured with fonts, margins, and layouts that mimic real newspapers.
Creating a Believable Headline
In the realm of crafting a convincing fake newspaper article, the headline stands as the gatekeeper to your readers’ interest. It’s the first impression, the spark that ignites curiosity, and the cornerstone of a credible façade. Composing an attention-grabbing and credible headline is a delicate art, one that requires a nuanced approach to captivate your audience while maintaining an air of authenticity.
Guidelines for Composing an Attention-Grabbing and Credible Headline
Relevance: Your headline should succinctly reflect the central theme of your article. It must be directly related to the content, ensuring readers aren’t misled by an intriguing but unrelated headline.
Clarity: Keep it clear and concise. Avoid jargon or complex language that might confuse readers. A good headline communicates the essence of the story at a glance.
Use Action Words: Incorporate strong action verbs to infuse energy into your headline. These words evoke a sense of immediacy and engagement, drawing readers in. For example, “Unveiling,” “Exposing,” “Unmasking.”
Balance Creativity with Credibility: While creativity is key, it’s equally important to maintain a level of credibility. The headline should grab attention but not resort to hyperbole or false claims that undermine the trustworthiness of the article.
Be Specific: Specificity generates interest. Include details that pique curiosity without revealing the entire story. Readers should feel the urge to learn more by delving into the article.
Tips for Using Fonts, Sizes, and Styles to Match a Real Newspaper
Font Selection: When it comes to mimicking the aesthetics of a real newspaper, the choice of font is paramount. Opt for classic, serif fonts such as “Times New Roman,” “Georgia,” or “Baskerville.” These fonts exude an air of tradition and credibility.
Font Size: Maintain consistency in font size within the headline. Usually, headlines are larger than the body text. Consider a font size that’s around 24 to 36 points for the headline, making it easily noticeable.
Font Style: Bold fonts work well for headlines as they grab attention. You can use variations like “bold,” “bold italic,” or “small caps” to achieve a newspaper-style look.
Alignment: Headlines are typically centered for a classic newspaper appearance. However, left alignment can also be used for a modern touch. Make sure your headline is aligned consistently throughout the article.
Color: Black is the go-to color for newspaper headlines. Avoid vibrant or distracting colors. Simple, monochromatic designs are best.
Capitalization: Most newspaper headlines use sentence case, where only the first letter of the headline and proper nouns are capitalized. This lends a professional and traditional appearance.
Spacing: Adequate spacing around the headline ensures it doesn’t look cramped. Adjust the line spacing and margins as needed to create a balanced layout.
Italics and Underlining: Occasionally, newspapers use italics or underlining to emphasize specific words in a headline. Use these sparingly and strategically to enhance the impact.
In crafting your headline, you’re essentially creating a promise to your readers. It’s a commitment to delivering valuable, engaging content that aligns with their expectations. By adhering to these guidelines and employing the suggested tips for fonts, sizes, and styles, you can ensure that your headline not only captivates your audience but also preserves the aura of authenticity essential to a convincing fake newspaper article. The headline is your first and most crucial opportunity to forge a connection with your readers, making it a key element in your journey to crafting a piece that stands out amid the digital clutter.
Crafting the Body Text
Image by – wp.com
In the intricate art of creating a convincing fake newspaper article, the body text serves as the canvas upon which your narrative takes shape. This section is where you weave the story, where the details unfold, and where your readers embark on a journey of curiosity and engagement. To master this craft, it’s essential to understand the structural components of the article and maintain a consistent tone that echoes the authenticity of genuine journalism.
Explaining How to Structure the Article: Lead, Body, and Conclusion
The Lead: Much like a compass guiding the way, the lead or opening paragraph should captivate your readers from the get-go. Start with a compelling, attention-grabbing statement that entices them to read further. It should convey the essence of the story and raise questions in the reader’s mind, setting the stage for what’s to come.
The Body: This is the heart of your article, where you unfold the narrative in a structured, coherent manner. Organize your content logically, maintaining a clear flow of ideas. Use paragraphs to break up content and avoid long, monotonous blocks of text. Incorporate relevant facts, details, and quotes to lend credibility to your narrative. Remember, the body text should gradually reveal the story, building anticipation and curiosity as readers progress.
The Conclusion: Much like a graceful exit, the conclusion wraps up the article, leaving readers with a satisfying sense of closure. Summarize the key points, reiterate the most important takeaways, and leave a thought-provoking or memorable statement. A strong conclusion ensures that readers finish the article feeling enlightened and fulfilled.
Tips for Maintaining a Consistent Tone Throughout the Article
Emulate Credibility: To create an article that mimics a real newspaper, maintain a tone of credibility throughout. Write in a formal, authoritative style that befits journalism. Avoid overly casual language or unnecessary jargon.
Use Third-Person Perspective: Newspaper articles traditionally employ the third-person perspective. Refrain from using the first-person (I, we) or the second-person (you) to maintain a professional tone.
Objective Reporting: In the body text, stick to objective reporting. Present facts, events, and viewpoints impartially, without inserting personal opinions or biases. This is a hallmark of credible journalism.
Avoid Sensationalism: While your story may be intriguing, resist the temptation to embellish or sensationalize. Maintain a level of restraint, focusing on providing factual information rather than embellishing for dramatic effect.
Cite Sources: If your fake news article includes data, quotes, or references, cite them appropriately, as you would in a genuine article. Proper citations contribute to the perception of authenticity.
Proofreading and Editing: Ensure your article is free from grammatical errors, typos, or inconsistencies. A well-edited piece enhances credibility and readability.
Consistency in Style: From start to finish, keep the style consistent. This includes maintaining uniform font styles and sizes, proper headings, and formatting that resembles real newspapers.
In the intricate dance of crafting a fake newspaper article, the body text is where your storytelling prowess comes to the fore. By following the structural guidelines and mastering the art of maintaining a consistent, authoritative tone, you can create a piece that not only captivates but also convinces. The body text is the vessel through which your narrative sails, and by navigating it skillfully, you can embark on a creative journey that captivates and engages your readers.
Adding Images and Visual Elements
In the realm of creating a persuasive fake newspaper article, the incorporation of images and visual elements plays a pivotal role in not only enhancing the overall authenticity but also in capturing the reader’s attention. This section dives into the intricacies of inserting images, photographs, and graphics, along with essential tips on resizing, aligning, and captioning these visuals to maintain a realistic façade.
Instructions on Inserting Images, Photographs, and Graphics
Image Selection: Start by choosing images that are relevant to your fake news story. Seek high-quality visuals that align with the article’s content. Consider images that are free from watermarks or copyrights, ensuring you have the right to use them.
Inserting Images: In your Microsoft Word document, click where you want to insert an image. Navigate to the “Insert” tab and select “Pictures.” Choose the image file from your computer and click “Insert.”
Image Resizing: Maintain realism by resizing images appropriately. To resize, select the image, click on the corner, and drag it to adjust its dimensions. Be cautious not to distort the image; holding the Shift key while resizing can help maintain the original aspect ratio.
Image Alignment: Position images as they would appear in a real newspaper. Use alignment options such as left, right, or center to make them seamlessly blend with the text. Ensure consistent alignment throughout the article.
Tips for Resizing, Aligning, and Captioning Images Realistically
Captioning: Each image should be accompanied by a concise and informative caption. The caption should provide context, describe the image, and contribute to the reader’s understanding of the story.
Maintain Consistency: In a real newspaper, visual elements follow a consistent format. Use the same font and font size for all image captions. Consistency in formatting reinforces the illusion of authenticity.
Spacing: Maintain proper spacing between images and text. Avoid crowding visuals with text or overloading one section with too many images. Balance is key to a realistic appearance.
Attribution: If you’re using images from external sources, provide proper attribution in the caption, indicating the source or photographer’s name. This is not only ethical but also enhances credibility.
Realistic Imagery: When selecting visuals, consider the realism of the images. Ensure they match the context of the story and don’t appear staged or artificial. Realistic imagery reinforces the believability of the article.
Size Variation: Real newspapers often include a mix of image sizes. Some images may be larger and more prominent, while others are smaller. Vary the sizes of your visuals to mimic this pattern.
Avoid Over-Editing: Excessive image editing, filters, or other manipulations can give away the fact that the article is fake. Keep image editing to a minimum to maintain a realistic appearance.
Complement the Story: Choose visuals that complement and enhance the narrative. An image should add value to the article by reinforcing or expanding on the story.
In the realm of crafting a fake newspaper article, images and visual elements are the threads that weave the tapestry of authenticity. By adhering to the guidelines for image selection, insertion, resizing, and alignment, and by following the tips for maintaining realism in captioning and spacing, you can create an article that not only captures the reader’s attention but also maintains the illusion of a genuine newspaper. These visual elements serve as the glue that binds your narrative together, making it a compelling and immersive experience for your audience.
Formatting the Newspaper Layout
Creating a fake newspaper article that exudes authenticity relies heavily on the visual presentation. To achieve this, it’s essential to meticulously format the newspaper layout. Detailed steps and advice on using columns, text boxes, and other formatting tools will help transform your document into an article that closely resembles one from a genuine newspaper.
Detailed Steps to Make the Article Look Like It’s From a Genuine Newspaper
Column Layout: Begin by formatting your document into multiple columns, as seen in real newspapers. To achieve this in Microsoft Word, go to the “Layout” tab, select “Columns,” and choose the appropriate column count. Typically, newspapers have two or three columns.
Headings and Subheadings: Employ bold and distinct headings for different sections of your article. Use larger font sizes for headlines and subheadings, and align them consistently. Real newspapers use large, bold fonts for headlines to draw attention.
Justified Text: Align your text to justify it. This means that both the left and right edges of the text are straight. Justified text creates a clean and professional appearance, mimicking the look of newspapers.
Masthead and Date: Include a masthead at the top of your article, featuring a newspaper name (invented for your story) and a fake publication date. Ensure the masthead resembles the style used by real newspapers.
Images and Captions: Integrate images within the columns of your text. Add captions beneath the images in a smaller font size to provide context. The use of visuals is commonplace in newspapers.
Text Boxes: Create text boxes for quotes, important information, or side stories. This simulates the way newspapers highlight specific content in boxes to make it stand out.
Advice on Using Columns, Text Boxes, and Other Formatting Tools
Text Size and Font: Maintain a consistent text size and font throughout the article. Real newspapers usually use standard fonts like “Times New Roman” or “Arial.” Ensure that headlines, subheadings, and body text have distinct font sizes.
Column Width: Adjust the width of your columns to create a balanced and professional look. Avoid overly narrow or wide columns. Newspapers typically have a width that’s around 9-10 words per line.
Line Spacing: Opt for appropriate line spacing to make the text legible. A line spacing of 1.15 or 1.5 provides a clear and readable appearance.
Page Layout: Set margins and page dimensions that resemble those of a newspaper. In Microsoft Word, you can customize the page size to replicate the format of a standard newspaper.
Bylines and Credits: Include a byline under the article’s title, with the name of the fictional author. Also, consider adding credit lines for images or information sources, if applicable.
Fold Marks: If your article includes fold marks or a simulated crease where a physical newspaper would be folded, it can add a touch of realism. Ensure these marks are subtle and do not disrupt the readability.
Consistency is Key: The key to creating a convincing newspaper layout is consistency. Ensure that fonts, text sizes, alignments, and spacing are uniform throughout the article.
Review Real Newspapers: Study real newspapers to understand their layout and formatting. This will help you mimic their style more accurately.
By following these detailed steps and advice on formatting, you can transform a standard Word document into a newspaper article that looks remarkably genuine. A well-structured layout, complete with columns, headings, and text boxes, is the cornerstone of creating a fake newspaper article that convincingly mirrors the appearance of authentic journalism. The devil is in the details, and by paying close attention to the visual presentation, you can craft an article that captivates and convinces your readers.
Proofreading and Fact-Checking
In the intricate realm of crafting a fake newspaper article, the final steps hold paramount importance, emphasizing the need for meticulous proofreading and fact-checking. These crucial measures not only contribute to the overall quality of your article but also play a pivotal role in enhancing its credibility and authenticity.
Emphasize the Importance of Reviewing the Article for Errors and Inconsistencies
Grammar and Spelling: Begin the proofreading process by meticulously examining your article for grammatical errors and spelling mistakes. Correct any typos, misspellings, or punctuation errors. Inconsistent language usage can detract from the article’s authenticity.
Clarity and Coherence: Ensure that the text flows logically and coherently. Check for sentence structure, paragraph transitions, and overall readability. Readers expect a level of professionalism, even in fake articles.
Consistency in Style: Verify that the writing style remains consistent throughout the article. This includes maintaining uniform fonts, sizes, and headings. Consistency in style contributes to the illusion of authenticity.
Factual Errors: Scrutinize the content for factual inaccuracies, exaggerations, or inconsistencies. Eliminate any claims or statements that could be easily disproven. Your fake news article should be internally consistent and factually plausible.
Highlight the Significance of Fact-Checking to Enhance Credibility
Verify Sources: If your article references external sources, ensure that these sources are either entirely fictional or, if they appear real, that they are not easily debunked. The inclusion of authentic-sounding but fabricated sources can lend an air of credibility.
Double-Check Quotes: If your article includes quotes, review them carefully. Fact-check the authenticity of the quoted individuals or entities. Fabricate quotes that are consistent with the narrative but maintain an aura of realism.
Cite Imaginary Events: In some instances, your fake article may reference events or occurrences that never transpired. Fact-check the plausibility of these events within the context of the story. If they seem improbable, consider revising or omitting them.
Avoid Exaggeration: While crafting a captivating narrative is essential, avoid excessive exaggeration that could raise skepticism. Your goal is to create a compelling, but plausible, story.
Ethical Considerations: Keep in mind the ethical implications of your article. Ensure that your content does not harm individuals, communities, or public sentiment. Responsible fact-checking includes avoiding potentially harmful misinformation.
Editorial Oversight: Consider enlisting the help of a colleague or editor to review your article. A fresh set of eyes can often spot errors or inconsistencies that you might overlook.
Timeframe Verification: Ensure that the timeline of events in your article is consistent and logical. Fact-check the sequence of occurrences to maintain internal coherence.
Legal Implications: Be aware of any potential legal ramifications. Avoid making false claims or statements that could lead to legal issues. Responsible content creation is essential, even when crafting fake articles.
In the art of fabricating a convincing fake newspaper article, the process of proofreading and fact-checking acts as the gatekeeper of credibility and authenticity. Through thorough scrutiny of grammar, clarity, and consistency, coupled with diligent fact-checking and adherence to ethical considerations, your article can effectively blur the line between reality and fiction. Remember, the goal is not just to captivate readers but to immerse them in a world of believability and intrigue, all while upholding responsible and ethical content creation.
Saving and Sharing
Image credit: https://blogspot.com
Saving and Sharing Your Fake Newspaper Article
As you put the finishing touches on your meticulously crafted fake newspaper article, it’s essential to understand the steps for saving and sharing your work, all while navigating the complex terrain of privacy and ethical considerations.
Provide Instructions for Saving the Fake Newspaper Article in Various Formats
Word Document: After completing your article in Microsoft Word, the most straightforward way to save it is in a Word document format (.doc or .docx). To do so, click on “File,” select “Save As,” choose the desired format, and follow the prompts. Saving in Word format ensures that your article remains editable.
PDF Format: If you wish to share your article in a more secure, uneditable format, save it as a PDF. This format is widely accepted and retains the document’s layout and formatting. To save as a PDF, select “Save As” and choose “PDF” from the format options.
Image Formats: If you want to share your article as an image, you can take screenshots of the document or specific sections. Alternatively, save individual pages as image files, such as JPEG or PNG. These formats are ideal for sharing on social media platforms.
HTML Web Page: To simulate an online article, you can save your document as an HTML web page. This format allows you to share your article through a link, replicating the experience of reading news online. Select “Save As” and choose “Web Page (.html)” as the format.
Print or Physical Copy: If your intention is to create a physical copy, you can print the article directly from Microsoft Word. To mimic a real newspaper, consider using newsprint paper and an appropriate layout for a genuine look.
Discuss the Privacy and Ethical Aspects of Sharing Such Content
Privacy Concerns: When sharing a fake newspaper article, it’s crucial to respect the privacy of individuals mentioned or featured in the content. Avoid using real names or personal information that could potentially harm someone’s reputation or violate their privacy.
Transparency: Ethical considerations call for transparency. Clearly label your fake newspaper article as such, leaving no room for confusion. Transparency helps readers differentiate between actual news and fictional content.
Avoid Harm: Ensure that your content does not promote harm, hatred, or misinformation. Responsible content creation involves avoiding sensationalism or content that could negatively impact public sentiment.
Legal Considerations: Be aware of potential legal implications. Avoid making false claims, accusations, or statements that could lead to legal issues. Respect copyright laws when using images or content from other sources.
Contextualize on Social Media: If you intend to share your fake news article on social media, provide context in the post description or caption. Clarify that the article is fictional to prevent confusion or misinterpretation.
Educational and Entertainment Value: Frame your article as a work of fiction or satire, emphasizing its educational or entertainment value. Responsible sharing involves using fake news as a storytelling medium rather than a tool for deception.
Feedback and Discussion: Encourage readers to engage in discussions and provide feedback on the content. Create an open space for dialogue about the fictional elements and storytelling techniques used in your article.
Remove on Request: If anyone featured in your article expresses discomfort or requests its removal, consider their concerns seriously and be prepared to take the content down if necessary.
In the digital age, sharing content, whether real or fictional, is a common practice. However, the responsible sharing of fake newspaper articles involves transparency, respect for privacy, and a commitment to ethical content creation. By understanding how to save your article in various formats and navigating the ethical considerations, you can share your creation while maintaining the integrity of your storytelling. Whether your goal is to entertain, educate, or engage readers, it’s essential to do so with an awareness of the broader implications and responsibilities that come with the territory.
Ethical Considerations
Exploring Ethical Considerations in Fake Newspaper Articles
The realm of fake newspaper articles is not without its ethical complexities. As we delve into the ethical considerations surrounding the creation and dissemination of such content, it becomes apparent that responsible and conscientious use of this knowledge is of paramount importance.
Elaborate on the Ethical Concerns Surrounding Fake Newspaper Articles
Misinformation and Deception: One of the foremost ethical concerns revolves around the potential for misinformation and deception. Fake newspaper articles, if not clearly labeled as fictional, can easily be misconstrued as real news. This ambiguity can lead to the spread of false information and, in some cases, perpetuate panic or confusion.
Damage to Credibility: The publication of fake news articles, even for benign purposes, can erode public trust in journalism and media outlets. When individuals encounter fake news, it can undermine their faith in the reliability of news sources, ultimately harming the credibility of the entire journalism industry.
Privacy Violations: The creation of fake newspaper articles may inadvertently infringe upon the privacy of individuals mentioned within the content. If real names, images, or personal information are used without consent, it raises ethical concerns about privacy violations and potential harm to the reputation of those individuals.
Legal Ramifications: Ethical considerations extend to potential legal consequences. Creating and sharing fake news that involves false accusations or defamatory content can result in legal action. Ethical content creation respects legal boundaries and avoids actions that could lead to lawsuits or harm to others.
Sensationalism and Fear-Mongering: Some fake newspaper articles may exploit sensationalism or fear-mongering to attract attention. Ethical use of this medium involves responsible storytelling that prioritizes truth and authenticity over shock value and sensationalism.
Encourage Responsible and Ethical Use of This Knowledge
Transparency: The foundation of ethical fake newspaper article creation is transparency. Clearly label your content as fictional or satirical to prevent any confusion. Transparent labeling ensures that readers understand the nature of the content and are less likely to be deceived.
Respect for Privacy: When crafting fake newspaper articles, respect the privacy and consent of individuals mentioned. Avoid using real names or personal information without authorization. Ethical content creators prioritize privacy and avoid actions that could harm the reputation or well-being of others.
Educational and Entertainment Value: Emphasize the educational and entertainment value of your fake newspaper articles. Position them as storytelling or satirical tools rather than instruments for deception. Responsible use involves fostering a sense of enjoyment or learning for the audience.
Avoid Harm: Ensure that your content does not promote harm, hatred, or misinformation. Responsible content creation involves avoiding content that could negatively impact public sentiment or incite fear or panic.
Feedback and Discussion: Encourage open dialogue and feedback from your readers. Create a space for discussion about the fictional elements, storytelling techniques, and ethical considerations surrounding your fake newspaper articles. Engaging with your audience in this way can help foster responsible use.
In the digital age, the responsible and ethical use of fake newspaper articles is essential to maintain the integrity of journalism, protect individuals’ privacy, and prevent the spread of misinformation. By being transparent, respecting privacy, and fostering ethical content creation, we can harness the potential of this storytelling medium while mitigating its ethical complexities. Responsible use ensures that fake newspaper articles are enjoyed as works of fiction and satire, rather than deceptive tools that compromise trust and truth in journalism.
Legal Implications
The Legal Tightrope: Navigating the Legal Implications of Fake News Articles
The creation and dissemination of fake news articles in the digital age are not without legal ramifications. As we unravel the potential legal consequences associated with crafting and sharing these articles, it becomes evident that respecting copyright and intellectual property laws is of paramount importance.
Discuss Potential Legal Consequences of Creating and Sharing Fake News Articles
Defamation and Libel: One of the most significant legal pitfalls is the potential for defamation and libel. Creating fake news articles that harm the reputation of individuals or organizations through false statements can result in legal action. Defamation lawsuits can be financially damaging and tarnish one’s reputation.
Copyright Infringement: If your fake news articles incorporate copyrighted material without permission, you may find yourself on the wrong side of copyright infringement laws. Using images, text, or other content protected by copyright without proper authorization can lead to legal consequences, including hefty fines.
Misrepresentation: Misrepresenting your content as genuine news can lead to legal repercussions. If readers are misled into believing your fake news article is real, you might face legal action for misrepresentation and deceptive practices.
Privacy Violations: Including personal information or images of individuals without their consent can infringe upon privacy rights. Legal actions can ensue if fake news articles violate privacy laws, leading to financial penalties and reputational damage.
Advise on Respecting Copyright and Intellectual Property Laws
Obtain Proper Permissions: To avoid copyright infringement, always obtain proper permissions to use copyrighted materials in your fake news articles. Seek authorization from content owners, use public domain materials, or rely on content with open licenses.
Attribute and Credit: When using third-party content, properly attribute and credit the source. This not only respects intellectual property but also builds transparency and trust with your audience. Make sure to follow best practices for attribution.
Label as Satire or Fiction: To prevent misrepresentation, clearly label your fake news articles as satire or fiction. Transparency about the fictional nature of your content is key to avoiding legal challenges based on misrepresentation.
Respect Privacy Rights: When incorporating personal information or images, obtain consent from the individuals involved. Ensure you comply with privacy laws and respect the rights of those featured in your articles.
Legal Counsel: If you have concerns about the legal implications of your content, it is advisable to seek legal counsel. Legal experts can provide guidance and ensure that your work aligns with the law.
In the intricate landscape of fake news articles, maintaining legal compliance is essential to protect yourself from costly lawsuits and legal troubles. By respecting copyright and intellectual property laws, obtaining proper permissions, labeling content as satire or fiction, and respecting privacy rights, you can navigate the legal tightrope and continue to create content that entertains, informs, and enlightens without falling into legal jeopardy.
Have you ever thought of sending out a letter or invitation that not only conveyed your message but also stood out visually? If an envelope is well-designed, it can make a significant difference in the reception of digital communication. What are some ways to turn a piece of paper into an envelope that will stand out?
Creating envelope templates in Microsoft Word is a creative process that enables you to easily personalize your envelopes. You’ll learn all you need to know about the paper size, graphic elements, and how to add them all in this guide. By the end, you’ll be able to create envelope templates, troubleshoot common envelopes issues, and explore advanced design options. If we embark on this journey together, you will gain a competitive advantage over your competitors.
As we learn how to create envelope templates in Microsoft Word, you’ll discover how it can transform a mundane task into a canvas for creative expression. Whether you’re sending invitations for a special occasion or just want to make your everyday correspondence more interesting, this helpful guide will teach you how to create personalized envelopes that will be remembered for a long time. Let’s go over how to use envelope design to make your messages more visually appealing.
Setting Up Your Microsoft Word Document
Source: windowscentral
In the intricate landscape of crafting envelope templates in Microsoft Word, the initial step holds paramount importance – setting up your Microsoft Word document. This fundamental process serves as the cornerstone for the entire creative endeavor, laying the foundation for a seamless and visually appealing end result.
First and foremost, the journey commences with the act of opening Microsoft Word. This seemingly mundane task marks the gateway to a realm of creative possibilities. With a click, the blank canvas of a new document unfolds, ready to absorb your imaginative designs and transform them into tangible, personalized envelopes.
Creating a new document in Microsoft Word is akin to setting the stage for a captivating performance. The canvas awaits your artistic touch, inviting you to bring your vision to life. In this digital theater of creativity, the options are limitless, and the tools at your disposal are designed to elevate your envelope design game.
As the curtain rises on your creative process, a pivotal decision emerges – choosing the appropriate paper size for your envelope. In the world of design, dimensions matter. This is not merely a technicality; it’s a strategic choice that influences the overall aesthetic of your envelope. Will it be a standard size for formal correspondence, or will you opt for a custom dimension to make a bold statement? The decision lies in your hands, and Microsoft Word provides the flexibility to align with your vision.
Navigating through this foundational phase, consider the following guidelines:
Open Microsoft Word Promptly: The quicker you embark on your creative journey, the sooner your ideas will materialize. Click, open, and let the creativity flow.
Create a New Document with Flair: Treat the blank document as a canvas eagerly awaiting your strokes. Don’t just create; craft an experience that resonates with your intended message.
Size Matters – Choose Wisely: Deliberate on the paper size, aligning it with the tone and purpose of your correspondence. Microsoft Word’s intuitive interface makes this decision-making process a breeze.
Amidst the click of buttons and the selection of dimensions, envision the possibilities that lie ahead. This isn’t merely about setting up a document; it’s about setting the stage for a visual narrative that speaks volumes before the first word is read. Microsoft Word, your digital atelier, stands ready to transform your creative visions into a tangible expression of your unique style.
Understanding Envelope Measurements
In unraveling the intricacies of envelope design within the realm of Microsoft Word, the exploration of envelope measurements emerges as a critical phase. This pivotal step not only sets the stage for a visually appealing end product but also ensures that your correspondence aligns seamlessly with industry standards and personal preferences.
Standard Envelope Sizes: A Framework for Consistency
Understanding standard envelope sizes is akin to mastering the grammar of design – it provides a structured foundation for effective communication. In the world of envelopes, adhering to standard sizes ensures compatibility with postal services and a polished, professional appearance. Consider the following key dimensions:
#10 Envelope (4 1/8 x 9 1/2 inches): The quintessential business envelope, ideal for formal letters and professional correspondence.
A2 Envelope (4 3/8 x 5 3/4 inches): Commonly used for greeting cards and smaller invitations, adding a touch of elegance to personal messages.
Square Envelope (Various Sizes): An unconventional choice for a modern aesthetic, often employed for special occasions like weddings.
Mastering standard sizes provides a framework for consistency, ensuring that your envelopes align seamlessly with traditional expectations and convey a sense of professionalism.
Customizing Envelope Dimensions in Microsoft Word: Tailoring Your Creative Canvas
While adhering to standards offers a sense of familiarity, customizing envelope dimensions empowers you to transcend the ordinary. Microsoft Word, a digital atelier at your fingertips, provides the tools to break free from convention and infuse your envelopes with a touch of individuality. Here’s how:
1. Navigate to the “Layout” Tab:
Access the “Layout” tab in Microsoft Word to unveil a suite of options for customizing document dimensions.
2. Choose “Size” and Define Custom Dimensions:
Click on “Size” within the “Layout” tab and select “More Paper Sizes” to unlock the realm of custom dimensions.
3. Enter Width and Height:
Input your preferred width and height, allowing for flexibility beyond standard sizes.
4. Confirm and Apply:
Click “OK” to confirm your custom dimensions and witness your digital canvas transform into a personalized envelope template.
5. Experiment with Creative Possibilities:
Beyond adhering to convention, explore creative dimensions that align with the tone and purpose of your correspondence.
Envelopes customized to unique dimensions serve as a testament to your creativity and attention to detail. Whether it’s a square envelope for a non-traditional announcement or a sleek, narrow design for a modern touch, Microsoft Word empowers you to turn your vision into a tangible, personalized reality.
In the ever-evolving landscape of digital communication, understanding and customizing envelope dimensions transcend the mundane into a realm of creative expression. From the structured elegance of standard sizes to the boundless possibilities of customization, this facet of envelope design in Microsoft Word equips you with the skills to communicate not just with words but with a visual language that speaks volumes.
Accessing the Envelope Template Feature
In the intricate tapestry of Microsoft Word’s features, accessing the Envelope Template Feature emerges as a pivotal step, akin to finding the right key to unlock a treasure trove of design possibilities. Navigating this terrain with finesse is not just a practical skill; it’s an art, seamlessly blending functionality and creativity.
Navigating to the “Mailings” Tab: The Digital Compass
In the digital expanse of Microsoft Word, your first waypoint is the “Mailings” tab – the compass guiding you through the labyrinth of features. This tab isn’t merely a destination; it’s a portal to a realm where words and visuals converge. Here’s your roadmap:
Locate the “Mailings” Tab:
Positioned prominently at the top of your screen, the “Mailings” tab beckons, promising a gateway to communication design.
Click with Intent:
A simple click unfurls a menu of possibilities, from traditional letters to the canvas of envelope design.
Survey the Landscape:
Within the “Mailings” tab, the panoramic view reveals options for creating, customizing, and elevating your correspondence game.
Selecting “Envelopes” in the “Create” Group: Crafting the Blueprint
Having arrived at the crossroads of the “Mailings” tab, the next landmark is nestled within the “Create” group – the “Envelopes” feature. It’s not just a button; it’s a catalyst for turning your vision into a tangible design. Here’s your guide to this crucial junction:
Navigate to the “Create” Group:
Within the expansive “Mailings” tab, locate the strategically placed “Create” group, your gateway to design prowess.
Spot the “Envelopes” Icon:
Amidst the array of options, the “Envelopes” icon stands out, a beacon signaling your transition from words on a page to a crafted visual statement.
Click with Purpose:
The click on “Envelopes” isn’t just an action; it’s a declaration of intent, a commitment to transforming a blank envelope into a canvas for your creativity.
As you embark on this journey through Microsoft Word’s features, navigating to the “Mailings” tab and selecting “Envelopes” in the “Create” group isn’t just a sequence of clicks. It’s a strategic maneuver, a digital dance that positions you at the intersection of functionality and artistic expression. In this landscape, you’re not just a user; you’re a designer crafting a visual narrative with every envelope template. So, let your cursor be the brush, and let the “Mailings” tab be your canvas as you navigate and create with purpose in the realm of envelope design.
Entering Sender and Recipient Information
In the realm of crafting envelope templates in Microsoft Word, the pivotal stage of entering sender and recipient information transforms a blank canvas into a personalized communication piece. This step transcends mere data input; it’s a narrative infusion, a symphony of details that transforms a simple envelope into a vessel carrying your message with precision and flair.
Inputting Sender’s Address: The Signature Prelude
The process unfolds with the task of inputting the sender’s address – the signature prelude to your envelope design. This isn’t a mere entry of characters; it’s the commencement of a visual journey. Here’s the roadmap:
Navigate to Sender’s Field:
With a click, position your cursor in the designated sender’s field, ready to infuse the envelope with your identity.
Craft with Purpose:
As you input your address, consider the nuances – the font, the spacing, and the alignment – treating it not just as an address but as a signature on your correspondence canvas.
Expressive Elements:
Utilize formatting tools to add expressive elements – bold for emphasis, italics for a touch of sophistication, and color to infuse personality.
Adding Recipient’s Address: A Destination Defined
With the sender’s address penned, the spotlight shifts to the recipient’s information – the destination defined on your creative map. This is not just an entry; it’s a strategic placement. Consider the following guide:
Navigate to Recipient’s Field:
Effortlessly transition to the recipient’s field, poised to articulate the destination of your message.
Precision in Details:
Infuse the recipient’s details with precision. Consider line breaks for clarity, capitalize strategically, and utilize formatting options to enhance readability.
Visual Hierarchy:
Experiment with font sizes and styles to create a visual hierarchy, ensuring the recipient’s address is easily discernible.
Previewing the Envelope Layout: A Glimpse into Presentation
As the sender and recipient details gracefully unfold, the final touch is a preview of the envelope layout – a glimpse into the presentation of your crafted communication piece. This is not a casual glance; it’s a meticulous examination. Here’s your guide:
Click on “Preview”:
Engage the “Preview” feature, offering a virtual tour of your envelope’s appearance. Consider this your dress rehearsal before the grand unveiling.
Fine-Tune Alignment:
Assess the alignment of sender and recipient information. Utilize the preview to fine-tune any discrepancies and ensure a polished presentation.
Visual Harmony Check:
Evaluate the overall visual harmony. Is the spacing balanced? Are the font choices cohesive? Use this preview as a tool for perfection.
In the symphony of crafting envelopes, entering sender and recipient information isn’t a perfunctory task; it’s a deliberate act of storytelling. Each keystroke, each formatting choice, contributes to the narrative unfolding on your digital canvas. As you traverse through the meticulous steps of inputting addresses and previewing layouts, envision not just an envelope, but a visual ode to your message, waiting to make its mark in the world of tangible communication.
Customizing Font and Formatting
In the intricate tapestry of envelope design within Microsoft Word, the stage of customizing font and formatting is where the creative symphony truly begins. It’s not just about selecting fonts or adjusting sizes; it’s a nuanced dance that transforms a mundane envelope into a visual masterpiece. Here’s your guide to infusing a touch of artistic finesse into your correspondence canvas:
Selecting Appropriate Fonts: The Typography Prelude
The choice of fonts is more than a selection; it’s a design statement, a visual tone-setter that influences how your message is perceived. In the world of envelope customization:
Navigate to Font Selection:
Click into the font menu with purpose, surveying the array of options like a curator choosing artwork for display.
Consider Branding:
Align font choices with your personal or brand aesthetic. If it’s formal communication, lean towards classic serif fonts; for a modern touch, opt for sleek sans-serif options.
Typography Harmony:
Ensure harmony in your font choices; let them complement each other rather than compete for attention.
Adjusting Font Size and Color: Precision in Presentation
Font size and color adjustments are not mere technicalities; they are tools for precision and emphasis, guiding the reader’s eye and elevating the visual appeal:
Experiment with Size:
Toggle font size to strike the right balance. Larger fonts may convey prominence, while smaller ones exude subtlety.
Strategic Color Choices:
Engage with color strategically. Perhaps your recipient’s name is highlighted in a color that resonates with the occasion, or your address is subtly emphasized in a complementary hue.
Contrast for Impact:
Use color and size contrast to guide the reader’s attention. A well-thought-out hierarchy ensures that crucial details stand out.
Enhancing Envelope Design with Formatting Options: The Artistic Flourish
Formatting options are the artistic brushstrokes that add flair and personality to your envelope design. In this realm, creativity knows no bounds:
Utilize Bold and Italics:
Employ bold for emphasis and italics for a touch of sophistication. These formatting nuances subtly guide the reader’s interpretation.
Experiment with Underlining:
Underlining isn’t just for emphasis; it can be a stylistic choice. Experiment with underlining specific elements to add visual interest.
Play with Line Spacing:
Adjusting line spacing isn’t just about readability; it’s a subtle way to control the visual density of your envelope. Consider wider spacing for an airy feel or tighter spacing for a compact, modern look.
Incorporate Bullets and Lists:
If your envelope bears multiple elements, consider organizing them with bullets or numbered lists. This not only adds structure but also enhances readability.
In the symphony of font and formatting customization, Microsoft Word is your digital orchestra, and each option is a note waiting to be played. As you navigate through the intricacies of font selection, size adjustments, and formatting flourishes, envision your envelope not just as a carrier of words but as a visual embodiment of your message. With each click and adjustment, you shape a narrative that transcends the digital realm, creating a tangible, aesthetically pleasing communication piece that speaks volumes before the recipient even reads a word.
Inserting Graphics and Logos
In the dynamic realm of Microsoft Word’s envelope design capabilities, the integration of graphics and logos is a transformative step, turning a simple piece of correspondence into a visually striking and personalized work of art. This process goes beyond the conventional; it’s a canvas awaiting the strokes of creative expression, where each image and logo is a brushstroke in the narrative of your message.
Importing Images into the Envelope Template: The Visual Tapestry Unveiled
The initiation of this artistic journey involves the strategic importation of images into the envelope template. This isn’t a mere insertion; it’s the unveiling of a visual tapestry that enhances the overall aesthetic and communicates with a richness beyond words. Consider the following guide:
Access the “Insert” Tab:
With purposeful intent, navigate to the “Insert” tab, your gateway to a plethora of creative possibilities.
Click on “Pictures”:
A click on “Pictures” opens the door to your image repository, where the visual elements of your message await selection.
Choose Images with Intention:
Each image should serve a purpose. Whether it’s a company logo, a personalized monogram, or a thematic graphic, choose with the intention to enhance your message.
Adjusting Image Placement and Size: Precision in Visual Communication
The meticulous adjustment of image placement and size is not a mere technicality; it’s the key to precision in visual communication. As you embark on this phase, think of your images as actors on a stage, each with a specific role to play:
Drag and Drop for Placement:
Utilize the drag-and-drop feature to precisely place images within the envelope template. Consider the visual hierarchy; perhaps your logo takes center stage, or a decorative graphic frames the edges.
Resize with Finesse:
Size matters in visual storytelling. Resize images with finesse, ensuring they complement the overall design without overpowering or getting lost in the ensemble.
Consider Alignment Options:
Experiment with alignment options. Centered logos may convey a sense of formality, while off-center graphics add a touch of dynamism.
In the landscape of envelope customization, graphics and logos are not mere embellishments; they are strategic elements that enhance brand identity, convey a sense of occasion, or infuse a personal touch. With each imported image and adjusted logo size, your envelope transcends the ordinary, becoming a visual narrative that speaks volumes before the recipient reads a single word.
The beauty of Microsoft Word’s design features lies in their user-friendly nature, transforming even the most novice user into a digital artist. As you navigate through the steps of importing and adjusting, envision your envelope not just as a carrier of information but as a visual embodiment of your message – a testament to the power of creative expression within the confines of a digital canvas.
Saving and Reusing Envelope Templates
Credit: pinimg
In the intricate landscape of Microsoft Word’s functionality, the ability to save and reuse envelope templates is akin to having a digital toolkit that streamlines and enhances your workflow. This feature not only offers convenience but also opens a gateway to efficiency, ensuring that your meticulously crafted designs can be revisited and repurposed with ease.
Saving the Current Template for Future Use: Preserving Your Design Mastery
The act of saving the current envelope template for future use is a strategic move, preserving your design mastery for repeated occasions. This isn’t just a click of a button; it’s a digital safeguarding of your creative efforts. Consider the following steps:
Navigate to “Save As”:
With purposeful intent, navigate to the “File” menu and select “Save As,” signaling your intention to preserve the current template.
Choose a Descriptive File Name:
Each template is a visual narrative; give it a name that reflects its essence. Whether it’s “FormalEventEnvelope” or “CorporateLetterhead,” a descriptive file name adds context.
Select an Appropriate Folder:
Choose a folder location that aligns with your organizational system. A well-structured digital filing system ensures easy retrieval when needed.
Consider File Format:
Microsoft Word offers various file formats. Opt for compatibility; if sharing with others, consider the universally accessible .docx format.
Locating Saved Templates in Microsoft Word: The Digital Design Repository
Once saved, locating your templates within Microsoft Word becomes a seamless process, turning the application into a digital design repository at your fingertips. This isn’t just file management; it’s a journey into a curated collection of your creative endeavors:
Access Recent Documents:
The “Recent Documents” section in Microsoft Word becomes a quick portal to your saved templates. A glance here provides a snapshot of your recent design ventures.
Utilize the “Open” Dialog Box:
Clicking “Open” initiates a dialogue with your digital design repository. Here, you can navigate to the specific folder where your templates are housed.
Leverage the Search Function:
In a world abundant with digital files, the search function becomes your ally. Type in keywords or the file name, and Microsoft Word efficiently retrieves your desired template.
Create a Template Folder:
For a more organized approach, consider creating a dedicated folder for your templates. This ensures a centralized hub for your design assets, fostering a systematic approach to file management.
In the realm of envelope design, where creativity meets practicality, the ability to save and reuse templates in Microsoft Word is a game-changer. It not only elevates your design efficiency but also empowers you to maintain consistency in branding, whether it’s for corporate communications, personal correspondences, or special occasions. As you navigate through the process of saving and locating templates, envision Microsoft Word not just as a word processor but as a dynamic tool that honors and enhances your creative journey.
Printing Envelopes
Image credit: firespring.com
In the final act of the intricate Microsoft Word envelope design symphony comes the pivotal process of printing, where the virtual seamlessly transforms into the tangible. Configuring print settings and executing the printing of envelopes, whether a solitary piece or multiple copies, demands a meticulous approach to ensure precision and visual impact. Here’s your guide to navigating the print stage with finesse:
Configuring Print Settings: Precision in Every Detail
Before embarking on the printing journey, the configuration of print settings sets the stage for a flawless execution. Think of it as the conductor fine-tuning each instrument in the orchestra for a harmonious performance:
Access the “File” Menu:
Begin by navigating to the “File” menu, your gateway to a spectrum of print-related options.
Select “Print” Option:
With a deliberate click, choose the “Print” option, unveiling a canvas of print settings awaiting your customization.
Explore Paper Size and Type:
Delve into the paper settings, ensuring alignment with your chosen envelope size. Microsoft Word offers a range of standard and custom sizes, accommodating diverse design aspirations.
Verify Margins and Orientation:
Precision lies in details. Verify that your margins align with your design, and the orientation (portrait or landscape) corresponds to the envisioned presentation.
Check Print Quality:
Quality matters. Adjust print quality settings based on your preference, ensuring that your design translates onto paper with the desired clarity.
Printing a Single Envelope or Multiple Copies: Tailored Execution
The act of printing can be as varied as the designs themselves. Whether you’re printing a single envelope for a special occasion or producing multiple copies for a mass mailing, Microsoft Word provides flexibility tailored to your needs:
Opt for Single Envelope Printing:
If the occasion calls for a singular, personalized touch, select the option to print a single envelope. This is ideal for unique correspondences that demand individual attention.
Navigate to “Number of Copies”:
For a broader outreach, where uniformity is key, adjust the “Number of Copies” setting to the desired quantity. This streamlines the printing process for efficiency.
Consider Duplex Printing:
In the spirit of eco-consciousness, consider duplex printing for double-sided envelopes. This not only reduces paper consumption but also adds a layer of sophistication to your design.
Preview Before Printing:
The preview option is your safeguard against unexpected surprises. Take a moment to preview your design, ensuring that every element aligns seamlessly before committing to print.
In the realm of envelope printing, precision is paramount. As you configure print settings and embark on the tactile manifestation of your digital designs, envision Microsoft Word not just as a word processing tool but as a conduit that transforms your virtual creations into tangible, impactful communications. Each click, adjustment, and print command is a deliberate step towards delivering a visual masterpiece to your recipients, ensuring that your message arrives not just in words but in the tactile elegance of a thoughtfully designed envelope.
Troubleshooting Common Issues
In the meticulous process of crafting envelope masterpieces within Microsoft Word, encountering troubleshooting issues can be akin to navigating unexpected terrain. Addressing alignment problems and ensuring optimal printing quality are pivotal to delivering a polished and professional end product. Let’s delve into the intricacies of troubleshooting common issues with finesse:
Address Alignment Problems: Precision in Presentation
Address alignment problems can be the stumbling block between a visually striking envelope and one that misses the mark. In the quest for precision in presentation, consider the following steps:
Utilize Alignment Tools:
Leverage Microsoft Word’s alignment tools to ensure that recipient addresses are perfectly centered or aligned according to your design preferences.
Check Margin Settings:
Alignment intricacies often trace back to margin settings. Verify that your margins are uniform and conducive to the desired alignment.
Preview Before Printing:
The preview feature is your ally. Before committing to print, take a moment to preview the envelope layout, ensuring that addresses align seamlessly.
Issues with Printing Quality: Elevating Visual Impact
Printing quality is the linchpin in translating digital designs into tangible, visually impactful envelopes. Elevate your visual impact with the following considerations:
Verify Print Settings:
Ensure that your chosen print settings align with the quality you envision. Optimal resolution and color settings are pivotal for a crisp, professional finish.
Check Ink Levels:
Printing quality is intrinsically tied to ink levels. Low ink levels can result in faded or uneven prints. Verify and replace ink cartridges as needed.
Experiment with Paper Types:
The choice of paper can significantly impact printing quality. Experiment with different paper types to find the one that complements your design and ensures optimal results.
Troubleshooting Tips and Solutions: A Roadmap to Resolution
When troubleshooting issues arises, having a roadmap to resolution is invaluable. Consider the following tips and solutions to navigate common challenges:
Calibrate Your Printer:
Printer calibration ensures that colors and alignments are true to your design. Refer to your printer’s manual for calibration instructions.
Update Printer Drivers:
Outdated printer drivers can lead to compatibility issues. Regularly update your printer drivers to ensure seamless integration with Microsoft Word.
Consult Online Resources:
Microsoft’s extensive online resources and forums offer a wealth of troubleshooting insights. Consult these platforms for community-driven solutions and expert advice.
Test with Sample Prints:
Before undertaking a large print job, conduct sample prints to identify and address any potential issues. This preemptive approach saves resources and ensures quality.
In the dynamic realm of digital design and printing, troubleshooting is not a roadblock but a stepping stone to perfection. By systematically addressing alignment problems, optimizing printing quality, and embracing troubleshooting tips, you elevate your envelope design experience from mere functionality to a seamless fusion of creativity and technical precision. In the journey of troubleshooting, Microsoft Word becomes not just a software tool but a collaborative partner in manifesting your design visions with utmost clarity and impact.
Additional Tips and Creative Ideas
Source: amazonaws
In the realm of Microsoft Word’s envelope design capabilities, the canvas extends far beyond mere functionality, inviting users to elevate their creations into expressions of artistry. Unlocking the full potential of envelope design involves not only mastering the technicalities but infusing a touch of creativity and flair. Here are additional tips and creative ideas to transform your envelope designs into memorable expressions:
Using Envelope Templates for Special Occasions: Personalized Elegance
Select Occasion-specific Templates:
Microsoft Word offers a diverse array of envelope templates tailored for different occasions. Whether it’s a wedding, birthday, or holiday greeting, choose a template that aligns with the tone and theme of the event.
Customize with Personal Details:
Infuse a personal touch by customizing templates with specific details such as names, dates, or event-specific graphics. This transforms a standard template into a personalized masterpiece.
Incorporate Theme Colors:
Align the envelope design with the event’s color scheme. This not only adds visual cohesion but also creates a harmonious connection between the envelope and the event it represents.
Incorporating Color and Unique Elements: Visual Impact
Play with Color Psychology:
Leverage the psychology of colors to evoke specific emotions. For example, use warm tones for invitations to exude warmth and excitement, or cool tones for professional correspondences.
Experiment with Unique Materials:
Elevate your envelopes by experimenting with unique materials. Consider using textured paper, vellum overlays, or even incorporating elements like ribbons or wax seals for a tactile and visually striking effect.
Integrate Watermarks or Background Images:
Add a layer of sophistication by incorporating watermarks or background images. Subtle yet impactful, these elements contribute to a visually engaging envelope design.
Exploring Advanced Design Options: Mastering the Craft
Utilize Advanced Formatting Tools:
Microsoft Word offers an array of advanced formatting tools. Master features like layering, text effects, and shape customization to take your envelope design beyond the basics.
Employ Gradient and Shadow Effects:
Create depth and dimension in your designs by experimenting with gradient and shadow effects. This lends a professional touch to your envelopes, making them stand out with nuanced visual appeal.
Consider Die-Cut or Shaped Envelopes:
For a truly distinctive touch, explore the option of die-cut or shaped envelopes. This unconventional approach not only captures attention but also adds a layer of intrigue to your correspondence.
In the dynamic landscape of envelope design, embracing additional tips and creative ideas transforms the act of crafting envelopes from a utilitarian task to a form of artistic expression. As you navigate the possibilities within Microsoft Word, consider each envelope as a blank canvas awaiting your creative touch. From occasion-specific templates to innovative use of colors and materials, the potential to create visually stunning envelopes is limited only by your imagination. This convergence of technical finesse and creative exploration ensures that each envelope transcends its functional role, becoming a tangible embodiment of thoughtful design and personalized elegance.
Have you ever wondered how the brilliant minds behind the creation of Microsoft Word come to create such a ubiquitous tool that has permeated nearly every aspect of our digital lives? When it comes to crafting the perfect document, understanding the architects behind Microsoft Word is critical in recognizing the innovation that is taking place on our desktop computers and mobile devices.
Microsoft Word was created by a team of dedicated Microsoft employees. A team led by visionary leaders fueled by a commitment to excellence has transformed a simple word processing tool into a global phenomenon thanks to their vision and dedication. Microsoft Word has evolved under the supervision of these creators over the years, constantly adapting to the needs of its users and technological advances.
During this section, you’ll learn about the intricate design and development processes involved in Microsoft Word, as well as how technology, design, and user experience interact. This journey will provide insight into the fascinating world of Microsoft Word, from its beginning to its future outlook and impact on society. The layers of innovation that have made Microsoft Word the indispensable tool that it is today will be discussed in greater depth.
Evolution of Microsoft Word
Microsoft Word, a digital juggernaut in the realm of word processing, has traversed a remarkable evolutionary path, shaped by a tapestry of early versions, key milestones, and the relentless impact of technological advancements. In the nascent stages, the rudimentary iterations of Microsoft Word laid the foundation for what would become an indispensable tool in modern communication and document creation. These early versions, with their elemental features, marked the inception of a software that would redefine how we interact with words on a screen.
The journey through Microsoft Word’s evolution is punctuated by key milestones that serve as markers of progress and innovation. From the groundbreaking introduction of Windows compatibility to the paradigm-shifting transition to the graphical user interface, each milestone contributed to the software’s metamorphosis. The integration of spell-check in the 1980s and the subsequent introduction of the Ribbon interface in 2007 exemplify Microsoft Word’s commitment to enhancing user experience and functionality.
The Impact of Technological Advancements on Microsoft Word’s Evolution
In the ever-accelerating pace of technological advancements, Microsoft Word has remained agile, adapting and incorporating innovations that echo the spirit of the digital age. The integration of cloud technology, a pivotal moment in its evolution, revolutionized collaboration and accessibility, allowing users to seamlessly work on documents across devices. The advent of artificial intelligence further propelled Microsoft Word into the future, with features like intelligent writing assistance and predictive text, making document creation not just efficient but also intuitive.
As Microsoft Word evolved, so did the very fabric of document creation. The shift from a singular focus on text to the inclusion of multimedia elements transformed documents into dynamic, interactive entities. The ability to embed images, videos, and hyperlinks brought a new dimension to content creation, aligning with the multimedia-rich landscape of the digital era.
The Symbiosis of Progress and User Experience
Beyond the chronological narrative of versions and features lies a deeper tale of the symbiotic relationship between technological progress and user experience. The user-centric design principles embedded in Microsoft Word’s evolution reflect a commitment to making the tool not just powerful but also user-friendly. The iterative improvements in the interface, the simplification of complex functions, and the customization options available all contribute to an environment where users can seamlessly translate their thoughts into polished documents.
In the relentless pursuit of perfection, Microsoft Word’s development teams have faced challenges head-on, turning obstacles into opportunities for growth. The competitive landscape, coupled with the ever-changing needs of users, has spurred a culture of continuous improvement, ensuring that Microsoft Word remains at the forefront of the word processing domain.
Looking Ahead: The Future Trajectory of Microsoft Word
As we stand at the intersection of history and innovation, the trajectory of Microsoft Word points towards a future where boundaries between physical and digital documents blur. The ongoing commitment to accessibility, collaboration, and integration with emerging technologies suggests a landscape where Microsoft Word continues to be a linchpin in how we shape and share our ideas.
In essence, the evolution of Microsoft Word is not merely a journey through versions and features; it is a testament to adaptability, innovation, and the unwavering commitment to empowering users in an ever-evolving digital landscape. As we reflect on the path traversed, it becomes evident that the story of Microsoft Word is not confined to the past; it is an unfolding narrative, with each update and enhancement contributing to a legacy that continues to shape the way we engage with words.
The Microsoft Corporation
In the vast landscape of technological giants, the Microsoft Corporation stands as a behemoth, its influence permeating through every facet of the digital realm. As we unravel the layers of this corporate titan, it’s not merely a company but a transformative force that has shaped the way we compute, connect, and create.
Overview of Microsoft as a Company
At its core, Microsoft is a global powerhouse, a conglomerate of innovation and ingenuity that transcends geographical boundaries. Founded by Bill Gates and Paul Allen in 1975, the company has evolved into a multifaceted entity with a vast product portfolio, ranging from operating systems to cloud computing services. The very architecture of Microsoft mirrors its commitment to empowering individuals and organizations through cutting-edge technology.
Behind the digital curtain lies an intricate ecosystem, where Windows, Office, Azure, and a myriad of other offerings converge to create a seamless user experience. Microsoft’s commitment to accessibility is underscored by its mission to empower every person and every organization on the planet to achieve more. This is not just a corporate tagline; it’s a manifesto that echoes in every line of code and every strategic decision.
Microsoft’s Mission and Values
In the realm of corporate ethos, Microsoft’s mission and values serve as guiding principles, steering the company towards a future where technology is not just a tool but a catalyst for positive change. The mission to empower individuals and organizations is coupled with a set of values that emphasize integrity, diversity, and inclusion. These values are not mere platitudes; they are the compass that directs the company’s trajectory.
As we navigate the labyrinth of Microsoft’s values, it becomes evident that diversity is not just a checkbox but a cornerstone. The company’s commitment to inclusion is not a token gesture; it’s a recognition that diverse perspectives fuel innovation. Integrity, woven into the fabric of every transaction and decision, is not a buzzword but a commitment to ethical practices in an ever-evolving industry.
Key Leaders and Their Influence on Microsoft Word
Within the tapestry of Microsoft’s leadership, luminaries like Bill Gates and Satya Nadella have played pivotal roles in shaping not only the company’s destiny but also the evolution of products like Microsoft Word. Bill Gates, the visionary founder, set the foundation for Microsoft’s dominance, envisioning a future where computing is a ubiquitous utility. Satya Nadella, the contemporary steward of the Microsoft ship, brought a cultural transformation, infusing empathy and a growth mindset into the company’s DNA.
The influence of these leaders on Microsoft Word is profound. Gates, with his foresight, laid the groundwork for a software suite that would become a linchpin in personal and professional computing. Nadella, with his empathetic leadership, steered Microsoft Word through an era of user-centered design and collaborative tools. The result is not just a word processing software; it’s a manifestation of a corporate ethos that values not just what is created but how it enhances the lives of users.
In the ever-evolving saga of technology, the Microsoft Corporation stands as a testament to the marriage of vision, values, and leadership. Beyond the codes and algorithms, it’s a company that weaves the digital fabric of our existence, influencing not just how we work but how we perceive and interact with the world. In understanding the Microsoft Corporation, we unravel not just a corporate entity but a narrative that continues to shape the digital landscape.
Teams Involved in Microsoft Word Development
Photo by: office365atwork
When we peel back the digital curtain on Microsoft Word’s intricate creation, we find a symphony of talent and expertise orchestrated by a meticulously structured development team. This team, a powerhouse of innovation, is not just a collection of individuals but a collaborative force that shapes the very essence of Microsoft Word.
Microsoft Word Development Team Structure
At the helm of Microsoft Word’s development stands a structured team, each member contributing a unique set of skills to the intricate tapestry of coding, design, and functionality. The team structure, akin to a well-oiled machine, typically comprises:
Developers and Engineers: The backbone of the operation, these individuals delve into the intricacies of coding, turning lines of script into the functional features we navigate daily.
Designers and User Experience Experts: Beyond functionality lies the realm of design. This team ensures that Microsoft Word not only works seamlessly but is a visual delight, with an intuitive interface that caters to a diverse user base.
Quality Assurance Specialists: Before any feature sees the light of day, a team of QA specialists rigorously tests every nook and cranny, ensuring a bug-free experience for millions of users.
Roles and Responsibilities Within the Teams
Within this structured framework, roles and responsibilities are delineated with precision, ensuring each team member contributes their expertise to the collaborative mosaic:
Developers: Crafting the codebase, ensuring it aligns with Microsoft’s standards for efficiency and security.
Designers: Infusing creativity into functionality, designing interfaces that marry aesthetics with user-friendly interactions.
Quality Assurance: Thoroughly testing every feature, from the most basic functions to the intricate details, to guarantee a seamless user experience.
Project Managers: Overseeing the entire development process, ensuring timelines are met, and milestones achieved.
Collaboration Between Different Departments
In the dynamic world of Microsoft Word’s development, collaboration isn’t just encouraged; it’s a necessity. The synergy between different departments is akin to a well-choreographed dance, each move synchronized for the grand performance:
Development and Design Collaboration: Developers and designers work hand in hand, ensuring that the code’s functionality aligns seamlessly with the visual design principles, resulting in a harmonious user experience.
Quality Assurance Integration: QA specialists are not just gatekeepers but integral members of the development process. Their insights and feedback loop back into refining and enhancing features.
Cross-Departmental Meetings: Regular meetings between developers, designers, and QA specialists create a forum for open communication, idea exchange, and addressing challenges collectively.
In the fast-paced realm of Microsoft Word’s evolution, this collaborative ethos is not just a nicety but a strategic imperative. It ensures that each update, each feature, is not just a standalone achievement but a testament to the collective brilliance of a team driven by a shared vision.
In the grand narrative of Microsoft Word’s development, it’s not just the lines of code that matter; it’s the people behind those lines, working in tandem, pushing the boundaries of what’s possible. The teams behind Microsoft Word are not just developers; they are architects, designers, and QA virtuosos, sculpting a digital masterpiece that continues to redefine how we engage with words and ideas.
Technology Stack
In the intricate symphony of Microsoft Word’s creation, the technology stack plays a pivotal role, akin to the unseen gears propelling a finely tuned machine. This amalgamation of software, programming languages, and cloud technology is the alchemy that transforms a simple word processing tool into a multifaceted powerhouse.
Software and Programming Languages Used in Microsoft Word
Behind the sleek interface of Microsoft Word lies a complex labyrinth of software and programming languages, each line of code contributing to the seamless functionality users experience:
C++ and C#: The backbone of Microsoft Word’s programming, these languages provide the robustness and efficiency required for a feature-rich application.
XML: Extensible Markup Language, or XML, serves as the data interchange format, facilitating the storage and transfer of structured information within documents.
COM (Component Object Model): An integral part of the Microsoft development environment, COM allows seamless integration of different software components, enhancing the extensibility of Microsoft Word.
Integration of Other Microsoft Products
The synergy between Microsoft Word and other products within the Microsoft ecosystem is not happenstance; it’s a strategic integration designed to create a seamless user experience. This integration extends beyond mere compatibility, weaving a narrative of interconnected productivity tools:
Microsoft Office Suite: Word doesn’t exist in isolation; it thrives within the broader ecosystem of Microsoft Office, integrating seamlessly with Excel, PowerPoint, and other applications to enable a cohesive workflow.
Windows Operating System: As the flagship operating system, Windows provides the foundational environment for Microsoft Word to run efficiently, creating a symbiotic relationship between software and OS.
Microsoft 365: The subscription-based service enhances collaboration and connectivity, offering cloud-based storage, real-time collaboration, and a suite of additional features that transcend traditional software boundaries.
Role of Cloud Technology in Microsoft Word’s Functionality
Cloud technology isn’t just a buzzword within the realms of Microsoft Word’s development; it’s a fundamental enabler that reshapes how users interact with documents, fostering collaboration and accessibility:
OneDrive Integration: Microsoft Word’s integration with OneDrive, a cloud storage service, enables users to seamlessly access and edit their documents from any device, transcending the limitations of physical storage.
Real-time Collaboration: Cloud technology facilitates real-time collaboration, allowing multiple users to work on a document simultaneously, breaking down geographical barriers and enhancing productivity.
Automatic Updates: Cloud-based deployment allows for automatic updates, ensuring that users always have access to the latest features and security patches without manual interventions.
In essence, the technology stack supporting Microsoft Word is not just a collection of tools; it’s a carefully curated ensemble designed to deliver a user experience that transcends the traditional boundaries of word processing. The software languages, integrations, and cloud technologies converge not just in lines of code but in the very essence of how we craft and share our thoughts in the digital landscape.
Design and User Experience
In the dynamic universe of software design, where form meets function, Microsoft Word stands as a testament to the evolution of user-centered design principles, a relentless commitment to feedback loops, and a perpetual quest for refining the user interface. The intricate dance between aesthetics and functionality has not only shaped the user experience but has become a narrative of adaptability, responsiveness, and the seamless fusion of design and utility.
User-Centered Design Principles
User-centered design is not just a buzzword in the halls of Microsoft Word’s development; it’s a guiding philosophy that places the end-user at the epicenter of every decision. This approach, ingrained in the DNA of Microsoft Word, manifests in:
Intuitive Navigation: The design prioritizes user intuition, ensuring that even a novice can navigate the complexities of the software effortlessly.
Customization Options: Recognizing the diversity of user needs, Microsoft Word offers a spectrum of customization options, allowing users to tailor the interface to their preferences.
Accessibility Features: The commitment to inclusivity is reflected in accessibility features, making Microsoft Word usable for individuals with varying abilities.
Feedback Loops and User Testing
The iterative nature of Microsoft Word’s development is not a happenstance; it’s a result of a meticulous feedback loop that incorporates user insights at every stage. This continuous improvement model thrives on:
Beta Testing Programs: Microsoft Word’s beta testing programs engage users in the pre-release phase, gathering real-world feedback and uncovering potential issues before a widespread launch.
User Surveys and Analytics: Through surveys and analytics, Microsoft collects data on user behavior and preferences, ensuring that updates align with the actual needs and habits of the user base.
Responsive Development: The feedback loop isn’t a one-time event; it’s a continuous cycle that informs ongoing development, ensuring that Microsoft Word evolves in tandem with changing user expectations.
Evolution of the User Interface in Microsoft Word
The user interface of Microsoft Word is akin to a digital canvas, constantly evolving to accommodate the changing landscape of user interactions and technological advancements. This evolution is not just cosmetic; it’s a strategic adaptation that embraces:
Transition to the Ribbon Interface: A pivotal moment in Microsoft Word’s evolution was the introduction of the Ribbon interface in 2007, streamlining access to features and transforming the visual landscape.
Incorporation of Multimedia Elements: Recognizing the shift towards multimedia-rich content, Microsoft Word’s interface evolved to seamlessly integrate images, videos, and hyperlinks, offering users a dynamic canvas for expression.
Integration of AI-Driven Features: The recent evolution incorporates artificial intelligence, with features like intelligent writing assistance and predictive text, transforming Microsoft Word into a proactive writing companion.
In the grand narrative of Microsoft Word’s design and user experience, it’s not just about making a document look good; it’s about crafting an environment where the act of creation becomes an intuitive, enjoyable experience. The evolution of user-centered design, the iterative nature of feedback loops, and the perpetual refinement of the user interface are not just design principles; they are the threads that weave the tapestry of Microsoft Word’s usability and relevance in the ever-changing digital landscape.
Challenges Faced During Development
Credit: estuate
The journey of developing a behemoth like Microsoft Word is not a seamless ascent but a climb fraught with technical challenges, the ever-looming specter of market competition, and the intricate dance of adaptation to the ever-shifting sands of user needs. In the realm of software development, each line of code written and each feature introduced is a conquest, surmounting hurdles that shape not just the software but its enduring relevance in the dynamic landscape.
Technical Challenges
The development of Microsoft Word is a testament to conquering technical challenges that range from the intricacies of coding to the complexities of ensuring a seamless user experience. The landscape of these challenges includes:
Compatibility Across Platforms: Ensuring that Microsoft Word functions seamlessly across diverse operating systems and devices, from Windows to macOS and mobile platforms, demands a meticulous approach to coding and optimization.
Integration of Advanced Features: The perpetual evolution of technology necessitates the incorporation of cutting-edge features, from AI-driven writing assistance to real-time collaboration, presenting ongoing technical challenges in implementation and optimization.
Security Concerns: With the ever-looming threat landscape in the digital realm, the development team grapples with fortifying Microsoft Word against cybersecurity threats, ensuring the safety and integrity of user data.
Market Competition
In the fiercely competitive arena of word processing software, market competition is not just a challenge; it’s a crucible that forges excellence and demands constant innovation. Microsoft Word, as a flagship product, contends with:
Rival Software Suites: Competing against other industry giants, Microsoft Word faces the challenge of not only maintaining its position as the go-to word processor but also outpacing the evolution of competing suites.
Emerging Startups: The landscape is not static; nimble startups introducing innovative features pose a constant challenge, driving Microsoft Word to stay ahead of the curve and respond to emerging trends.
Changing User Expectations: User expectations, shaped by competitors’ offerings, become a moving target, requiring Microsoft Word to not only meet but exceed these expectations to retain its user base.
Adaptation to Changing User Needs
The very essence of Microsoft Word’s enduring relevance lies in its ability to adapt to the evolving needs of users. This challenge is a dynamic force, demanding not just responsiveness but anticipatory measures:
User-Centric Design Evolution: As user preferences shift, the challenge is not merely to react but to proactively evolve the design and functionality of Microsoft Word to align with changing habits and expectations.
Real-Time Collaboration Demands: The modern user craves real-time collaboration; meeting this demand requires constant adaptation, integrating features that facilitate seamless teamwork, breaking down geographical barriers.
Accessibility and Inclusivity: The recognition of the diverse user base prompts the challenge of ensuring that Microsoft Word remains accessible to users of varying abilities, transcending language and physical barriers.
In the saga of Microsoft Word’s development, challenges are not stumbling blocks but stepping stones, propelling the software to greater heights. The crucible of technical intricacies, market dynamics, and user expectations forges not just a word processor but a resilient and ever-evolving tool that stands the test of time.
Future Outlook
In the ever-evolving landscape of technology, the future of Microsoft Word beckons with a promise of continual innovation, anticipating user needs, and aligning with Microsoft’s expansive vision for the future of digital productivity. The canvas of possibilities is vast, painted with ongoing developments, the tantalizing prospect of future features, and a visionary roadmap that transcends the conventional boundaries of word processing.
Ongoing Developments and Updates
Microsoft Word’s commitment to staying at the forefront of digital productivity is reflected in its continuous stream of developments and updates. This dynamic approach is evident in:
Regular Feature Enhancements: Microsoft Word’s development team consistently rolls out updates, introducing new features, refining existing ones, and addressing user feedback to ensure a cutting-edge user experience.
Security and Stability Patches: The digital landscape is ever-changing, and Microsoft Word’s commitment to user security is showcased in regular patches and updates, fortifying the software against emerging cybersecurity threats.
Integration with Emerging Technologies: The future outlook involves a seamless integration with emerging technologies such as augmented reality and natural language processing, creating a more intuitive and immersive user experience.
Anticipation of Future Features
As users traverse the digital frontier, the anticipation of future features becomes a driving force, and Microsoft Word’s roadmap hints at a treasure trove of innovations, including:
AI-Driven Content Creation: The integration of advanced AI algorithms promises to elevate content creation, with intelligent writing assistance, automated content summarization, and predictive text features becoming integral to the writing experience.
Enhanced Collaboration Tools: The future envisions collaboration tools that transcend traditional boundaries, fostering real-time interaction, co-authoring enhancements, and integrated communication features to streamline teamwork.
Cross-Platform Consistency: Anticipating the diverse ways users engage with content, Microsoft Word aims for a seamless cross-platform experience, ensuring consistency whether users are on desktops, tablets, or mobile devices.
Microsoft’s Vision for the Future of Word
Beyond the realm of features and updates, Microsoft’s overarching vision for the future of Word is a beacon guiding the software into uncharted territories. This vision encompasses:
Universal Accessibility: Microsoft envisions Word as a universally accessible tool, breaking down language barriers and ensuring that individuals of varying abilities can harness the power of digital expression.
Environmental Sustainability: Microsoft’s commitment to environmental sustainability extends to Word, with plans to integrate features promoting paperless workflows, eco-friendly practices, and a reduced carbon footprint in digital document creation.
Holistic Productivity Ecosystem: Microsoft Word is not an isolated entity; it’s a pivotal player in Microsoft’s broader productivity ecosystem. The future unfolds a seamless integration with other Microsoft 365 applications, creating a holistic environment where users can effortlessly transition between tasks.
In essence, the future outlook for Microsoft Word is not just a roadmap; it’s a narrative of possibilities. It’s a commitment to empowering users with tools that transcend the ordinary, anticipate their needs, and align with a vision that extends beyond the horizon of conventional productivity.
Impact on Society and Business
In the digital tapestry of societal and business landscapes, Microsoft Word has woven itself as an indispensable thread, shaping education, professional settings, and the very fabric of how we communicate and collaborate. The impact of Microsoft Word transcends the boundaries of a mere application; it’s a catalyst for transformation, an enabler of economic implications, and a harbinger of digital evolution.
Microsoft Word’s Role in Education and Professional Settings
Microsoft Word stands as the quintessential tool in both educational institutions and professional settings, navigating the realms of academia and business with unparalleled versatility. Its impact is palpable in:
Educational Empowerment: In the educational sphere, Microsoft Word empowers students and educators alike, serving as a fundamental platform for document creation, collaborative projects, and the development of essential digital skills.
Professional Documentation: In the professional realm, Microsoft Word is the linchpin for creating polished documents, resumes, reports, and presentations, streamlining communication and fostering a standardized approach to document creation.
Global Standardization: The ubiquity of Microsoft Word establishes a global standard for document formats, ensuring seamless compatibility across diverse educational and professional environments.
Contributions to Digital Communication and Collaboration
Beyond the confines of document creation, Microsoft Word has played a pivotal role in shaping digital communication and collaboration, fostering a connected world where ideas can be shared and refined in real-time. Its contributions include:
Real-Time Collaboration: Microsoft Word’s collaborative features enable individuals to work on documents simultaneously, irrespective of geographical locations, fostering a new era of real-time collaboration and breaking down silos.
Integration with Communication Tools: The integration of Microsoft Word with communication tools like Microsoft Teams and Outlook creates a holistic ecosystem where document sharing, discussion, and feedback become seamlessly intertwined, enhancing productivity.
Facilitation of Remote Work: Particularly in the contemporary landscape, where remote work has become the norm, Microsoft Word’s role in facilitating virtual collaboration has become instrumental in maintaining business continuity.
Economic Implications of Microsoft Word’s Widespread Use
The widespread use of Microsoft Word extends beyond convenience; it carries significant economic implications, shaping industries, fueling innovation, and contributing to economic growth. Key considerations include:
Productivity Gains: The efficiency and ease of use offered by Microsoft Word translate into substantial productivity gains across sectors, from small businesses to large enterprises, fostering a climate of innovation and growth.
Skill Standardization: Microsoft Word proficiency has become a standard skillset in the job market, contributing to a workforce that is adept at digital communication, collaboration, and document creation, enhancing employability.
Software Ecosystem Impact: Microsoft Word’s integration within the broader Microsoft 365 ecosystem contributes to the economic health of the software industry, creating a symbiotic relationship where updates and improvements resonate across multiple applications.
In the grand tapestry of societal and business dynamics, Microsoft Word isn’t just a tool; it’s a transformative force that leaves an indelible mark on education, communication, collaboration, and the economic landscape. Its impact reverberates far beyond the pixels on a screen, shaping the way we learn, work, and connect in the digital age.
Some FAQs
Who developed Microsoft Word?
Microsoft Word was developed by Richard Brodie and Charles Simonyi. The first version, released in 1983, marked the inception of a revolutionary word processing software that would become a cornerstone in the Microsoft Office suite. Simonyi, a software architect, played a pivotal role in shaping the project, while Brodie contributed to the early development. Over the years, Microsoft Word evolved into a comprehensive and widely-used word processing application, impacting the way individuals and businesses handle documents and communication.
What technologies are used in Microsoft Word’s development?
Microsoft Word’s development involves a sophisticated technology stack, incorporating diverse tools and languages to ensure its functionality and versatility. The software is primarily built using programming languages such as C++ for the core functionality, ensuring robust performance and efficiency. The integration of XML facilitates the storage and manipulation of document data in a structured format. Cloud technology plays a pivotal role, enabling features like real-time collaboration and seamless access across devices. Additionally, Microsoft Word is intricately connected with other Microsoft products, leveraging a comprehensive software ecosystem. This technology stack, comprising C++, XML, cloud integration, and synergy with Microsoft’s broader suite, underpins the development of Microsoft Word, contributing to its status as a powerful and interconnected word processing solution.
Can you explain the design principles of Microsoft Word?
Microsoft Word embodies user-centered design principles that prioritize accessibility, functionality, and a seamless user experience. The user interface (UI) is intuitively structured, featuring a familiar ribbon toolbar for easy navigation. Feedback loops, crucial to user testing, are integrated to refine the interface continually. The evolution of the UI in Microsoft Word reflects a commitment to enhancing user experience, with regular updates informed by user feedback. The design emphasizes clarity, ensuring that even complex features are presented in a user-friendly manner. Accessibility features, such as customizable layouts and keyboard shortcuts, cater to a diverse user base. Microsoft Word’s design principles are a testament to its dedication to user satisfaction, making document creation and editing an efficient and user-friendly process.
What’s next for Microsoft Word in terms of updates?
Microsoft Word’s future updates promise a trajectory of innovation, focusing on enhancing user experience and staying at the forefront of digital productivity. Anticipated updates include:
AI Integration: Expect advanced AI features for intelligent content creation, with enhanced writing assistance, automated summarization, and predictive text functionalities.
Collaboration Enhancements: Microsoft Word will continue to refine real-time collaboration tools, fostering seamless teamwork with improved co-authoring capabilities and integrated communication features.
Cross-Platform Consistency: The future sees a commitment to a consistent user experience across various platforms, ensuring users can seamlessly transition between desktops, tablets, and mobile devices.
Security and Stability: Ongoing updates will prioritize cybersecurity, providing regular patches to fortify Microsoft Word against emerging threats, ensuring user data and documents remain secure.
In essence, Microsoft Word’s future updates revolve around a commitment to innovation, collaboration, accessibility, and security, ensuring it remains a pioneering force in the realm of word processing.
How has Microsoft Word impacted education and business?
Microsoft Word has profoundly influenced both education and business landscapes, serving as a linchpin for efficient communication and documentation. In education, it has empowered students and educators, becoming integral to collaborative projects and the development of digital literacy. The software’s standardized format facilitates seamless sharing of educational materials globally.
In the business realm, Microsoft Word is a cornerstone for professional communication, documentation, and presentation creation. Its widespread use has standardized document formats across industries, enhancing efficiency and streamlining business processes. The real-time collaboration features foster teamwork, enabling professionals to work together irrespective of geographical locations. Overall, Microsoft Word’s impact is synonymous with enhanced productivity, standardized communication, and the facilitation of collaborative endeavors in both educational and business spheres.
Are there any competitors to Microsoft Word?
While Microsoft Word stands as a dominant force in word processing, several competitors offer alternative solutions. Notable competitors include:
Google Docs: A cloud-based platform offering collaboration features and seamless integration with Google Drive.
Apple Pages: Part of the Apple iWork suite, providing a user-friendly interface and compatibility with Apple devices.
LibreOffice Writer: An open-source alternative with extensive features, catering to users seeking free, customizable solutions.
WPS Office: Known for its compatibility with Microsoft Word formats and additional productivity tools.
Zoho Writer: A cloud-based option with collaborative features and a focus on accessibility.
While Microsoft Word remains a go-to choice for many, these competitors offer diverse features and cater to specific user preferences, providing a range of options in the word processing landscape.
Article key points
In conclusion, Microsoft Word is a product that has remained adaptable and innovative for over a century. Microsoft Word, which began as a humble offering and has since evolved into a cornerstone of digital communication, exemplifies Microsoft’s dedication to excellence, as demonstrated by the relentless pursuit of excellence by the company’s talented employees.
Microsoft Word’s evolution is a testament to the team’s dedication, as it reflects technological advancements, user-centered design principles, and a commitment to addressing challenges. In light of the intricate details of Microsoft Word’s creation, it appears that not only the software’s success is driven by its programming code, but also by the work of a multidisciplinary team.
There appears to be promising future for Microsoft Word, owing to ongoing developments and a commitment to meeting the ever-changing needs of users. Microsoft Word has a significant impact on education, business, and daily life, demonstrating how it has an impact on how we interact with information.
As we conclude our investigation into the architects behind Microsoft Word, we encourage you to consider how this software has impacted your life. There is something fascinating about Microsoft Word’s journey, whether you are a student, a professional, or simply enjoy using words. The story will only get better as updates and improvements are made. We appreciate your interest in Microsoft Word’s evolution and creation.
Have you ever faced the unfortunate situation of having to seamlessly transition your carefully crafted document in Google Docs to Microsoft Word? The compatibility struggle is real, and we all know what it’s like. Despite your fears, this guide will show you how to convert your Google Docs document into a flawless Microsoft Word document.
In essence, the process entails more than simply copying and pasting. Throughout the course, we’ll show you the most effective methods, such as manual copy-paste, using Google Docs add-ons, and even exporting your document directly into Word. There are no longer any issues with formatting or collaborative features that go astray.
As you can see, this world is a seamless transition between Google Docs and Microsoft Word, ensuring that your documents remain pristine. With the ease of a simple phone call, you can collaborate smoothly, share securely, and troubleshoot common problems. As we embark on this journey, you can rest assured that Google Docs will be transformed into Microsoft Word, eliminating compatibility issues for good. Ready to make your way into the water?
Checking Document Compatibility
In the intricate realm of document conversion, the pivotal second step, ‘Checking Document Compatibility,’ unfolds as a meticulous dance between the features of Google Docs and the receptive embrace of Microsoft Word. This phase is akin to orchestrating a symphony where each note must resonate harmoniously. At the forefront is the imperative to ensure that the distinctive features embedded in your Google Docs creation seamlessly translate into the nuanced language of Word.
Navigating this transition requires a discerning eye for potential formatting pitfalls, where the devil resides in the details. It’s not just about the words on the page; it’s about preserving the essence, the visual appeal, and the collaborative spirit of your document. Imagine, for a moment, your carefully crafted table suddenly distorted, or your meticulously chosen fonts lost in translation. Addressing these nuances becomes paramount to delivering a document that not only communicates effectively but does so with an aesthetic finesse.
Compatibility Checklist:
Feature Translation: Delve into the intricacies of Google Docs features and assess how they resonate within the Word ecosystem. This involves scrutinizing elements such as hyperlinks, comments, and document structure. Consider this the translation phase, where the language of Google Docs meets the dialect of Word.
Formatting Vigilance: A vigilant eye is the guardian of your document’s aesthetic integrity. Bullet points, headers, footers, and spacing – these seemingly mundane elements are the building blocks of visual appeal. The devil may indeed be in the details, and this is the juncture where meticulous attention ensures a smooth visual transition.
Navigating the Terrain:
When embarking on this compatibility check, consider it a meticulous examination rather than a perfunctory task. The nuances lie in understanding the idiosyncrasies of each platform and orchestrating a seamless fusion. Here’s where the alchemy happens, turning a potentially arduous task into a ballet of digital synchronization.
Potential Pitfalls and Proactive Solutions:
Images and Media Handling: Images embedded in Google Docs may face a metamorphosis when transplanted into Word. Address this by ensuring image formats are universally compatible and that the resolution remains unaffected. It’s the visual tapestry of your document that deserves preservation.
Collaborative Features: Google Docs thrives on collaborative editing; Word has its collaborative nuances. During this compatibility check, explore how comments, suggestions, and real-time collaboration elements seamlessly transition. This is where the heartbeat of shared document creation finds its rhythm in a new environment.
Hurdles and Triumphs:
As you navigate through these compatibility intricacies, consider it a journey filled with both hurdles and triumphs. It’s not merely a task to check off but an opportunity to elevate your document’s resilience and adaptability. Your Google Doc isn’t just making a transition; it’s undergoing a transformation, emerging on the other side as a Word document with newfound capabilities.
Conclusion:
In the grand tapestry of document conversion, the meticulous compatibility check emerges as the unsung hero. It’s the safeguard against potential dissonance, ensuring that your document, with all its nuances, transitions seamlessly from the vibrant realm of Google Docs to the polished sophistication of Microsoft Word. As you embark on this journey, armed with insights and a discerning eye, rest assured that your document’s essence will not only endure but flourish in its new linguistic home.
Manual Copy-Paste Method
In the intricate ballet of document conversion, the manual copy-paste method emerges as a classic maneuver, akin to a skilled chef executing a culinary masterpiece. This process, nestled in the heart of transitioning a document from Google Docs to Microsoft Word, is not merely a mechanical transfer but an artful dance where each step requires finesse. Let’s break down the intricacies of this method, exploring the nuances that transform a seemingly straightforward action into a strategic move.
Selecting and Copying Content:
The first act in this ballet involves delicately selecting the content in Google Docs, akin to a curator choosing the most precious artifacts for display. It’s not just about the words; it’s about capturing the essence—the carefully crafted sentences, the embedded images, and the collaborative spirit. Think of it as curating a gallery of your ideas, ensuring that each piece finds its place in the new exhibit.
Pro Tip: Use the Ctrl+A shortcut to select all content swiftly, saving time for the grander nuances of the transition.
Pasting into Microsoft Word:
The second act unfolds as you paste this curated collection into the canvas of Microsoft Word. It’s a transfer of creativity, a migration of thought, where Google Docs relinquishes its custody to the Word domain. This isn’t a mere transaction; it’s a transference of the soul of your document. Think of it as introducing a character from one novel into a different literary universe—maintaining their essence while adapting to the new narrative.
Pro Tip: Utilize the “Paste Special” option to choose how your content integrates, ensuring a seamless fit into the Word landscape.
Dealing with Formatting Adjustments:
Ah, the climax of our ballet—the intricate dance of formatting adjustments. This is where the rhythm of Google Docs meets the tempo of Microsoft Word, and sometimes, a little choreography is required. Headers, footers, spacing, fonts—they all have their unique dance moves, and ensuring they align harmoniously is the key to a visually stunning performance. It’s not just about the steps; it’s about the synchrony.
Pro Tip: Pay meticulous attention to paragraph styles, ensuring that the visual aesthetics of your document remain intact.
Navigating the Formatting Ballet:
As you navigate the formatting ballet, think of it as choreographing a visual masterpiece. Each element—bolded headings, italicized quotes, numbered lists—contributes to the symphony of your document. The challenge lies in maintaining this visual harmony, where the manual copy-paste method transforms from a mechanical transfer to a curated presentation of your ideas.
The Data Dance:
Consider this not just a dance of words but a data-driven performance. The efficiency of the manual copy-paste method is backed by its simplicity and the preservation of document integrity. According to recent SEO trends, this method, when executed seamlessly, contributes to a positive user experience, a crucial factor in search engine rankings.
The Grand Finale:
In the grand finale of this document conversion ballet, the manual copy-paste method emerges not as a mere transfer but as a deliberate and artful transition. It’s a testament to the meticulousness of the document creator—the curator, the chef, the choreographer—ensuring that the essence of the Google Docs creation not only survives but flourishes in the refined ambiance of Microsoft Word. So, as you embark on this balletic journey, remember that it’s not just about moving words; it’s about orchestrating a visual symphony. Let the manual copy-paste method be your dance partner in this eloquent conversion performance.
Exporting as Word Document
Source: https://paloalto.com
In the realm of seamless document migration, the prowess of ‘Exporting as Word Document’ emerges as a beacon, guiding users through a labyrinth of file format intricacies. This method transcends the mundane and becomes a digital craft—a strategic maneuver to ensure that your Google Docs creation metamorphoses flawlessly into the sophisticated landscape of Microsoft Word. Let’s embark on this expedition, breaking down the process into digestible steps, akin to unraveling the layers of a digital enigma.
Step-by-Step Guide:
Access the Export Option: Navigate to the upper menu of your Google Docs interface. Here, under the ‘File’ tab, unfolds the gateway to your document’s transformation. Think of it as the portal through which your creation transcends its native habitat.
Select ‘Download:‘ Within the ‘File’ tab, hover over ‘Download.’ A submenu materializes, offering a pantheon of export possibilities. It’s not merely a click but a strategic selection—a conscious choice to shepherd your document into the Word realm.
Choose ‘Microsoft Word (.docx):‘ A pivotal decision awaits. Amidst the export options, select ‘Microsoft Word (.docx).’ Picture this as the roadmap your document will follow—a trajectory designed for a seamless assimilation into the Word ecosystem.
Wait for the Download: A moment of anticipation follows. As you click ‘Microsoft Word (.docx),’ your document undergoes a digital metamorphosis. The download commences, a progress bar materializes—a visual testament to the conversion in motion. This is the heartbeat of the export process, each pulse resonating with the promise of compatibility.
Highlighting Available Export Settings:
Preserve Document Structure: As your document embarks on its Word-bound journey, ensure the preservation of its structural integrity. This is not just about words on a page; it’s about the architecture of your ideas. Choose the export settings that maintain headers, footers, and indentation—a blueprint for seamless readability.
Optimize for Compatibility: Within the export settings, embrace the option to optimize for Word compatibility. It’s not a mere checkbox but a strategic move to ensure that the nuances of your document—be it fonts, spacing, or specialized features—translate seamlessly into the Word dialect.
Embed Images: In the visual tapestry of your document, images play a pivotal role. Ensure that the export settings include the embedding of images. This is not just about visuals; it’s about preserving the soul of your document—each image a brushstroke in the narrative.
Consider Accessibility: Beyond the aesthetics, consider the accessibility of your document. Explore export settings that enhance readability for a diverse audience. Think of it as ensuring your document speaks a universal language—a linguistic bridge between Google Docs and Microsoft Word.
Navigating the Export Landscape:
As you navigate this export landscape, think of it not as a mere technical process but as a conscious choice—a decision to ensure that your document doesn’t just survive but thrives in its new Word habitat. The nuances lie not just in the clicks and selections but in the strategic choices made at each juncture.
The SEO Edge:
From an SEO perspective, this method boasts efficiency and user-centricity. The seamless export of your document as a Word file contributes to positive user experiences, a factor that search engines hold in high regard. The data-driven approach reveals that user-friendly practices, including effective document conversion, positively impact search rankings.
In conclusion, exporting your Google Docs as a Word document transcends the mundane. It’s a strategic dance—a choreography of clicks and selections that transforms your creation into a format fluent in the language of Microsoft Word. So, as you embark on this digital odyssey, armed with insights and a step-by-step guide, envision it not as a mere export but as a deliberate choice to elevate your document into the echelons of Word document sophistication.
Using Google Docs Add-ons
Image by: saymedia-content.com
In the ever-evolving landscape of document compatibility, the deployment of Google Docs Add-ons emerges as a tactical move—a digital arsenal designed to enhance the user’s ability to seamlessly export to Microsoft Word. This isn’t just a feature; it’s a testament to the adaptability and extensibility of the Google Docs ecosystem. Let’s delve into the intricacies, demystifying the process of utilizing these add-ons to orchestrate a smooth transition from the familiar Google Docs terrain to the refined realms of Microsoft Word.
Introduction to Relevant Add-ons:
In the ever-expanding galaxy of Google Docs, add-ons stand as constellations—distinct, purposeful, and illuminating the path toward enhanced functionality. When it comes to exporting to Word, specific add-ons step into the spotlight, offering users a nuanced toolkit for a more refined transition.
“Word Exporter”: As the name suggests, this add-on is a dedicated companion for those traversing the Google Docs to Word bridge. It encapsulates a suite of features that streamline the export process, ensuring not just compatibility but an optimal translation of Google Docs elements into their Word counterparts.
“Format Transfer”: This add-on is akin to a linguistic translator, proficient in the dialects of both Google Docs and Microsoft Word. It not only facilitates the smooth transition of text but also ensures that formatting nuances—be it fonts, styles, or even collaborative features—are seamlessly transposed.
“Image Embedder”: In the visual tapestry of document creation, images play a pivotal role. This add-on isn’t just an accessory; it’s a crucial component for those with a visually rich document. It ensures that images embedded in Google Docs retain their vibrancy and relevance when transplanted into the Word document.
Step-by-Step Guide on Integration and Utilization:
Accessing the Add-on Marketplace: The first step in this journey is navigating to the Google Docs Add-on marketplace. Think of this as the portal to a treasure trove—a marketplace teeming with digital tools ready to elevate your document creation experience.
Search for Relevant Add-ons: Armed with the names—Word Exporter, Format Transfer, Image Embedder—embark on a quest within the marketplace. Picture this as navigating a digital bazaar, selecting tools tailored to your document’s needs. Install these add-ons to empower your Google Docs with enhanced export capabilities.
Integration with Google Docs Interface: Once installed, these add-ons seamlessly integrate into the Google Docs interface. It’s not a mere installation but a fusion—an augmentation of your document creation environment. Picture it as enhancing your toolkit with specialized instruments, each ready to perform a specific task.
Accessing Add-on Features: With the add-ons seamlessly integrated, access their features within the Google Docs interface. This is not a detour from your familiar document creation process; it’s an enhancement—a strategic infusion of capabilities designed to optimize the export journey.
Utilizing Export Settings: Within the add-ons, explore export settings tailored to your Word migration needs. It’s not just about options; it’s about customization—tailoring the export process to align with your document’s nuances. Consider this the fine-tuning phase, where you dictate how your document will resonate in the Word landscape.
Navigating the Add-on Landscape:
Think of utilizing Google Docs Add-ons as not just a feature exploration but as an intentional choice—a decision to fortify your document creation arsenal with tools designed for precision. It’s not about navigating complex interfaces; it’s about empowering your familiar Google Docs interface with capabilities that transcend the ordinary.
The SEO Advantage:
From an SEO perspective, the seamless integration and utilization of these add-ons contribute to a positive user experience. Search engines, in their quest to prioritize user-centric practices, favor content that aligns with user needs and preferences. By leveraging these add-ons, users not only enhance their document creation but also contribute to a digital environment that values user-friendly practices.
In essence, the integration and utilization of Google Docs Add-ons for Word exportation transcend the ordinary. It’s not just a process; it’s a deliberate choice to enhance your document creation journey. Picture it as equipping your digital workspace with tools that understand the nuances of document compatibility—an intentional move toward a more refined and optimized user experience. So, as you navigate this landscape, consider these add-ons not as mere extensions but as strategic allies in your quest for seamless document migration.
Adjusting Formatting in Word
Navigating the transition from the creative haven of Google Docs to the structured landscape of Microsoft Word brings forth the critical juncture of ‘Adjusting Formatting in Word.’ Picture this as the meticulous touch-up phase of a masterpiece—where each brushstroke matters, and every detail contributes to the visual symphony. This is not merely about crossing platforms; it’s a deliberate act of preserving the visual aesthetics and structural integrity of your document. Let’s embark on a journey through the nuances of formatting adjustment, dissecting potential discrepancies and offering detailed instructions on rectifying common issues.
Overview of Potential Formatting Discrepancies:
Font and Style Variations: As your document traverses from the sans-serif realms of Google Docs to the serif sophistication of Word, subtle variations in font styles may emerge. Picture this as a linguistic translation—ensuring that your document’s voice remains consistent in a new dialect.
Spacing and Indentation Challenges: The dance of spacing and indentation is a delicate one. Google Docs and Word may have different interpretations of these nuances. Imagine it as a choreography where each line break and paragraph indentation needs precise alignment to retain the visual flow.
List and Bullet Point Adjustments: Lists and bullet points are the punctuation marks of visual rhetoric. The transition may introduce subtle alterations, demanding a careful examination to maintain the hierarchical structure and visual appeal.
Image Placement and Size: In the visual narrative, images are protagonists. However, Word may have its interpretation of image placement and sizing. Think of this as adjusting the frames in an art gallery—ensuring each visual element fits seamlessly into the canvas.
Detailed Instructions on Fixing Common Issues:
Unified Font and Style: Begin by selecting the entire document. In the ‘Home’ tab, standardize the font and style to align with your original Google Docs formatting. This is not a mere adjustment; it’s a declaration—a proclamation that your document retains its visual identity.
Spacing and Indentation Consistency: Navigate to the ‘Layout’ or ‘Page Layout’ tab in Word. Here, meticulously examine line spacing and paragraph indentation settings. Adjust as needed, envisioning it as a meticulous typographical edit—a refinement to ensure visual coherence.
List and Bullet Point Refinement: For lists and bullet points, dive into the ‘Home’ tab. Check the list settings—be it numbered or bulleted. This isn’t just a correction; it’s a choreography adjustment, ensuring each point in your document hits its visual mark.
Image Alignment and Sizing: Click on each image, treating it as a visual element worthy of individual attention. Use the ‘Format’ or ‘Picture Tools’ tab to fine-tune positioning and sizing. This is not a mere adjustment; it’s a curator’s touch—ensuring each visual element contributes harmoniously to the document’s narrative.
Navigating the Formatting Symphony:
As you navigate this formatting symphony, envision it not as a mere technical process but as a deliberate act of visual preservation. It’s not just about fixing discrepancies; it’s about orchestrating a seamless transition where your document’s essence remains unscathed.
The SEO Lens:
From an SEO perspective, ensuring consistent formatting across platforms contributes to positive user experiences—a metric search engines hold in high regard. User-centric practices, including visual coherence and readability, amplify the discoverability of your content in the digital landscape.
Collaborative Editing Considerations
In the dynamic realm of collaborative document editing, the considerations surrounding the seamless transition from Google Docs to Word—a transition akin to orchestrating a symphony where each contributor plays a crucial role—demand meticulous attention. The collaborative features ingrained in Google Docs serve as the harmonious notes of a collaborative composition, and when transposed into the structured landscape of Word, they must retain their resonance. Let’s delve into the intricacies of ‘Collaborative Editing Considerations,’ addressing the nuanced dance between collaborative elements in Google Docs and their adaptation to the Word environment.
Addressing Collaborative Features in Google Docs:
Real-Time Editing Harmony: Google Docs is celebrated for its real-time editing capabilities—a synchronous dance where multiple contributors can seamlessly edit a document concurrently. Picture this as a dynamic jazz improvisation, each contributor adding their flair to the collective masterpiece.
Commenting and Suggestions Elegance: The commenting and suggestion features in Google Docs are akin to an art critique—a space for constructive input and refinement. The collaborative dialogue unfolds seamlessly, ensuring each voice is heard. This is not just a feature; it’s an architectural design for collective creativity.
Version History Transparency: The version history feature is the archival backbone of collaborative editing—an evolving manuscript capturing the journey of collective authorship. Think of it as a historical record, preserving the evolution of ideas, revisions, and refinements.
Ensuring Collaborative Elements Work in Word:
Real-Time Collaboration in Word: As the document transitions to Word, preserving real-time collaboration is paramount. Utilize Word’s built-in collaboration features, ensuring that the synchronized dance of multiple contributors remains intact. This isn’t just a technical adaptation; it’s a commitment to preserving the essence of collaborative editing.
Commenting and Tracking Changes: Word, too, boasts commenting and tracking changes features, ensuring the refinement dialogue continues seamlessly. It’s not just about comments; it’s about fostering a space for collaborative critique, suggestions, and improvements—a continuation of the creative conversation initiated in Google Docs.
Integration with External Collaboration Tools: Consider the integration of external collaboration tools compatible with both Google Docs and Word. This is not just an integration; it’s an expansion—a strategic move to enhance the collaborative toolkit, ensuring that contributors can seamlessly engage regardless of the platform.
Navigating the Collaborative Symphony:
Envision the collaborative editing process as a symphony—each note, each suggestion, and each revision contributing to a harmonious whole. As you navigate the transition from Google Docs to Word, consider it not as a conversion but as an orchestrated adaptation where the collaborative symphony endures.
The Collaborative SEO Impact:
From an SEO perspective, collaborative editing signifies user engagement and content evolution—factors search engines value. The seamless adaptation of collaborative elements from Google Docs to Word contributes to positive user experiences, a metric that aligns with search engine algorithms favoring user-centric content.
In essence, collaborative editing considerations stand as a testament to the evolving landscape of document creation—a landscape where contributors, features, and ideas converge. As you navigate this transition, envision it not as a technical challenge but as an opportunity to enhance the collaborative toolkit, ensuring that the symphony of collective authorship continues to resonate, whether in the dynamic realms of Google Docs or the structured landscape of Microsoft Word.
Dealing with Images and Media
In the multifaceted landscape of document creation, where words often intertwine with visuals, ‘Dealing with Images and Media’ stands as a pivotal chapter—a narrative where the visual storytelling prowess of Google Docs transcends into the structured confines of Microsoft Word. This isn’t just a transposition; it’s an artful adaptation, ensuring that the vibrant tapestry of images and media retains its brilliance across platforms.
Handling Images and Media in Google Docs:
Embedding Visual Narratives: Google Docs serves as a canvas for visual narratives, allowing users to seamlessly embed images and media to enhance the storytelling experience. This isn’t merely about insertion; it’s about weaving a visual thread that complements the textual tapestry, transforming documents into immersive experiences.
Collaborative Image Integration: Picture a collaborative mural where contributors seamlessly integrate images into the document. Google Docs facilitates this collaborative image integration, ensuring that each contributor’s visual contribution becomes an integral part of the collective narrative. It’s not just about individual images; it’s about fostering a collaborative visual dialogue.
Responsive Media Alignment: In the responsive environment of Google Docs, media elements align dynamically, adapting to different screen sizes. This is not just about display; it’s about ensuring that the visual impact remains consistent, whether viewed on a large monitor or a handheld device—a testament to the user-centric design of Google Docs.
Ensuring Proper Display and Functionality in Word:
Embedding in Word Documents: Transitioning to Word requires a meticulous approach to ensure proper image embedding. Utilize Word’s image insertion features, envisioning it as transplanting visual elements from one gallery to another. This isn’t just about compatibility; it’s about preserving the visual essence of each image in the new environment.
Maintaining Collaborative Image Integrity: The collaborative spirit of visual storytelling shouldn’t diminish in Word. Ensure that collaborative image integration remains seamless, as if each contributor’s brushstroke is preserved in the transferred mural. It’s not just about images; it’s about preserving the collaborative narrative.
Responsive Design Considerations: Acknowledge the varied devices on which Word documents may be viewed. Optimize media elements for responsive design, ensuring that the visual impact adapts gracefully to different screens. This is not just about functionality; it’s about acknowledging the diverse ways audiences engage with digital content.
Navigating the Visual Symphony:
Envision the handling of images and media not as a technical task but as orchestrating a visual symphony—a symphony where each image, each video, and each media element contributes to a harmonious whole. As you navigate this visual landscape, consider it not as a migration but as a curated adaptation where visual stories endure.
The SEO Visual Impact:
From an SEO perspective, the effective handling of images and media contributes to a positive user experience—a key metric in search engine algorithms. Visual content that seamlessly transitions from Google Docs to Word ensures a consistent and engaging user journey, aligning with the user-centric criteria valued by search engines.
In essence, ‘Dealing with Images and Media’ is not just a technicality; it’s an artful translation—a deliberate act to preserve the visual narrative in the evolving landscape of document creation. So, as you embark on this visual journey, envision it not as a mere task but as a commitment to maintaining the vibrancy and integrity of your visual storytelling, whether in the collaborative realms of Google Docs or the structured expanse of Microsoft Word.
Document Security and Privacy
In the intricacies of digital document management, the paramount concern of ‘Document Security and Privacy’ transcends beyond the mere act of sharing and conversion. It’s a narrative of safeguarding intellectual landscapes and ensuring the sanctity of information in a realm where data privacy is of paramount importance. As you embark on the journey of transitioning documents from the collaborative expanse of Google Docs to the secure enclave of Microsoft Word, the considerations extend beyond the surface, delving into the nuanced layers of sharing settings and security fortifications.
Checking and Adjusting Sharing Settings:
Granular Permission Management: In Google Docs, the sharing settings function as gatekeepers, regulating access to the document. Consider this as the keymaster’s duty, where each permission setting dictates who can view, edit, or comment on the document.
Collaborative Access Control: The collaborative essence of Google Docs thrives on shared access. Adjusting sharing settings becomes a collaborative covenant—a strategic balance between openness and control, ensuring that contributors have the right level of access without compromising document integrity.
Version Visibility Management: The version history, a testament to collaborative evolution, requires meticulous sharing setting considerations. Each version is a chapter in the document’s narrative, and managing visibility becomes an editorial decision, ensuring that contributors have access to the relevant historical context.
Ensuring Document Security During the Conversion Process:
Encryption Protocols in Transition: As the document transitions to Word, the encryption protocols must seamlessly adapt. Encryption becomes the guardian, ensuring that the document’s journey from one platform to another remains shielded against potential vulnerabilities—a digital cloak that safeguards the integrity of the content.
Metadata Scrubbing Vigilance: Metadata, the subtle fingerprints embedded in digital documents, demands meticulous attention. Consider this as a digital forensics task—scrubbing metadata during the conversion process to ensure that confidential information, hidden in the digital shadows, remains secure.
Secure Storage in Word Environment: The destination, in this case, Microsoft Word, should not just be a repository but a secure vault. Ensure that Word’s security features, from password protection to access controls, are employed. This isn’t just about conversion; it’s about ensuring that the document’s sanctity is preserved in its new habitat.
Navigating the Fortified Landscape:
Envision the fortification of document security and privacy not as a barrier but as a strategic defense—a shield that preserves the collaborative spirit while safeguarding against potential vulnerabilities. As you navigate this fortified landscape, consider it not as a mere conversion but as a security pledge—a commitment to upholding the trust embedded in every word, every comment, and every version.
The SEO Security Implications:
From an SEO perspective, document security contributes to user trust—a pivotal factor in search engine algorithms. Platforms that prioritize and ensure robust security measures foster positive user experiences, aligning with the user-centric criteria search engines prioritize.
In essence, ‘Document Security and Privacy’ is not just a technicality; it’s a pledge—an assurance that the collaborative and intellectual wealth embedded in your document remains safeguarded, whether in the expansive realms of Google Docs or the secure corridors of Microsoft Word. So, as you embark on this security journey, envision it not as a hurdle but as a testament to the unwavering commitment to protect the integrity of your digital narrative.
Troubleshooting Common Issues
Photo by: limblecmms.com
In the intricate dance between digital platforms, the transition of documents from the collaborative embrace of Google Docs to the structured realm of Microsoft Word can encounter its share of hiccups. ‘Troubleshooting Common Issues’ becomes a critical chapter in this narrative, offering a roadmap to navigate the potential stumbling blocks with finesse. As you embark on this conversion journey, consider it not just as a technical task but as a symphony of problem-solving, where each discordant note transforms into a harmonious resolution.
Addressing Common Problems Encountered During the Conversion:
Formatting Fiascos: The transition from the fluid design canvas of Google Docs to the more structured confines of Word can lead to formatting discrepancies. Picture this as a choreography glitch that needs meticulous attention to ensure that the visual elements, from fonts to spacing, seamlessly adapt to the new stage.
Image and Media Misalignment: The visual narrative woven in Google Docs might experience a slight misalignment when transposed to Word. Address this as a narrative hiccup—a moment where the visual elements need repositioning to ensure that the collaborative visual storytelling retains its original impact.
Collaborative Conundrums: The collaborative spirit embedded in Google Docs might encounter minor disruptions during the migration. Treat this as a collaborative detour, where ensuring the smooth transition of comments, suggestions, and collaborative contributions becomes paramount—a testament to preserving the collaborative ethos.
Troubleshooting Tips for a Smooth Process:
Version History Resilience: The version history, akin to the chapters in a book, might face a momentary disruption. Consider this as a narrative checkpoint, where ensuring the resilience of version history becomes pivotal. Troubleshoot to maintain the continuity of the collaborative evolution.
Security Stitching: The transition should not compromise document security. If security settings encounter a snag, treat it as a security stitch—carefully ensuring that the document’s integrity remains intact during the conversion, just as a skilled tailor mends a fabric flaw.
Collaborative Editing Harmony: Collaborative editing features, a hallmark of Google Docs, should seamlessly align in Word. Consider this as a collaborative overture, where ensuring that each contributor’s keystroke, suggestion, and edit align harmoniously in the new environment becomes a troubleshooting priority.
Navigating the Symphony of Troubleshooting:
Envision the troubleshooting process not as a daunting labyrinth but as a symphony—a harmonious blend of problem-solving notes that elevate the conversion journey. As you navigate through these troubleshooting intricacies, consider it not as a setback but as an opportunity to showcase the resilience and adaptability of your document.
The SEO Troubleshooting Impact:
From an SEO perspective, addressing and resolving common issues contributes to a positive user experience, a key factor in search engine algorithms. Platforms that prioritize seamless transitions and troubleshoot effectively contribute to a favorable SEO profile, aligning with the user-centric criteria valued by search engines.
In essence, ‘Troubleshooting Common Issues’ is not just a checklist; it’s a troubleshooter’s guide—a compass that steers you through the potential nuances of the conversion process. So, as you embark on this troubleshooting odyssey, envision it not as a challenge but as a demonstration of your adeptness in transforming potential discord into a symphony of seamless document transition.
Additional Tips and Tricks
Photo by: k5learning
In the intricate realm of document migration, the journey from the collaborative expanse of Google Docs to the structured terrain of Microsoft Word demands not just precision but a mastery of additional tips and tricks to enhance the efficiency of the conversion process. These insights go beyond the conventional, offering a strategic playbook to not only navigate the transition seamlessly but also to leverage the full spectrum of Word features post-conversion.
Providing Extra Insights for a More Efficient Conversion Process:
Optimized Formatting Techniques: Elevate your formatting game by exploring advanced techniques. Dive into Word’s style options and leverage advanced formatting tools to ensure that your document not only looks polished but also aligns seamlessly with your intended visual narrative.
Hyperlink Preservation Strategies: Documents often contain a web of hyperlinks. Ensure their seamless transition by adopting preservation strategies. This involves not only validating the hyperlinks during the conversion but also employing Word’s hyperlink management features to maintain their functionality post-migration.
Efficient Comment Handling: Comments, a vital aspect of collaboration, should transition with finesse. Explore Word’s comment management tools, allowing for efficient handling, resolution, and tracking of collaborative inputs, ensuring that the collaborative spirit remains vibrant in the new environment.
Maximizing the Use of Word Features Post-Conversion:
Harnessing Advanced Editing Capabilities: Word is not just a vessel for your content; it’s a powerhouse of editing capabilities. Dive into advanced editing features, from track changes to document comparison, enhancing your post-conversion editing prowess and streamlining the refinement process.
Dynamic Table of Contents Implementation: Elevate document navigation by mastering Word’s dynamic Table of Contents features. Implementing a dynamic TOC not only enhances document aesthetics but also facilitates seamless navigation, ensuring that readers can traverse your content with ease.
Visual Appeal with Advanced Graphics Tools: Visual elements play a crucial role in document engagement. Unleash Word’s advanced graphics tools to enhance the visual appeal of your document. From sophisticated image editing to creative text wrapping, these features add a layer of visual finesse post-conversion.
Navigating the Enhanced Landscape:
Consider these additional tips and tricks not as mere add-ons but as navigational beacons, guiding you through an enhanced landscape of document creation and refinement. As you implement these strategies, envision them not just as tools but as catalysts—propelling your document to new heights of visual appeal, collaborative functionality, and overall reader engagement.
The SEO Enhancement Perspective:
From an SEO standpoint, the efficient implementation of these tips and tricks contributes to a positive user experience—a cornerstone of search engine algorithms. Platforms that optimize the use of advanced features align with the user-centric criteria valued by search engines, thereby enhancing their SEO profile.
In essence, ‘Additional Tips and Tricks’ is not a supplementary chapter; it’s a transformative playbook—a guide that empowers you to not only navigate the conversion process seamlessly but also to harness the full potential of Microsoft Word’s rich feature set post-conversion. So, as you embark on this advanced journey, consider it not as an addendum but as an opportunity to elevate your document creation and refinement prowess to unprecedented levels.
Have you ever submitted a document only to realize later that a pesky typo has slipped through unnoticed? We have all been there, and it’s frustrating as well. Fortunately, Microsoft Word has a powerful feature: spell check, which can be used to save words. You would be able to easily create error-free documents if you would. If you’re interested, let’s try spell checking for a few minutes to hone your writing skills.
The best way to make sure that spell checks are always in Microsoft Word is to click the “Check” button. With just a few mouse clicks, you can apply the power of a real-time proofreader to your documents. As part of this article, we’ll explain how to use spell check, customize settings, and troubleshoot common problems. As you embark on your writing adventure, you will notice that it will become much easier and more pleasant.
Why should we not go into the “grounds?” But why not get to the “grounds?” We’ve got answers for you. Do you ever wish your spell check understood industry-specific terms or your unique writing style? By customizing the spell check, adding custom words, and making advanced settings, you can create the spell check that works best for you. By the end of this course, you will not only understand how to activate spell check but also how to make it your own personal writing assistant. Have you tried transforming your writing game?
Accessing Spell Check in Microsoft Word
In the intricate tapestry of Microsoft Word functionalities, the realm of spell check stands as a guardian of linguistic precision, ensuring your prose emerges unblemished and refined. To navigate this indispensable tool, one must first embark on the journey of accessing the spell check feature. The avenues to this linguistic sanctuary are as diverse as the nuances of the English language itself.
Toolbar Option:
At the forefront of accessibility lies the toolbar, a user-friendly gateway to the spell check realm. With a mere click, a world of linguistic scrutiny unfolds. This straightforward approach caters to the seasoned professional and the novice wordsmith alike. It’s a visual prompt, a beacon in the digital landscape signaling that your words are about to undergo a meticulous examination.
Keyboard Shortcut:
For the adept wordsmith seeking efficiency, the keyboard shortcut becomes the weapon of choice. The sleek combination of keystrokes opens the portal to spell check prowess with swift precision. It’s the silent dance of fingers across keys, a secret handshake among those who value both speed and accuracy in their written endeavors.
Review Tab Option:
Venturing into the nuanced terrains of the Review tab reveals yet another avenue to the spell check utopia. This option caters to those who prefer a methodical and organized approach to their writing process. It’s here that the meticulous can find solace, as the spell check feature aligns seamlessly with other review functionalities, creating a cohesive environment for comprehensive document scrutiny.
In the quest for linguistic perfection, mastering these diverse access points to Microsoft Word’s spell check is akin to wielding a versatile quill in the literary battlefield. Whether you favor the visual simplicity of the toolbar, the nimble strokes of keyboard shortcuts, or the organized embrace of the Review tab, each avenue converges to elevate your writing to a higher echelon of clarity and correctness.
Streamlining Your Proofreading Journey: Tips and Tricks
Honing the Craft:
To optimize your spell check experience, consider incorporating the following tips into your proofreading ritual:
Customizing Preferences: Dive into the settings to tailor spell check to your linguistic idiosyncrasies. Ensure it aligns with your preferred language and style nuances.
Real-Time Vigilance: Activate the real-time spell check feature to catch errors on the fly. Those subtle red underlines become your vigilant companions in the pursuit of flawless prose.
Overcoming Challenges:
The path to linguistic perfection may not be without its challenges. Addressing potential roadblocks ensures a smoother proofreading journey:
Troubleshooting Techniques: Familiarize yourself with troubleshooting measures to tackle common issues. From misspelled words slipping through undetected to false positives, each challenge has a solution within your grasp.
Adapting to Your Workflow:
Consider the integration of spell check into your unique workflow, making it an organic part of your writing process. The synergy between your creative flow and the meticulous eye of spell check transforms writing from a task into an art.
In the grand tapestry of writing, spell check emerges as a silent collaborator, refining your words without altering your voice. As you navigate the diverse routes to accessing this indispensable feature, remember that linguistic precision is not a destination but a continuous journey. Embrace the tools at your disposal, wield them with finesse, and watch as your written expression reaches new heights of clarity and impact.
Configuring Spell Check Settings
Source: windowscentral.com
In the intricate dance of words, configuring spell check settings in Microsoft Word emerges as a crucial choreography, tailored to the unique rhythm of each writer. This step-by-step guide serves as your navigational chart through the sea of options, ensuring that spell check becomes not just a tool but an extension of your linguistic style.
Language Preferences: Crafting Your Linguistic Canvas
Embarking on the customization journey, the first canvas awaits—language preferences. Here, the tapestry of expression unfurls in myriad hues. Microsoft Word caters to the global wordsmith, offering an array of languages to choose from. Navigating to the “Language” settings becomes your linguistic palette, where you can select and prioritize the languages that resonate with the nuances of your prose.
Auto-Correct Options: The Guardian of Fluidity
Beyond language, the realm of auto-correct beckons, a guardian ensuring the fluidity of your writing. With a deft hand, you can toggle the auto-correct options to seamlessly rectify common typos and streamline your creative flow. This automated vigilance becomes your silent ally, sparing you the need to backtrack and allowing your thoughts to cascade onto the digital canvas with uninterrupted eloquence.
Grammar Checking Settings: Fine-Tuning Precision
For the discerning writer, precision extends beyond mere spelling. The grammar checking settings, a realm of meticulous fine-tuning, await your exploration. As you delve into this domain, options such as sentence structure, passive voice, and punctuation scrutiny become your allies in sculpting grammatically immaculate prose. This feature is not just a correction tool; it’s a writing mentor, refining your syntax and enhancing the structural integrity of your compositions.
As you traverse the landscape of configuring spell check settings, envision it as tailoring a bespoke suit for your writing style. Each adjustment, from language preferences to grammar intricacies, contributes to the seamless fusion of technology and expression.
Navigating the Configuration Maze: Pro Tips
Prioritize Your Primary Language:
Step 1: Head to the “Review” tab.
Step 2: Click on “Language” in the Language group.
Step 3: Select your primary language. This not only fine-tunes spell check but also aligns language-specific grammar rules.
Auto-Correct Efficiency:
Step 1: Navigate to “File” > “Options.”
Step 2: Click on “Proofing” in the left-hand menu.
Step 3: Explore “AutoCorrect Options” to customize auto-correction settings. Adjust the level of intervention based on your preference.
Grammar Polishing:
Step 1: Within the same “Proofing” menu, explore “Grammar” settings.
Step 2: Tailor grammar checking options to align with your writing style. This step ensures that your prose not only adheres to spelling rules but also follows grammatical conventions.
Frequent Check-ins:
Step 1: Regularly revisit and reassess your spell check settings.
Step 2: As your writing style evolves, so should your spell check configurations. A dynamic approach ensures optimal assistance.
As you embark on this odyssey of customization, envision your spell check settings as a collaborator rather than a mere tool. Together, you and Microsoft Word sculpt a writing environment that resonates with your individuality, where technology seamlessly enhances, but never eclipses, your unique voice.
Activating Spell Check as You Type
In the symphony of digital composition, real-time spell check emerges as the unsung hero, orchestrating a seamless writing experience. To embark on this journey of linguistic finesse, let’s delve into the art of activating spell check as you type, transforming your wordsmithing process into a fluid dance of expression and accuracy.
Enabling the Spell Check Symphony: A Walkthrough
Navigating the realm of real-time spell check begins with a deliberate stroll through Microsoft Word’s intricacies. Here’s your guide to unleashing the spell check symphony as you type:
Exploring ‘Spelling & Grammar’ Options:
Step 1: Direct your cursor to the ‘Review’ tab.
Step 2: Click on ‘Spelling & Grammar’ in the Proofing group.
Step 3: Marvel at the array of options that unveil before you.
At this juncture, you’re not just activating spell check; you’re customizing its orchestra. Explore the diverse settings – from ignoring words in uppercase to opting for a thorough grammar check. It’s a personalized journey, ensuring your writing nuances align harmoniously with the vigilant spell check conductor.
Ensuring the Red Squiggly Lines are Activated:
Step 1: Venture into the ‘File’ menu.
Step 2: Click on ‘Options.’
Step 3: Within ‘Proofing,’ confirm that the ‘Check spelling as you type’ and ‘Mark grammar errors as you type’ options are gleaming with a checkmark.
The red squiggly lines, akin to attentive musical notes, are the maestros of real-time correction. They gently signal potential errors, allowing you to refine your prose with a deft hand. It’s not just about catching mistakes; it’s about creating a symbiotic relationship with your digital writing companion.
Unveiling the Symphony’s Subtleties: Pro Tips
Fine-Tuning Grammar Checking:
Tip 1: Within ‘Spelling & Grammar’ options, explore ‘Settings.’
Tip 2: Tweak the grammar checking preferences based on your writing style. Whether you favor a minimalist approach or crave in-depth scrutiny, these settings are your personalized conductors.
Navigating the Proofing Landscape:
Tip 1: Customize the proofing options according to your needs.
Tip 2: Dabble in ‘AutoCorrect Options’ for a heightened writing experience. This isn’t just about rectifying mistakes; it’s about preemptively understanding your linguistic cadence.
Staying in the Flow:
Tip 1: Familiarize yourself with keyboard shortcuts for on-the-fly adjustments.
Tip 2: Embrace the rhythm of writing without interruptions. The real-time spell check, when attuned to your preferences, becomes a silent companion, ensuring you stay immersed in the creative flow.
As you activate spell check as you type, envision it not as a stringent editor but as a collaborative partner in your creative journey. Microsoft Word’s spell check, when customized to your unique writing cadence, transforms into a maestro orchestrating a symphony of words. It’s not just about catching errors; it’s about fostering a dynamic relationship where technology enhances, rather than hinders, your expressive prowess. Welcome to the realm where your words dance seamlessly with the vigilant melody of real-time spell check.
Utilizing Custom Dictionaries
Photo by – https://groovypost.com
In the intricate ballet of language, where industries have their own dialects and individuals cultivate unique lexicons, custom dictionaries emerge as the unsung heroes of precision in Microsoft Word. Navigating the realm of industry-specific or personal terms requires not just a linguistic compass but a bespoke guide on creating and managing custom dictionaries.
Crafting Your Lexical Sanctuary: A Guided Journey
Adding Words to the Dictionary:
Akin to laying the foundation of a linguistic fortress, adding words to your custom dictionary is a deliberate act of inclusion.
Step 1: Hover over the word you wish to include.
Step 2: Right-click to reveal a contextual menu.
Step 3: Select “Add to Dictionary.”
This isn’t merely expanding a dictionary; it’s a statement of linguistic sovereignty. From specialized jargon to inventive neologisms, your writing lexicon now bears the stamp of your distinct linguistic fingerprint.
Editing the Custom Dictionary:
The true artistry lies not just in inclusion but in the delicate act of editing, ensuring your lexical sanctuary remains pristine.
Step 1: Navigate to the ‘File’ menu.
Step 2: Select ‘Options’ and delve into ‘Proofing.’
Step 3: Click on ‘Custom Dictionaries’ to unveil the array of words you’ve woven into your linguistic tapestry.
Editing your custom dictionary allows for the nuanced curation of your lexicon. Delete obsolete terms, refine definitions, and evolve your linguistic haven in tandem with your writing journey.
The Alchemy of Linguistic Inclusion: Pro Tips
Strategic Inclusions:
Tip 1: Prioritize industry-specific terms essential to your discourse.
Tip 2: Balance the scale by incorporating personal expressions and colloquialisms. This amalgamation ensures a nuanced linguistic landscape.
Synchronized Edits:
Tip 1: Regularly revisit and edit your custom dictionary.
Tip 2: Align your edits with the evolution of your industry or the shifting sands of your personal lexicon. A synchronized dictionary is a living document, adapting to the ebbs and flows of language.
Backup and Restore:
Tip 1: Understand the importance of safeguarding your lexical treasury.
Tip 2: Utilize the ‘Custom Dictionaries’ option to back up and restore your personalized dictionary. This precautionary measure ensures your linguistic history remains intact, impervious to technological hiccups.
As you embark on the journey of utilizing custom dictionaries, envision it not merely as a technological function but as an intimate collaboration between you and your words. Your custom dictionary becomes a linguistic artifact, a testament to the evolution of your discourse. It’s not just about words; it’s about crafting a lexicon that mirrors the intricacies of your industry or the idiosyncrasies of your expression. Welcome to the realm where precision and personalization converge, and every added word is a stroke on the canvas of your unique linguistic masterpiece.
Troubleshooting Spell Check Issues
In the intricate web of words, spell check serves as a diligent guardian against the pitfalls of linguistic oversights. However, even the most reliable tools encounter stumbling blocks. In this troubleshooting guide, we’ll navigate through common spell check woes and unveil the solutions that restore its seamless functionality.
Unmasking the Culprits: Common Problems and Solutions
Misspelled Words Not Detected:
The perplexing scenario of misspelled words slipping through the spell check net can leave writers scratching their heads.
Solution 1:Custom Dictionary Checks: Ensure that the misspelled word isn’t added to your custom dictionary, which might override the default spell check.
Solution 2:Language Settings Verification: Confirm that the document’s language setting aligns with the language you’re writing in, as discrepancies can lead to undetected misspellings.
False Positives:
The overzealous red squiggly line indicating an error where there is none can be a source of frustration.
Solution 1:Add to Dictionary Option: Right-click on the flagged word and choose “Add to Dictionary” if the word is legitimate and part of your writing lexicon.
Solution 2:Grammar Settings Adjustment: Fine-tune grammar settings to strike a balance between precision and flexibility, minimizing false positives.
Issues with Language Recognition:
When the digital polyglot stumbles in deciphering your linguistic intent, it’s time to troubleshoot.
Solution 1:Explicit Language Declaration: Manually set the language for specific portions of your document using the language tool in the ribbon.
Solution 2:Reinstall Language Packs: If using multiple languages, reinstall language packs to ensure robust language recognition across the document.
Navigating the Spell Check Maze: Pro Tips
Dynamic Proofing:
Tip 1:Regular Review: Periodically review and update your custom dictionary to prevent inadvertent exclusions.
Tip 2:Adaptive Customization: Tailor your spell check settings based on the evolving nature of your writing, whether it’s industry-specific terms or evolving language nuances.
False Positive Management:
Tip 1:Contextual Review: Consider the context of flagged words to discern false positives from genuine errors.
Tip 2:User Feedback: Leverage user feedback mechanisms within the spell check tool to enhance its learning algorithm over time.
Language Harmony:
Tip 1:Consistent Language Usage: Maintain consistency in language usage throughout your document to aid accurate language recognition.
Tip 2:Revisit Document Settings: Periodically revisit document language settings to ensure alignment with your writing style.
As you navigate the intricate landscape of spell check troubleshooting, envision it not as a tedious task but as a dynamic dialogue between you and your writing companion. Spell check, when fine-tuned and understood, becomes a harmonious ally, catching genuine errors without impeding the creative flow. By implementing these solutions and adopting a proactive approach to linguistic precision, you pave the way for a writing experience where technology enhances rather than hinders your expressive prowess.
Updating Microsoft Word
VII. Updating Microsoft Word: Sustaining Spell Check Excellence
In the dynamic realm of digital writing, where precision is paramount, ensuring the optimal performance of Microsoft Word’s spell check is akin to tuning a fine instrument. The key to this sustained excellence lies in understanding and embracing the importance of keeping Microsoft Word up-to-date, an often overlooked yet crucial aspect that impacts spell check functionality.
The Imperative of Timely Updates: Enhancing Spell Check Prowess
Checking for Updates:
In the ever-evolving landscape of software, the periodic release of updates stands as a testament to the commitment of enhancement and refinement.
Step 1:Navigation to ‘File’: Access the ‘File’ menu within Microsoft Word.
Step 2:Check for Updates: Explore the ‘Account’ tab and select ‘Update Options.’ From here, click on ‘Update Now.’
Step 3:Installation: Follow the prompts to install the latest updates.
Timely updates act as the elixir for your spell check, addressing bugs, refining algorithms, and introducing compatibility enhancements. It’s not merely a routine task; it’s a proactive measure to fortify your writing arsenal.
Enabling Automatic Updates:
To ensure a continuous stream of enhancements without manual intervention, configuring automatic updates becomes a strategic move.
Step 1:Access ‘Options’: Navigate to the ‘File’ menu and click on ‘Options.’
Step 2:Automatic Updates: Within ‘Options,’ select ‘Trust Center’ and then ‘Trust Center Settings.’ Finally, choose ‘Update Options’ and enable ‘Automatic Updates.’
Automatic updates transform your software maintenance into an effortless background process, guaranteeing that your spell check remains at the forefront of linguistic precision without requiring constant vigilance.
Nurturing Spell Check Through Software Vigilance: Pro Tips
Regular Checks for Office Updates:
Tip 1:Set a Schedule: Establish a routine for checking and installing updates. This proactive approach ensures that you don’t miss critical improvements.
Tip 2:Leverage Version Information: Keep an eye on the version information to gauge the relevance of available updates to your writing needs.
Seamless Automatic Updates:
Tip 1:Bandwidth Consideration: Ensure that your internet connection can support automatic updates without disruption.
Tip 2:Background Update Awareness: Familiarize yourself with the background update process to minimize interference with your writing flow.
Backup and Restore Practices:
Tip 1:Backup Strategy: Implement a robust backup strategy before major updates to safeguard your documents.
Tip 2:Version Compatibility: Confirm the compatibility of updates with your existing document versions to avoid unforeseen compatibility issues.
As you embark on the journey of updating Microsoft Word, envision it not as a mundane task but as a strategic investment in the proficiency of your spell check. Regular updates transform your writing experience into a seamless orchestration of technology and expression, where each keystroke resonates with the precision nurtured by cutting-edge enhancements. It’s a commitment to linguistic excellence, where the ever-evolving software landscape converges with the timeless artistry of wordsmithing.
Spell Check in Different Versions of Microsoft Word
VIII. Spell Check in Different Versions of Microsoft Word: A Journey Through Evolution
In the intricate tapestry of Microsoft Word’s evolution, the spell check feature has undergone a metamorphosis, adapting to the nuances of each version. Navigating the landscape of Word 2010, Word 2013, Word 2016, Word 2019, and the cloud-based Word 365 involves understanding the subtle variations in accessing and configuring the spell check functionality.
Unraveling the Spell Check Symphony: Version-Specific Insights
Word 2010:
In the bygone era of Word 2010, accessing spell check was a deliberate process, underscoring the evolution toward user-friendly interfaces.
Access Spell Check:
Navigate to the ‘Review’ tab.
Click on ‘Spelling & Grammar’ to initiate the spell check process.
Configuration Insights:
Limited customization options compared to later versions.
A more manual process, emphasizing user intervention.
Word 2013:
Word 2013 marked a transition, introducing a more streamlined spell check experience with subtle refinements.
Access Spell Check:
Similar to Word 2010, located in the ‘Review’ tab.
Introduced a smoother, more intuitive interface.
Configuration Insights:
Enhanced customization options.
The beginning of a trend toward user-centric configurations.
Word 2016:
Word 2016 continued the trajectory of refinement, focusing on user-centric spell check interactions.
Access Spell Check:
Remained in the ‘Review’ tab.
Further streamlined interface for accessibility.
Configuration Insights:
Advanced customization options introduced.
A more seamless integration with user preferences.
Word 2019:
With Word 2019, the emphasis on user empowerment reached a zenith, offering an intricate dance of accessibility and customization.
Access Spell Check:
Retained in the ‘Review’ tab.
A culmination of intuitive design elements.
Configuration Insights:
Unprecedented customization options.
Heightened user control over spelling and grammar preferences.
Word 365:
Word 365, residing in the cloud, represented the pinnacle of accessibility and real-time collaboration, redefining the spell check experience.
Access Spell Check:
Seamlessly integrated into the cloud-based interface.
A reflection of Microsoft’s commitment to fluid user experiences.
Configuration Insights:
Constant updates and enhancements.
Synchronized configurations across devices, emphasizing a unified user experience.
Navigating the Evolutionary Spell Check Landscape: Pro Tips
Cross-Version Compatibility:
Tip 1:Understand Version Nuances: Familiarize yourself with the specific spell check features unique to each version.
Tip 2:Utilize Online Resources: Leverage Microsoft’s online resources for version-specific tutorials and troubleshooting.
User-Centric Configurations:
Tip 1:Explore Customization Options: Delve into the customization features available in your specific version.
Tip 2:Community Forums Engagement: Participate in online forums to share insights and learn from user experiences across versions.
Cloud-Based Synergy:
Tip 1:Embrace Continuous Updates: In Word 365, allow automatic updates to stay abreast of the latest enhancements.
Tip 2:Unified User Experience: Enjoy the seamless synchronization of configurations across devices for a unified writing experience.
As you embark on the journey through different versions of Microsoft Word, envision it not as a mere software transition but as an exploration of the evolving symphony of spell check capabilities. Each version represents a chapter in the narrative of user-centric design, with enhanced features and configurations that empower writers. It’s a testament to Microsoft’s commitment to refining the writing experience, ensuring that spell check not only catches errors but does so with an intuitive finesse tailored to the unique needs of each user.
Integrating Third-Party Spell Check Tools
IX. Integrating Third-Party Spell Check Tools: Augmenting Precision in Word Crafting
In the expansive realm of written expression, the pursuit of linguistic precision is a continual quest, and while Microsoft Word stands as a stalwart guardian of grammatical accuracy, the integration of third-party spell check tools emerges as a strategic augmentation to this arsenal. These supplementary tools, adept at navigating nuanced language intricacies, serve as collaborative partners to Microsoft Word’s native spell check, providing an extra layer of scrutiny and refinement.
Exploring the Collaborative Tapestry: Microsoft Word and Third-Party Allies
Grammarly:
In the pantheon of third-party spell check tools, Grammarly reigns supreme, offering an intelligent amalgamation of grammar, spelling, and style checks.
Comprehensive Linguistic Insights:
Real-time suggestions for grammatical enhancements.
In-depth analysis of writing style nuances.
User-Friendly Integration:
Seamless integration with Microsoft Word, ensuring a harmonious writing experience.
ProWritingAid:
ProWritingAid emerges as a versatile companion, not only addressing spelling intricacies but delving into the realms of structure and readability.
Advanced Style Analysis:
Beyond spell check, provides insights into sentence structure and readability.
Tailored suggestions for improving overall writing quality.
Compatibility Across Platforms:
Extends its functionality to various platforms, fostering a consistent writing experience.
Ginger:
Ginger, with its innovative approach, goes beyond conventional spell check, incorporating language translation and sentence rephrasing.
Contextual Spell Check:
Context-aware spell check for accurate suggestions.
Emphasis on correcting contextual errors for enhanced clarity.
Multifaceted Language Support:
Inclusive language translation and rephrasing features catering to diverse linguistic needs.
Weaving a Tapestry of Linguistic Excellence: Pro Tips
Selective Integration:
Tip 1:Identify Writing Needs: Assess individual writing needs to determine which third-party tool aligns best with specific requirements.
Tip 2:Optimize Settings: Customize settings to harmonize the third-party tool with Microsoft Word, ensuring a seamless collaborative experience.
Consistency in Application:
Tip 1:Regular Usage: Incorporate the third-party tool into the writing process consistently for optimal results.
Tip 2:Utilize Comprehensive Checks: Leverage the additional features of third-party tools, such as style and structure analysis, to elevate overall writing quality.
Platform Considerations:
Tip 1:Cross-Platform Compatibility: Choose tools that offer compatibility across various platforms, fostering a unified writing experience.
Tip 2:Sync Configurations: Ensure synchronization of configurations between Microsoft Word and third-party tools for a streamlined workflow.
As writers navigate the intricate landscape of textual craftsmanship, the integration of third-party spell check tools stands as a testament to the evolving nature of linguistic refinement. Each tool, with its unique strengths, complements Microsoft Word’s native spell check, creating a collaborative ecosystem where precision is not just a goal but a shared endeavor. Embracing the synergy of these linguistic allies, writers embark on a journey where the artistry of words meets the prowess of technology, resulting in a written tapestry that resonates with unparalleled clarity and finesse.
Has anyone ever looked at a bland Microsoft Word document, wishing it had the visual appeal to match your creative ideas? How about transforming it into a stunning landscape that not only conveys information, but also leaves a lasting impression? We’ll show you how to transform your Microsoft Word documents into works of art by unraveling the secrets of beautiful landscapes.
Why is it simple to bring the vibrant colors and vivid landscapes of your documents to life? Our step-by-step guide will teach you how to insert background images, use fonts and shapes, use SmartArt graphics, and even incorporate 3D models. Make your document stand out with a splash of color and a visual appeal, and you can easily combine functionality and aesthetics.
Learn how to elevate your documents in Microsoft Word, including practical tips and creative techniques, by diving into the intricacies of landscape design. Our team can assist you with troubleshooting common problems, as well as custom headers. Our journey will take us to discover the artistic potential of your documents, allowing us to create visually striking landscapes that tell your story.
Getting Started
In the realm of Microsoft Word mastery, the journey commences with a strategic initiation, and here’s where the voyage of document transformation unfurls. First and foremost, confirming that Microsoft Word is not merely a bystander in your digital repertoire but is installed and standing at the pinnacle of the update game is the opening gambit. Updates aren’t just bug fixes; they’re gateways to enhanced features, a digital evolution that propels your document creation to the next echelon. The very foundation of your creative odyssey hinges on this prerequisite—ensuring that Microsoft Word isn’t just present but is donned in its latest, feature-rich avatar.
With the digital canvas at your fingertips, the next stride beckons you to open a new chapter or dust off an existing one. In the grand symphony of document creation, the blank canvas isn’t an abyss; it’s a palette of possibilities awaiting your strokes. A canvas already bearing the imprints of your ideas is equally potent. Opening a new document or revisiting an existing one isn’t just a mundane task; it’s the act of stepping onto the stage where your ideas perform a ballet of expression. It’s the commencement of a narrative, an inception that echoes the keystrokes and creativity infused into every paragraph, sentence, and punctuation mark.
Navigating this phase demands the dexterity of a maestro. The subtleties lie not just in the installation and opening but in the foresight to envision the digital tapestry you’re about to weave. Consider it the overture to a symphony—the meticulous tuning of instruments (in this case, Word’s features) to harmonize with your creative composition. Here’s where the roadmap to compelling content begins: with the assurance that your tools are finely tuned, your canvas is unblemished, and your journey into the realm of document creation is poised for brilliance.
Mastering the Basics
Now that the stage is set, let’s delve into the specifics. Installing and updating Microsoft Word might seem like elementary maneuvers, but they lay the groundwork for a seamless creative process. These foundational steps pave the way for a user experience that transcends the mundane, unlocking the full spectrum of possibilities inherent in this ubiquitous word processing tool.
Updates Unveiled: More Than Just Fixes
Before you dismiss updates as mere routine, consider this: each update is a trove of enhancements, a digital metamorphosis that introduces new features, improves functionality, and fortifies security. It’s not about fixing what’s broken; it’s about evolving towards what’s better. Numbers alone don’t capture the essence; it’s the tangible impact on your creative arsenal that makes updating a strategic move.
In the grand tapestry of document creation, installing and opening Word is not just a ritual; it’s the orchestration of your symphony of ideas. It’s about having your tools finely tuned, your canvas unblemished, and your journey into the realm of document creation poised for brilliance. Let the keystrokes begin, and may your digital odyssey be one of unbridled creativity and seamless functionality.
Inserting a Background Image
Picture source: https://wikihow.com
When it comes to elevating the visual appeal of your Microsoft Word document, the judicious use of background images can transform a bland canvas into a captivating masterpiece. The process isn’t just about dropping an image into the document; it’s a strategic dance between selection, insertion, and adjustment. Let’s dive into the intricacies of inserting a background image, a skill that transcends the ordinary and adds a visual dimension to your textual narrative.
Locate and Choose a Suitable Image
In the vast expanse of the digital realm, the first step is akin to choosing the perfect brushstroke for a painting. The internet is a treasure trove of images, but the art lies in discernment. Seek an image that aligns with the document’s theme, resonating with your content’s essence. It’s not merely about aesthetics; it’s about synergy. Once your vision is clear, with a suitable image in mind, embark on the hunt. Consider reputable stock photo websites or your curated collection, ensuring the image not only complements but enhances your document’s narrative.
Insert the Image into the Document
With the visual maestro chosen, the next act involves seamlessly integrating it into your Word document. This isn’t a mere transaction of copy-pasting; it’s an artful incorporation. Navigate to the ‘Insert’ tab, where the canvas awaits your visual imprint. A click on ‘Pictures’ heralds the entry of your chosen image. The document becomes a gallery, with your image poised for exhibition. As the pixels settle into the virtual parchment, you witness the marriage of text and visuals, each enriching the other’s narrative.
Adjust Size and Position for Optimal Effect
The insertion is but a prelude; the grandeur lies in the orchestration of size and position. Your image shouldn’t be a mere backdrop; it should harmonize with your content. Resize with precision, a ballet of pixels to enhance without overpowering. Here, the ‘Format’ tab becomes your atelier, offering tools for size adjustment and positioning. Consider the visual hierarchy, allowing your text and image to coexist harmoniously. It’s not just about size; it’s about spatial poetry, where every element finds its resonance.
Crafting Visual Symphony: A Fusion of Form and Function
In the realm of SEO, visuals aren’t just adornments; they’re strategic assets. A background image isn’t a mere aesthetic indulgence; it’s an SEO cue. Engaging visuals retain reader attention, reducing bounce rates and signaling to search engines that your content is not just informative but visually compelling. The careful selection, seamless insertion, and meticulous adjustment of background images aren’t just design choices; they’re SEO maneuvers that bolster your document’s online presence.
In Conclusion: Where Art Meets Optimization
The art of inserting a background image in Microsoft Word transcends the visual realm; it’s a strategic endeavor. From choosing the image to adjusting its nuances, each step contributes not just to the document’s aesthetics but also to its SEO prowess. As your words intertwine with visuals, remember, it’s not just about what the audience sees; it’s about what search engines perceive. In this meticulous dance of creativity and optimization, your document emerges not just as a visual treat but as an SEO-savvy content piece, ready to captivate both readers and algorithms alike.
Setting the Page Layout
Photo by: teachucomp
In the intricate ballet of document design, the page layout stands as the choreographer, orchestrating the visual dance that unfolds on the digital canvas. The nuances of this process extend beyond mere aesthetics; they encompass strategic choices that influence reader engagement and, crucially, SEO performance. To embark on this transformative journey, one must first navigate the corridors of the Page Layout tab, where the keys to a harmonious composition lie.
Access the Page Layout Tab
The gateway to visual refinement opens with a simple yet pivotal maneuver—accessing the Page Layout tab. This tab isn’t just a repository of formatting options; it’s the sanctum where the elements of your document converge. A click here transcends the ordinary, unveiling a palette of possibilities. Think of it as the backstage pass to the document’s visual symphony. Here, the power to mold perceptions lies at your fingertips.
Pro Tip: Utilize shortcut keys (Alt + P + L) for expedited access to the Page Layout tab, streamlining your journey from concept to execution.
Adjust Margins, Orientation, and Size to Enhance the Landscape
With the stage set, the next act involves the meticulous calibration of margins, orientation, and size—a trifecta that shapes the landscape of your document. Margins are not mere boundaries; they’re the breathing space, framing your content with precision. A judicious balance ensures a reader’s visual comfort, preventing the unsettling squeeze or the void of white expanses. The orientation, whether portrait or landscape, is the pivot on which the narrative turns. A landscape orientation isn’t just a stylistic choice; it’s a canvas expansion, offering a broader expanse for your content to unfold.
Size, a seemingly mundane attribute, harbors the potential for visual impact. It’s not about conformity but optimization. Larger fonts for titles, strategically spaced paragraphs, and the interplay of font sizes contribute to visual hierarchy—a subtle cue for both readers and search engines. Here, the mantra is not uniformity but strategic diversity, a tapestry where each element serves a purpose.
Pro Tip: Leverage the ‘Size’ and ‘Orientation’ options within the Page Layout tab, using them as your digital brushstrokes to craft a visually arresting landscape.
Crafting a Visual Odyssey: Where Form Meets Functionality
In the realm of SEO, the significance of page layout transcends aesthetics; it’s an integral facet of user experience, a metric that search engines keenly assess. A well-calibrated layout reduces bounce rates, signaling to algorithms that your content is not just informative but also visually engaging. Margins, orientation, and size aren’t arbitrary choices; they’re SEO cues, each adjustment a note in the symphony of digital optimization.
In Conclusion: A Visual Symphony Unveiled
As you delve into the intricacies of setting the page layout in Microsoft Word, remember, this isn’t a mere visual embellishment—it’s a strategic maneuver. The Page Layout tab is your palette, and margins, orientation, and size are your brushstrokes. In this meticulous dance between form and functionality, your document emerges not just as a visual treat but as an SEO-savvy composition, ready to captivate both readers and algorithms. The narrative unfolds not just in words but in the visual symphony orchestrated by your adept use of the Page Layout tab.
Creating a Custom Header
In the intricate tapestry of document design, the custom header emerges as the pièce de résistance—a personalized touch that not only adds visual flair but also serves as a navigational beacon for readers traversing the textual landscape. The creation of a bespoke header is akin to selecting the perfect frame for a masterpiece; it not only complements the content but elevates it to a realm of aesthetic distinction. Here, we delve into the art and science of crafting a custom header in Microsoft Word, transcending the ordinary and optimizing for both reader engagement and SEO finesse.
Insert a Header for a Personalized Touch
The journey commences with the strategic insertion of a header—an overture to the visual symphony that awaits within the document. A header is not a mere label; it’s a signature, an imprint that heralds the thematic essence of the content. In Microsoft Word, this is a seamless process, a rendezvous with the ‘Insert’ tab, where the canvas beckons for your creative brushstroke. Choose ‘Header’ from the dropdown menu, and the blank expanse transforms into a realm where your personalized touch takes center stage. Consider it the opening act, where your narrative begins not with words but with the visual identity etched in the custom header.
Pro Tip: Experiment with a blend of text and images in your header, adding a layer of complexity that captivates the reader’s attention from the outset.
Experiment with Font Styles, Sizes, and Colors
The allure of a custom header lies not just in its existence but in the nuances of font styles, sizes, and colors—a trifecta that shapes the visual identity. Fonts are the voice of your header, each style resonating with a distinct tone. Bold fonts exude authority, script fonts evoke elegance, and sans-serif fonts embody modernity. Experimentation here is not just encouraged; it’s imperative. Choose a font style that aligns with your content’s personality, ensuring a harmonious blend between textual and visual elements.
Size, often overlooked, is a silent conductor of visual hierarchy. A header that commands attention doesn’t just rely on words; it employs strategic sizing. The title, larger than the accompanying text, creates a natural flow for the reader’s eye. It’s a nuanced dance where size isn’t just about dimensions; it’s about visual orchestration.
Colors, the palette of emotion, infuse vitality into your header. Experimentation with color schemes isn’t just a whim; it’s a calculated choice. Consider the psychological impact—blues for trust, reds for urgency, greens for freshness. The custom header isn’t a static entity; it’s a visual journey, and colors are the hues that guide the reader through the narrative.
Pro Tip: Ensure readability by choosing high-contrast color combinations, aligning with accessibility standards for an inclusive user experience.
Crafting a Visual Symphony: SEO Optimization Unveiled
In the realm of SEO, the custom header is not a mere embellishment; it’s a strategic asset. The text within the header serves as a cue for search engines, signaling the thematic focus of your content. Strategic use of keywords within the header aligns with SEO best practices, enhancing the document’s discoverability in search engine results. Remember, the custom header is not just a visual treat; it’s an SEO-savvy component that optimizes your document for online visibility.
In Conclusion: A Header of Distinction
As you navigate the terrain of creating a custom header in Microsoft Word, remember, it’s not a decorative afterthought; it’s a strategic choice. Fonts, sizes, and colors aren’t just aesthetic nuances; they’re the brushstrokes that define your document’s visual identity. In this meticulous dance between personalization and SEO optimization, your custom header emerges not just as a visual delight but as a beacon that guides both readers and search engines through the narrative tapestry. Let your header be the signature that resonates in the reader’s memory—a visual symphony that lingers long after the words have faded.
Adding Text Boxes
In the intricate dance of document design, the incorporation of text boxes emerges as a nuanced choreography—a visual augmentation that transcends the limitations of linear text. Text boxes aren’t mere elements; they’re storytellers, offering a canvas within the canvas where captions, labels, and additional information unfold with a flair that captivates the reader’s gaze. As we navigate the terrain of text box utilization in Microsoft Word, it’s not merely about insertion and formatting; it’s about elevating the narrative through strategic visual elements.
Use Text Boxes for Captions, Labels, or Additional Information
Text boxes are the unsung heroes of document design, the versatile containers that hold the key to visual engagement. In Microsoft Word, their integration is a strategic choice—a decision to transcend the conventional and embrace a visual hierarchy. Captions find a home within text boxes, aligning with images to provide context that resonates. Labels, far from being mundane tags, become visual cues that guide the reader through the informational labyrinth. Additional information, once relegated to footnotes, now finds a prominence that invites exploration.
Pro Tip: Embed text boxes strategically to break the monotony of continuous text, creating visual islands that anchor the reader’s attention.
Format Text Boxes for a Polished Look
The artistry doesn’t conclude with insertion; it extends to the meticulous formatting that imparts a polished veneer to your text boxes. A well-formatted text box is not a mere embellishment; it’s a visual punctuation, underscoring the importance of the encapsulated content. Within the ‘Format’ tab, the options unfold like a palette of possibilities. Consider it your design atelier, where choices extend beyond mere aesthetics to readability and coherence. Border transparency, shadow effects, and color gradients are not mere embellishments; they’re the strokes that define the contours of your visual narrative.
Pro Tip: Harmonize the formatting of text boxes with the overall document theme, ensuring a seamless blend that elevates rather than disrupts the reader’s visual journey.
Crafting Visual Harmony: Where Form Meets Functionality
In the realm of SEO, the strategic use of text boxes isn’t a whimsical choice; it’s a calculated maneuver that optimizes both visual appeal and discoverability. Search engines interpret visual cues, and text boxes, when appropriately formatted and positioned, become signals that augment the thematic relevance of your content. Keywords nestled within text boxes resonate with search algorithms, enhancing the document’s visibility in online searches. It’s not just about aesthetics; it’s about strategic augmentation that resonates with both human readers and digital algorithms.
In Conclusion: Text Boxes as Visual Maestros
As we navigate the intricacies of adding text boxes in Microsoft Word, it’s imperative to view them not as mere design elements but as visual maestros that conduct the reader’s gaze. Captions, labels, and additional information cease to be mere annotations; they become integral parts of the narrative. The formatting nuances, far from being superficial, add layers to the visual experience. In this dance between form and functionality, text boxes emerge not just as design elements but as SEO-savvy components that optimize your document for both aesthetic appeal and online discoverability. Let your text boxes be the visual orchestrators, guiding your readers through a symphony of content that resonates visually and resonates in the digital landscape.
Incorporating Shapes and Lines
In the realm of document design, the incorporation of shapes and lines stands as a visual symphony—a deliberate choice that transcends mere aesthetics to weave a tapestry of engagement and sophistication. Microsoft Word, often perceived as a tool for textual composition, harbors a rich palette for visual storytelling through shapes and lines. Here, we delve into the art and strategy of inserting these visual elements, exploring how adjustments in colors, sizes, and styles can transform a document landscape into a dynamic and visually compelling masterpiece.
Insert Shapes and Lines to Enhance Design
The canvas of a document is not confined to words alone; it extends to the strategic integration of shapes and lines, each a visual cue that directs the reader’s gaze. In the ‘Insert’ tab, a plethora of possibilities unfolds—circles, rectangles, arrows, and lines—each waiting to be wielded as a visual brushstroke. Shapes, far from being mere embellishments, serve as anchors for attention, breaking the monotony of text and guiding the reader’s eye. Lines, whether sleek or bold, become conduits that lead the reader through the narrative, underscoring connections and demarcating sections.
Pro Tip: Utilize shapes for emphasis, placing them strategically to highlight key points or draw attention to critical information.
Adjust Colors, Sizes, and Styles to Complement the Landscape
The artistry doesn’t conclude with insertion; it extends to the nuanced adjustments that transform shapes and lines into visual maestros. Colors are not arbitrary choices; they’re strokes on the palette, adding vibrancy and thematic resonance. Consider the psychology—bold reds for urgency, calming blues for stability. Size, a silent conductor, dictates visual hierarchy. Larger shapes command attention, while subtle lines guide without imposing. Styles, whether solid or dashed lines, are not mere design nuances; they contribute to the overall tone of the document.
Pro Tip: Harmonize the colors of shapes and lines with the document theme, ensuring a cohesive visual identity that resonates with the reader.
Crafting Visual Narratives: SEO Optimization Unveiled
In the realm of SEO, the strategic integration of shapes and lines isn’t just a design choice; it’s a calculated move that optimizes both visual appeal and discoverability. Search engines interpret visual elements as cues, and the judicious use of shapes and lines becomes signals that augment the thematic relevance of your content. Colors within shapes can subtly reinforce brand colors or thematic motifs, contributing to a holistic brand experience. It’s not just about decoration; it’s about strategic augmentation that resonates with both human readers and digital algorithms.
In Conclusion: Visual Flourish in Document Design
As we navigate the intricacies of incorporating shapes and lines in Microsoft Word, it’s imperative to view them not as mere adornments but as integral components of the document narrative. Shapes become visual anchors, and lines become pathways, guiding the reader through a visual journey that complements textual content. The adjustments in colors, sizes, and styles aren’t superficial choices; they’re the strokes that define the contours of your visual narrative. In this intricate dance between form and functionality, shapes and lines emerge not just as design elements but as SEO-savvy components that optimize your document for both aesthetic appeal and online discoverability. Let your document be a visual symphony, where shapes and lines play the notes that resonate visually and echo in the digital landscape.
Applying SmartArt Graphics
Image source: https://wikigain.com
In the ever-evolving landscape of document design, the incorporation of SmartArt Graphics in Microsoft Word emerges as a strategic maneuver—a digital symphony that orchestrates visual hierarchy with finesse. Beyond the realm of static text, SmartArt unleashes a dynamic visual narrative, allowing creators to explore options that transcend the conventional. Here, we delve into the art of applying SmartArt Graphics, unraveling the potential for both visual appeal and seamless integration within a landscape-themed document.
Explore SmartArt Options for Visual Hierarchy
SmartArt isn’t merely a collection of pre-designed graphics; it’s a toolkit for storytellers navigating the intricate terrain of visual hierarchy. Within the ‘Insert’ tab, a world of options unfolds—hierarchies, processes, cycles, and more. Each SmartArt graphic isn’t just a visual element; it’s a deliberate choice that structures information, guiding the reader through the narrative. Hierarchical layouts establish relationships, process graphics unfold procedural intricacies, and cycles create a visual rhythm that resonates.
Pro Tip: Consider the narrative flow before selecting a SmartArt graphic, ensuring alignment with the thematic essence of the content.
Customize SmartArt Elements to Fit the Landscape Theme
The true artistry lies not just in selection but in customization—a nuanced process that transforms SmartArt from a template into a tailored visual masterpiece. Colors, shapes, and styles within SmartArt graphics are not rigid boundaries; they’re malleable elements that harmonize with the landscape theme. The ‘Design’ and ‘Format’ tabs become virtual ateliers, offering options to tweak colors, resize elements, and refine styles. Customization isn’t about conformity; it’s about infusing a unique visual identity into the document.
Pro Tip: Align the color palette of SmartArt graphics with the overall document theme, ensuring a cohesive visual narrative.
Crafting Visual Narratives: Where Form Meets Functionality
In the realm of SEO, the integration of SmartArt Graphics isn’t just a design choice; it’s a strategic move that optimizes both visual engagement and discoverability. Search engines interpret visual elements as indicators of content relevance, and SmartArt graphics, when judiciously applied, become signals that augment the thematic resonance of your content. The hierarchical structure within SmartArt aligns with SEO best practices, enhancing the document’s readability and signaling the importance of key concepts.
In Conclusion: SmartArt as a Visual Alchemist
As we navigate the intricacies of applying SmartArt Graphics in Microsoft Word, it’s crucial to view them not as mere design elements but as visual alchemists that transmute information into a dynamic narrative. SmartArt isn’t a one-size-fits-all solution; it’s a versatile toolkit that creators wield to structure content and engage readers visually. The customization options within SmartArt allow for a seamless integration with the landscape theme, ensuring that visual elements resonate with the document’s overarching aesthetic. In this dance between form and functionality, SmartArt Graphics emerge not just as design elements but as SEO-savvy components that optimize your document for both aesthetic appeal and online discoverability. Let your document be a visual symphony where SmartArt plays the chords that resonate visually and echo in the digital landscape.
Playing with WordArt
Image credit: pinimg
In the intricate tapestry of document design, where words transcend mere communication to become visual elements, the integration of WordArt in Microsoft Word emerges as a canvas of creativity—an avenue to transform text into stylized masterpieces. Far beyond the realm of conventional fonts, WordArt invites creators to sculpt words with flair and finesse. Here, we delve into the art of playing with WordArt, exploring not just the integration but the experimentation that elevates text to a visual crescendo.
Integrate WordArt for Stylized Text Elements
WordArt isn’t just a font selection; it’s an artistic choice that transcends the mundane, breathing life into text elements. Within the ‘Insert’ tab, WordArt becomes a portal to creativity, offering styles that range from subtle sophistication to bold flamboyance. The integration of WordArt is more than embellishment; it’s an intentional move to infuse personality into the document. Text, now unshackled from the constraints of standard fonts, becomes a visual entity—an integral part of the design landscape.
Pro Tip: Choose WordArt styles that align with the document’s tone and purpose, ensuring a seamless integration into the overall visual narrative.
Experiment with Different Fonts and Effects
The true artistry of WordArt lies in experimentation—a process that extends beyond mere integration to the exploration of diverse fonts and effects. Fonts cease to be mere vessels for words; they become brushstrokes that paint a visual story. Bold and italicized fonts convey emphasis, while shadow and reflection effects add depth to the textual landscape. WordArt isn’t a one-size-fits-all; it’s a playground of possibilities where creators can experiment with combinations that resonate with the intended message.
Pro Tip: Strike a balance between creativity and readability, ensuring that the chosen fonts and effects enhance rather than obscure the text.
Crafting Visual Narratives: SEO Optimization Unveiled
In the realm of SEO, WordArt isn’t just a stylistic choice; it’s a strategic move that optimizes both visual appeal and discoverability. Search engines interpret visual elements, including stylized text, as indicators of content relevance. When judiciously applied, WordArt becomes a signal that reinforces the importance of key concepts within the document. Keywords embedded within stylized text resonate with search algorithms, enhancing the document’s visibility in online searches.
In Conclusion: WordArt as a Typography Maestro
As we navigate the nuances of playing with WordArt in Microsoft Word, it’s imperative to view it not as a superficial embellishment but as a typography maestro that conducts the visual symphony of the document. Stylized text isn’t a distraction; it’s a deliberate choice to engage the reader visually. The experimentation with fonts and effects isn’t mere ornamentation; it’s a strategic maneuver that optimizes the document for both aesthetic appeal and online discoverability. Let your words transcend the ordinary; let them dance and dazzle in the realm of WordArt, where text becomes an artistic expression that resonates visually and echoes in the digital landscape.
Utilizing Themes and Styles
In the dynamic landscape of document creation, the strategic utilization of themes and styles in Microsoft Word emerges as an art form—a means to elevate the visual coherence and aesthetic appeal of your content. Beyond the traditional realms of formatting, themes and styles are the brushstrokes that paint a cohesive and engaging canvas. Here, we explore the nuanced process of applying pre-designed themes and customizing styles, turning the document into a visual masterpiece that seamlessly aligns with the thematic essence of the landscape.
Apply Pre-Designed Themes for a Cohesive Look
Themes in Microsoft Word aren’t mere templates; they’re curated collections of fonts, colors, and formatting choices that set the tone for your document. Within the ‘Design’ tab, a plethora of pre-designed themes await, offering a quick and efficient way to impart a cohesive visual identity. Applying a theme isn’t just about aesthetics; it’s a strategic move to create a consistent look that resonates with your content’s overarching theme. Themes transcend individual formatting choices; they’re holistic design solutions that tie together the visual elements of your document.
Pro Tip: Choose a theme that not only aligns with the landscape theme but also enhances the readability and visual appeal of the content.
Customize Styles to Match the Landscape’s Aesthetic
While pre-designed themes provide a solid foundation, customization becomes the artisanal touch that transforms your document into a unique visual creation. Styles, found within the ‘Home’ tab, allow for meticulous adjustments to individual elements like headings, paragraphs, and quotes. Customizing styles isn’t a deviation from the theme; it’s a methodical refinement that ensures each element harmonizes with the overall aesthetic. Fonts, spacing, and emphasis styles become tailored components that accentuate the thematic identity of the landscape.
Pro Tip: Maintain consistency in customized styles to uphold the visual unity established by the chosen theme.
Crafting Visual Narratives: SEO Optimization Through Coherence
In the realm of SEO, the utilization of themes and styles isn’t a superficial choice; it’s a strategic maneuver that aligns with search engine algorithms’ interpretation of cohesive and well-structured content. The visual coherence established by themes and styles enhances not only the document’s aesthetic appeal but also its readability—a crucial factor in search engine rankings. Consistent formatting signals the importance of key concepts, contributing to the document’s discoverability in online searches.
In Conclusion: Themes and Styles as Visual Architects
As we navigate the intricacies of utilizing themes and styles in Microsoft Word, it becomes evident that they are not just formatting tools; they are the visual architects that shape the document’s identity. Pre-designed themes offer a quick start, setting the stage for a cohesive visual experience. Customization, on the other hand, transforms the document into a bespoke creation, ensuring that each element aligns with the thematic essence of the landscape. In the dance between pre-designed cohesion and tailored refinement, themes and styles emerge not just as formatting choices but as SEO-savvy components that optimize your document for both aesthetic appeal and online discoverability. Let your document be a testament to visual unity, where themes and styles work in tandem to create a compelling and harmonious narrative in the digital landscape.
Enhancing with 3D Models
Image credit: https://tech-wonders.com
In the ever-evolving landscape of document design, the integration of 3D models in Microsoft Word emerges as a transformative tool—a gateway to infuse modernity and dynamism into your content. Far beyond the realm of static imagery, 3D models redefine visual storytelling, offering a three-dimensional perspective that captivates and engages readers. Here, we delve into the art of enhancing documents with 3D models, exploring not just the insertion but the meticulous adjustment of angles and positions to optimize visual impact and elevate the document into a cutting-edge visual experience.
Insert 3D Models for a Modern and Dynamic Touch
The ‘3D Models’ feature within the ‘Insert’ tab of Microsoft Word unlocks a realm of possibilities, allowing creators to transcend the confines of traditional visuals. From intricate architectural designs to product prototypes, 3D models provide a modern touch that transcends flat imagery. The insertion of 3D models isn’t just an embellishment; it’s a strategic move to convey complex concepts with clarity. Whether it’s a geometric shape or a detailed representation, 3D models inject a sense of depth and realism, transforming the document into a visually immersive experience.
Pro Tip: Opt for 3D models that align with the document’s theme, ensuring that the visual elements seamlessly integrate with the overall narrative.
Adjust Angles and Positions for Optimal Visual Impact
While the insertion of 3D models lays the foundation, the true artistry lies in the meticulous adjustment of angles and positions. Microsoft Word empowers creators to fine-tune the orientation of 3D models, allowing for optimal visual impact. A strategic rotation or a subtle tilt can make a significant difference, guiding the reader’s focus and enhancing the overall comprehension of the content. Adjusting angles isn’t just a technicality; it’s a creative process that transforms static visuals into dynamic components that actively contribute to the document’s narrative.
Pro Tip: Experiment with different angles to find the perfect balance between visual appeal and communicative effectiveness.
Crafting Visual Narratives: SEO Optimization Through Engagement
In the realm of SEO, the enhancement with 3D models isn’t merely a stylistic choice; it’s a strategic move that aligns with search engine algorithms’ evolving criteria for content engagement. Search engines prioritize user experience, and the inclusion of 3D models contributes to prolonged reader engagement. The interactive nature of 3D visuals invites readers to explore and interact, signaling to search algorithms that the content is not only visually appealing but also holds substantive value. This engagement factor becomes a key determinant in search rankings, amplifying the document’s online visibility.
In Conclusion: 3D Models as Visual Catalysts
As we navigate the intricacies of enhancing documents with 3D models in Microsoft Word, it becomes apparent that this isn’t just a technological feature; it’s a visual catalyst that propels content into the future. The insertion of 3D models transcends the boundaries of traditional visuals, offering a modern and dynamic touch. The adjustment of angles elevates this feature from a technical tool to a creative endeavor, where each tweak contributes to the optimal visual impact. In the synergy of insertion and adjustment, 3D models emerge not as embellishments but as strategic elements that optimize the document for both engagement and online discoverability. Let your content transcend the two-dimensional constraints; let it unfold in the immersive realm of 3D models, where modernity meets narrative in the digital landscape.
Review and Refine
In the meticulous journey of document creation, the pivotal stage of ‘Review and Refine’ stands as the linchpin between a well-crafted piece and a masterpiece. This critical phase involves more than mere proofreading; it encapsulates the holistic assessment of the document’s integrity, ensuring not only grammatical precision but also fine-tuning layout and design elements for an optimal reader experience. Here, we delve into the intricacies of this crucial process, where the marriage of linguistic accuracy and visual appeal elevates the document to the zenith of its communicative potential.
Proofread the Document for Errors
The first pillar of the ‘Review and Refine’ process is the comprehensive proofreading of the document. Every comma, every punctuation mark, and every syllable undergoes scrutiny to eradicate errors and enhance the document’s readability. This step is not a formality but a commitment to linguistic excellence. A pristine document not only avoids the pitfalls of grammatical blunders but also fosters credibility, projecting an image of professionalism that resonates with the discerning reader.
Pro Tip: Leverage digital tools and human proofreaders in tandem for a comprehensive error-detection strategy, ensuring a harmonious blend of technological precision and nuanced linguistic insight.
Fine-Tune the Layout and Design Elements
Beyond the realm of words, the aesthetic presentation of a document plays a pivotal role in capturing and retaining the reader’s attention. The ‘Review and Refine’ process extends its discerning gaze to layout and design elements, ensuring a seamless visual journey. From the alignment of text to the judicious use of white space, each facet contributes to the overall visual harmony. Fonts, colors, and formatting choices are not arbitrary; they are strategic decisions that influence the reader’s perception and engagement.
Pro Tip: Opt for a reader-centric approach; consider the visual hierarchy of information to guide the reader’s attention through the document intuitively.
Crafting a Seamless Fusion: SEO Optimization Through Cohesiveness
In the landscape of SEO, the ‘Review and Refine’ process is more than a quality assurance checkpoint; it is a strategic maneuver to optimize the document for search engine algorithms. Cohesiveness in layout and design enhances user experience, a metric that search engines prioritize for ranking. A well-structured document with a polished appearance signals to algorithms that the content is not only valuable but also presented in a user-friendly manner, contributing to improved search rankings and discoverability.
Incorporating Data: The Impact of Cohesive Design on User Engagement
Statistics reveal a compelling correlation between cohesive design and user engagement. Documents that undergo a meticulous ‘Review and Refine’ process, addressing both linguistic precision and visual aesthetics, tend to have lower bounce rates and longer average session durations. The seamless fusion of error-free content with visually appealing design elements creates an immersive reader experience, a factor that search engines recognize and reward in their algorithms.
In essence, the ‘Review and Refine’ phase transcends the confines of a quality control checkpoint; it emerges as a strategic endeavor to optimize the document for both human readers and search engine algorithms. As the final brushstroke on the canvas of content creation, this phase ensures that every word resonates with precision, every layout choice enhances comprehension, and the document, in its entirety, stands as a testament to excellence in both form and substance.
Printing and Sharing
XIII. Printing and Sharing: A Seamless Culmination
As the digital realm continues to evolve, the penultimate stage of the document creation journey, ‘Printing and Sharing,’ takes on a multifaceted role that extends beyond the traditional act of producing hard copies. This phase is not merely a mechanical conclusion but a strategic maneuver that encapsulates both precision and connectivity. In this exploration, we delve into the intricacies of the process, from previewing the document before printing to the electronic sharing that transcends geographical boundaries.
Preview the Document Before Printing
In the age of sustainability and mindful resource utilization, the act of printing a document necessitates a level of intentionality. The ‘Preview’ step emerges as the gatekeeper, allowing for a meticulous review before any ink touches paper. This is not just a visual inspection; it’s a final assurance of the document’s readiness for the physical realm. The digital preview allows for a comprehensive examination of formatting, ensuring that the transition from screen to print is seamless and devoid of any unforeseen anomalies.
Pro Tip: Leverage the ‘Print Preview’ feature to simulate the physical output, saving both resources and potential frustration.
Save and Share the Landscape Document Electronically
In the era of rapid information dissemination, the significance of electronic sharing cannot be overstated. ‘Save and Share’ transforms the landscape document into a versatile entity, ready to traverse the digital highways with ease. Whether through email attachments, cloud storage links, or collaborative platforms, the electronic sharing of documents facilitates a dynamic exchange of ideas, transcending the limitations of physical presence.
Pro Tip: Optimize electronic sharing by selecting file formats compatible with various devices and platforms, ensuring a seamless user experience for recipients.
Strategic SEO Integration: Beyond the Print and Share Paradigm
While ‘Printing and Sharing’ might seem like a conventional phase, it harbors untapped potential for SEO optimization. Each saved document, shared electronically, becomes a digital footprint contributing to online visibility. Strategic use of keywords in file names, metadata, and even within the document itself enhances search engine discoverability. The digital landscape, much like the document, is multifaceted, and every electronic share serves as a thread weaving a narrative of online presence.
The Data-Driven Impact of Electronic Sharing
Quantifying the impact of electronic sharing unveils a trove of data-driven insights. Metrics such as download counts, view durations, and user interactions provide a nuanced understanding of how the document resonates with its audience. Harnessing these insights empowers content creators to refine future iterations, aligning the document’s structure and content with the preferences and expectations of the target audience.
Beyond Geographical Boundaries: The Global Reach of Electronic Sharing
One of the transformative aspects of electronic sharing is its ability to transcend geographical boundaries. A landscape document conceived in one corner of the world can find its way to diverse audiences globally, fostering collaboration and knowledge exchange. This interconnectedness not only amplifies the document’s impact but also contributes to a collective intelligence that defies spatial constraints.
Troubleshooting Tips
XIV. Troubleshooting Tips: Navigating the Landscape Creation Terrain
In the intricate landscape of document creation, unforeseen challenges can occasionally disrupt the seamless flow of creativity. ‘Troubleshooting Tips’ emerges as the guiding compass, offering insights into common pitfalls and providing solutions for an uninterrupted journey through the landscape creation experience.
Common Issues and How to Resolve Them
Encountering roadblocks during the document design process is not uncommon, but understanding the common issues and their resolutions transforms obstacles into stepping stones. When formatting glitches threaten the aesthetic harmony of your landscape document, consider these solutions:
Inconsistent Formatting: When elements appear disjointed, reevaluate the use of style templates to ensure uniformity.
Image Distortion: Optimize images before insertion to prevent distortion, maintaining visual integrity.
Font Compatibility: Confirm font compatibility across devices to prevent unexpected font substitutions.
Tips for a Seamless Landscape Creation Experience
Embarking on a landscape document creation journey requires not just technical proficiency but also a strategic approach. Consider these tips for a smoother, more efficient process:
Responsive Design: Prioritize a responsive design approach to ensure your document adapts seamlessly to various screen sizes and orientations.
File Size Management: Compress images and multimedia elements to maintain a balance between visual appeal and swift loading times.
Version Control: Implement version control practices to track changes and facilitate collaboration without the risk of data loss.
Accessibility Integration: Enrich your document by integrating accessibility features, ensuring inclusivity for all users.
Strategic SEO Integration: Troubleshooting Beyond the Document
While troubleshooting typically focuses on the document creation process, strategic SEO integration extends its scope to address potential online hurdles. Utilizing descriptive filenames, optimizing alt text for images, and refining metadata contribute not only to document accessibility but also to enhanced online visibility. These meticulous SEO strategies become the unsung heroes, ensuring your landscape document not only looks good but ranks high in the vast digital expanse.
User-Centric Approach: Turning Challenges into Opportunities
Troubleshooting is not merely a technical exercise; it’s a user-centric approach to enhance the overall document creation experience. User feedback becomes a valuable ally in identifying potential pitfalls. Encourage users to report issues, and implement iterative improvements based on their insights. This collaborative troubleshooting approach transforms challenges into opportunities for continuous enhancement.
The Data-Driven Evolution of Troubleshooting
In the digital landscape, troubleshooting is not a one-time event but an evolving process fueled by data-driven insights. Analyzing user interactions, identifying recurring issues, and implementing data-backed solutions create a dynamic troubleshooting ecosystem. This iterative approach not only resolves existing challenges but anticipates and mitigates future issues, fostering a landscape document creation experience that evolves in tandem with user needs.
Commonly asked questions
How can I customize the background image in Microsoft Word?
To customize the background image in Microsoft Word, follow these steps for a seamless visual appeal. First, locate and select a suitable image. Insert it into the document, then navigate to the ‘Format’ tab. Adjust the image size and position for optimal effect. Explore the ‘Wrap Text’ options to refine its integration. To enhance the aesthetic, experiment with the ‘Color’ options under the ‘Format Picture’ menu. Ensure the image complements your content without overpowering it. This customization adds a distinctive touch to your document, creating a visually engaging and professional impression.
What are the best practices for adjusting page layout in Word?
Optimizing the page layout in Microsoft Word involves accessing the ‘Page Layout’ tab and fine-tuning key elements. First, set the margins, adjusting them according to your document’s requirements. Explore the ‘Orientation’ option to switch between portrait and landscape modes. Tailor the page size to enhance the overall presentation. Utilize the ‘Columns’ feature for a structured layout, ensuring readability. Incorporate section breaks to customize layout variations within the document. Adjusting headers and footers through the ‘Header & Footer’ tools adds a professional touch. Moreover, consider utilizing the ‘Page Borders’ option to enhance visual appeal. These best practices ensure a well-organized and visually pleasing document layout in Microsoft Word, catering to both aesthetic and functional aspects.
How do I add a personalized header to my Word document?
Adding a personalized header to your Word document involves accessing the ‘Insert’ tab, selecting ‘Header,’ and choosing the desired header style. Once in the header section, insert your personalized text, which may include titles, page numbers, or other relevant information. Experiment with font styles, sizes, and colors to achieve the desired aesthetic. You can also include images or logos for further customization. Ensure consistent formatting across all headers by utilizing the ‘Link to Previous’ option when working with sections. This simple yet effective process allows you to infuse your Word document with a distinctive and professionally tailored header that aligns with your unique preferences and document requirements.
What are the creative ways to use text boxes in Microsoft Word?
Text boxes in Microsoft Word offer a plethora of creative applications, enhancing document visual appeal and organization. Employ text boxes for dynamic captions, labels, or additional information, breaking the monotony of conventional layouts. By adjusting text box formatting, including colors, borders, and shapes, you can achieve a polished and professional look. Create emphasis and hierarchy within your document by strategically placing text boxes to highlight key points. Utilize them for sidebars, quotes, or callouts, providing readers with a visually engaging and easy-to-follow reading experience. Experiment with various fonts and sizes to match your document’s tone. In summary, text boxes in Word are versatile tools that, when used creatively, elevate your document’s aesthetics and improve overall readability.
Can I insert 3D models into a Word document for landscaping?
Certainly, you can enhance your Word document with 3D models to elevate its visual appeal, making it especially valuable for landscaping projects. Microsoft Word allows users to insert 3D models seamlessly, bringing a modern and dynamic touch to your content. These models can be adjusted in terms of angles and positions, offering optimal flexibility for visual impact. Whether you’re showcasing architectural designs, garden layouts, or any landscaping project, the incorporation of 3D models in Word adds a layer of sophistication and clarity to your presentation. It’s an effective way to communicate complex ideas and provide a realistic preview of your landscaping vision directly within the document.
What troubleshooting tips are there for common landscape design issues?
When encountering common landscape design issues, consider these troubleshooting tips for a seamless experience. Firstly, ensure your software is updated to the latest version to address potential bugs. If facing formatting challenges, double-check your document settings and margins. Inconsistent layout? Utilize gridlines and snap-to options for precise placement. For image-related concerns, optimize file sizes and formats to prevent distortion. If SmartArt elements behave unexpectedly, review your chosen layout and adjust accordingly. To tackle text box complications, confirm proper formatting and alignment. Lastly, if integrating 3D models poses challenges, verify compatibility and experiment with different positions. Following these troubleshooting strategies ensures a smooth landscape design process in Microsoft Word.


/what-is-motivation-2795378_color4-5b61dbeec9e77c0050889e49.png)